Understanding the Next.js App Directory and How to Use It


In Next.js 13, the app directory (also known as the app router) was introduced as a new way to build Next.js applications that leverage the benefits and updates made in the latest version of React (18). Since its beta was originally launched with Next.js 13 in 2022, it has matured and now become the suggested and recommended way to build Next.js applications as of Next.js 13.4.
But, even though the app directory is now stable and the recommended approach, there is still some confusion around what it is, how it works, and how it can make our lives easier as developers. So, in this post, we’re going to cover all of those questions as well as work through an example project that showcases some of the new features of the app directory.
What is the Next.js App Directory?
As mentioned above, the app directory is the new and recommended way to build Next.js applications. It leverages some of the latest features and benefits of React 18, like React Server Components and more. It also introduces some of its own new exciting features like Nested, Grouped, and Parallel routes, as well as Suspense loading states and error boundaries.
So, there’s plenty to be excited by in the app directory, but because of how big of a change it is in comparison to the older pages router, it means there is also a lot we need to get comfortable with and learn. To start with, we need to learn the new structure of the app directory, so let’s take a look at that next.
App Directory Structure Explained
Unlike in the older pages router where the name of the file dictated the name of the route you’re creating. With the app directory, the routes are determined by the directory names instead. Then, inside these directories, we have files with specific names to perform different functions. Below is a graphic to help visualize this directory-based pattern as well as the files within it.
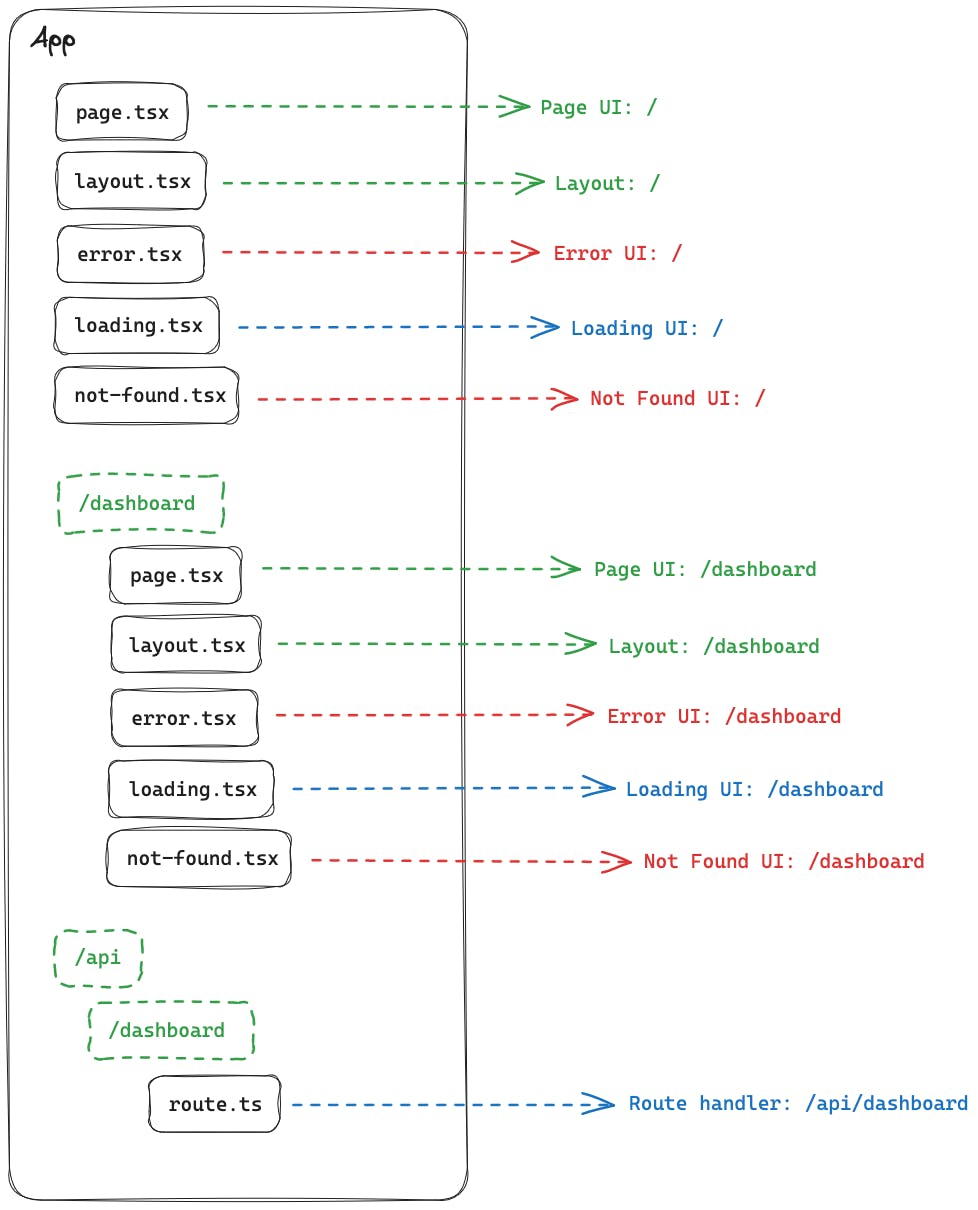
layout.tsx
As the name implies, the layout file is for defining a shared layout across multiple routes or segments that are children of it. However, you can also nest layouts inside directories to have different routes, and pages use different layouts, as we’ll see in our example project later on. One important thing to note with the layout file is that during navigation between pages that share a layout, it does not re-render, and it remains interactive.
page.tsx
The page file is where we define the page and its contents that the user will see and interact with. By adding a page file to a directory, we’re defining a new route at that file path. So, for example, app/page.tsx is equal to the path /, and the path app/dashboard/page.tsx would be the path /dashboard.
loading.tsx
The loading file is a special file that can be added to any directory to define UI elements for a loading interface, which will be automatically shown by Next.js when Suspense detects an asynchronous request is being performed from that route or its children.
error.tsx
In a similar way to loading, error is another special file that can be used to define UI elements for an error interface. This will automatically be shown to the user by Next.js when it detects an error has occurred in the route or one of its children.
not-found.tsx
The not-found file is used to define and render UI elements to be shown when a page or route is not found. It’s similar to the old 404.tsx file that we could define in the pages router to create 404 pages.
route.ts
The route file is the new pattern for defining API routes (now called Route Handlers) in an app directory project. In the past, we could define an API route with a file path like api/example.ts, and we could call it with a request to /example. However, we now need to structure it like /app/api/example/route.ts to have an API endpoint available at /example.
Data Fetching in the App Directory
Now that we know about all of the new files we can define in an app directory project, as well as their purpose, let’s take a look at the new ways we can fetch data in an app directory project before finally jumping into our tutorial.
To start with, it’s important to remember that the app directory adds support for React Server Components (RSC), which means we now have two types of components: server and client.
Client components are the ones we know and love from the past, but server ones are new. Server components have many benefits and features, but the one we’re interested in for data fetching is being able to use async/await to directly fetch data directly from the component.
This means there are now four ways you can fetch data in an app directory project. Two of which we’re familiar with from the pages router, calling a Router Handler (API route) from a client component and using third-party libraries like swr in a client component. But, we can now add the server components equivalents to that list, using fetch on the server and using a third-party library on the server.
When it comes to fetching data in the app directory, Next.js recommends we fetch all of our data on the server via either an RSC or a route handler. It’s also worth noting that while in the past it’s been drilled into React developers to never perform sensitive data requests (like database calls) directly in a component (so we don’t leak credentials to a client), this is no longer true for RSCs. Because RSCs perform all of their data fetching and requests on the server, we can safely perform direct calls to our database without worrying about leaking any credentials or secrets, removing the need for an intermediary API route as we’d need with client components.
Request memoization
Finally, something else to be aware of when fetching data in an app directory project is request memoization. This means if we want to reuse the same data in multiple components in a component tree, we no longer need to do a global data fetch or prop drill to each component. Instead, we can perform a fetch request in each individual location, and there are no performance implications because all fetch requests are automatically memoized for us.
Deliver a fast website with a visual Page Builder
Prismic is a headless solution, with a visual Page Builder for your marketing team to release pages independently.

Next.js App Directory Tutorial
Now, we’ve covered everything we need to know about the app directory to allow us to get started with our tutorial project. So, the first thing we’re going to do is clone this base repository that contains everything you need to get started with the tutorial. To do this, you can run the following command.
git clone https://github.com/prismicio-community/2310-nextjs-13-app-router-tutorial.gitAfter the repository has been cloned, we’ll want to run the below commands to finish the setup process.
- Change into the projects directory,
cd 2310-nextjs-13-app-router-tutorial - Install the project’s dependencies,
npm install - Run the project,
npm run dev
With those steps complete, our project should now be running on http://localhost:3000, and we can get started building with the app directory!
Nested Routes
The first thing we’re going to look at configuring is a nested route. To configure this, create a new directory inside the app directory called nested. Then create a new file inside the nested directory called page.tsx which if we remember from earlier is how we create a new page in our application. Inside the page.tsx file add the below code.
export default function Page() {
  return (
    <main className="flex min-h-screen flex-col items-center justify-between p-24">
      <div className="text-black">
        <p>Nested Route</p>
      </div>
    </main>
  );
}
Now, in our browser, if we navigate to http://localhost:3000/nested we should see the page we’ve defined above with the Nested Route text on the screen.

Route Groups
With nested routes covered, let’s move on to something new for the app directory: route groups. Route groups are a way we can use directories to group files and routes together in the file structure without the folders themselves being included in the route’s URL path. To demonstrate this, we’re going to create two more pages /about and /settings and they’re going to have their own layout.tsx to separate them from our existing two routes (/ and /nested).
To start with, let’s define our route group by creating a new directory inside app called (group). You’ll note with this folder name, we’ve wrapped the name in parentheses. This is what denotes it as a route group. The name itself (group) is purely for our own organization.
Inside this new directory, create a new layout.tsx file and add in the below code.
import '../globals.css';

export default function GroupLayout({
  children,
}: {
  children: React.ReactNode;
}) {
  return <section className="bg-blue-300">{children}</section>;
}
Now, because this layout.tsx file is inside the (group) directory, it is scoped to it so only routes inside of this group will be impacted by it which includes the two routes we’re going to create now. To do this, create two more directories inside of (group), called about and settings. Both will have their own page.tsx files inside. Then, add the below code to the respective files.
// ./app/(group)/about/page.tsx

export default function Page() {
  return (
    <main className="flex min-h-screen flex-col items-center justify-between p-24">
      <div className="text-black">
        <p>About</p>
      </div>
    </main>
  );
}// ./app/(group)/settings/page.tsx
export default function Page() {
return (
<main className="flex min-h-screen flex-col items-center justify-between p-24">
<div className="text-black">
<p>Settings</p>
</div>
</main>
);
}Now, with our route group defined, we can navigate to the URLs http://localhost:3000/about and http://localhost:3000/settings and see the new pages we’ve created and that they’ve inherited the blue background color we defined in our scoped layout.tsx file.

Parallel Routes
The final type of routing we’re going to look at in this tutorial is parallel routes. This is another new type of route that has been added to the app directory and allows us to simultaneously or conditionally render one or more pages in the same layout. If it helps, you can think about these routes almost like defining components. They cover a section of the page and can independently load from each other without stopping the overall page from rendering.
To get started with these routes, create two new directories inside the app directory, @dashboard and @user. You’ll notice this time, in the directory names, we’ve included an @ at the beginning. This is what denotes it as a parallel route like the () did for the route groups.
Now, inside both of the directories, create two new files default.tsx and page.tsx. The page.tsx file serves the same purpose as it has with the other routes, defining the contents of the UI to be shown. The default.tsx however is a new type of route we haven’t seen before. This special file is used as a fallback when Next.js cannot recover the active state of a route based on the current URL. Learn more about the default.tsx file here.
With our directories and files created, let’s go about adding the necessary code to them. Add the below code into the respective files shown.
// ./app/@dashboard/page.tsx

export default function Page() {
  return (
    <main className="flex flex-col items-center justify-between p-24 bg-orange-300">
      <div className="text-black">
        <p>Dashboard</p>
      </div>
    </main>
  );
}// ./app/@dashboard/default.tsx
export default function Default() {
return null;
}// ./app/@user/page.tsx
export default function Page() {
return (
<main className="flex flex-col items-center justify-between p-24 bg-green-300">
<div className="text-black">
<p>User</p>
</div>
</main>
);
}// ./app/@user/default.tsx
export default function Default() {
return null;
}Now, we’ve defined our parallel routes, but at this point, we can’t access them. If you navigate to http://localhost:3000/user in your browser, you’ll notice a 404 error and a blank page is shown. This is because this type of route is designed to be rendered via a layout file and not directly accessed like other types of routes are.
So, let’s configure our new parallel routes to be shown via the layout.tsx file in the root of our app directory by updating the file to look like the one below.
// ./app/layout.tsx

import './globals.css';
import type { Metadata } from 'next';
import { Inter } from 'next/font/google';

const inter = Inter({ subsets: ['latin'] });

export const metadata: Metadata = {
  title: 'Create Next App',
  description: 'Generated by create next app',
};

export default function RootLayout({
  children,
  user,
  dashboard,
}: {
  children: React.ReactNode;
  user: React.ReactNode;
  dashboard: React.ReactNode;
}) {
  return (
    <html lang="en">
      <body className={inter.className}>
        <div className="bg-white min-h-screen">
          {children}
          <div>
            <div>{user}</div>
            <div>{dashboard}</div>
          </div>
        </div>
      </body>
    </html>
  );
}
You’ll notice that what we’ve done is import the names of our parallel route directories as props in our layout.tsx file alongside the children prop we’ve always had. We’ve then rendered these props on our page underneath the children prop.
The final thing we’re going to do to make the parallel slots a bit easier to see on the page is amend the styling in our ./app/page.tsx file to remove the minimum height. Here is the updated code for that file.
// ./app/page.tsx
export default function Home() {
return (
<main className="flex flex-col items-center justify-between p-24">
<div className="text-black">
<p>Home</p>
</div>
</main>
);
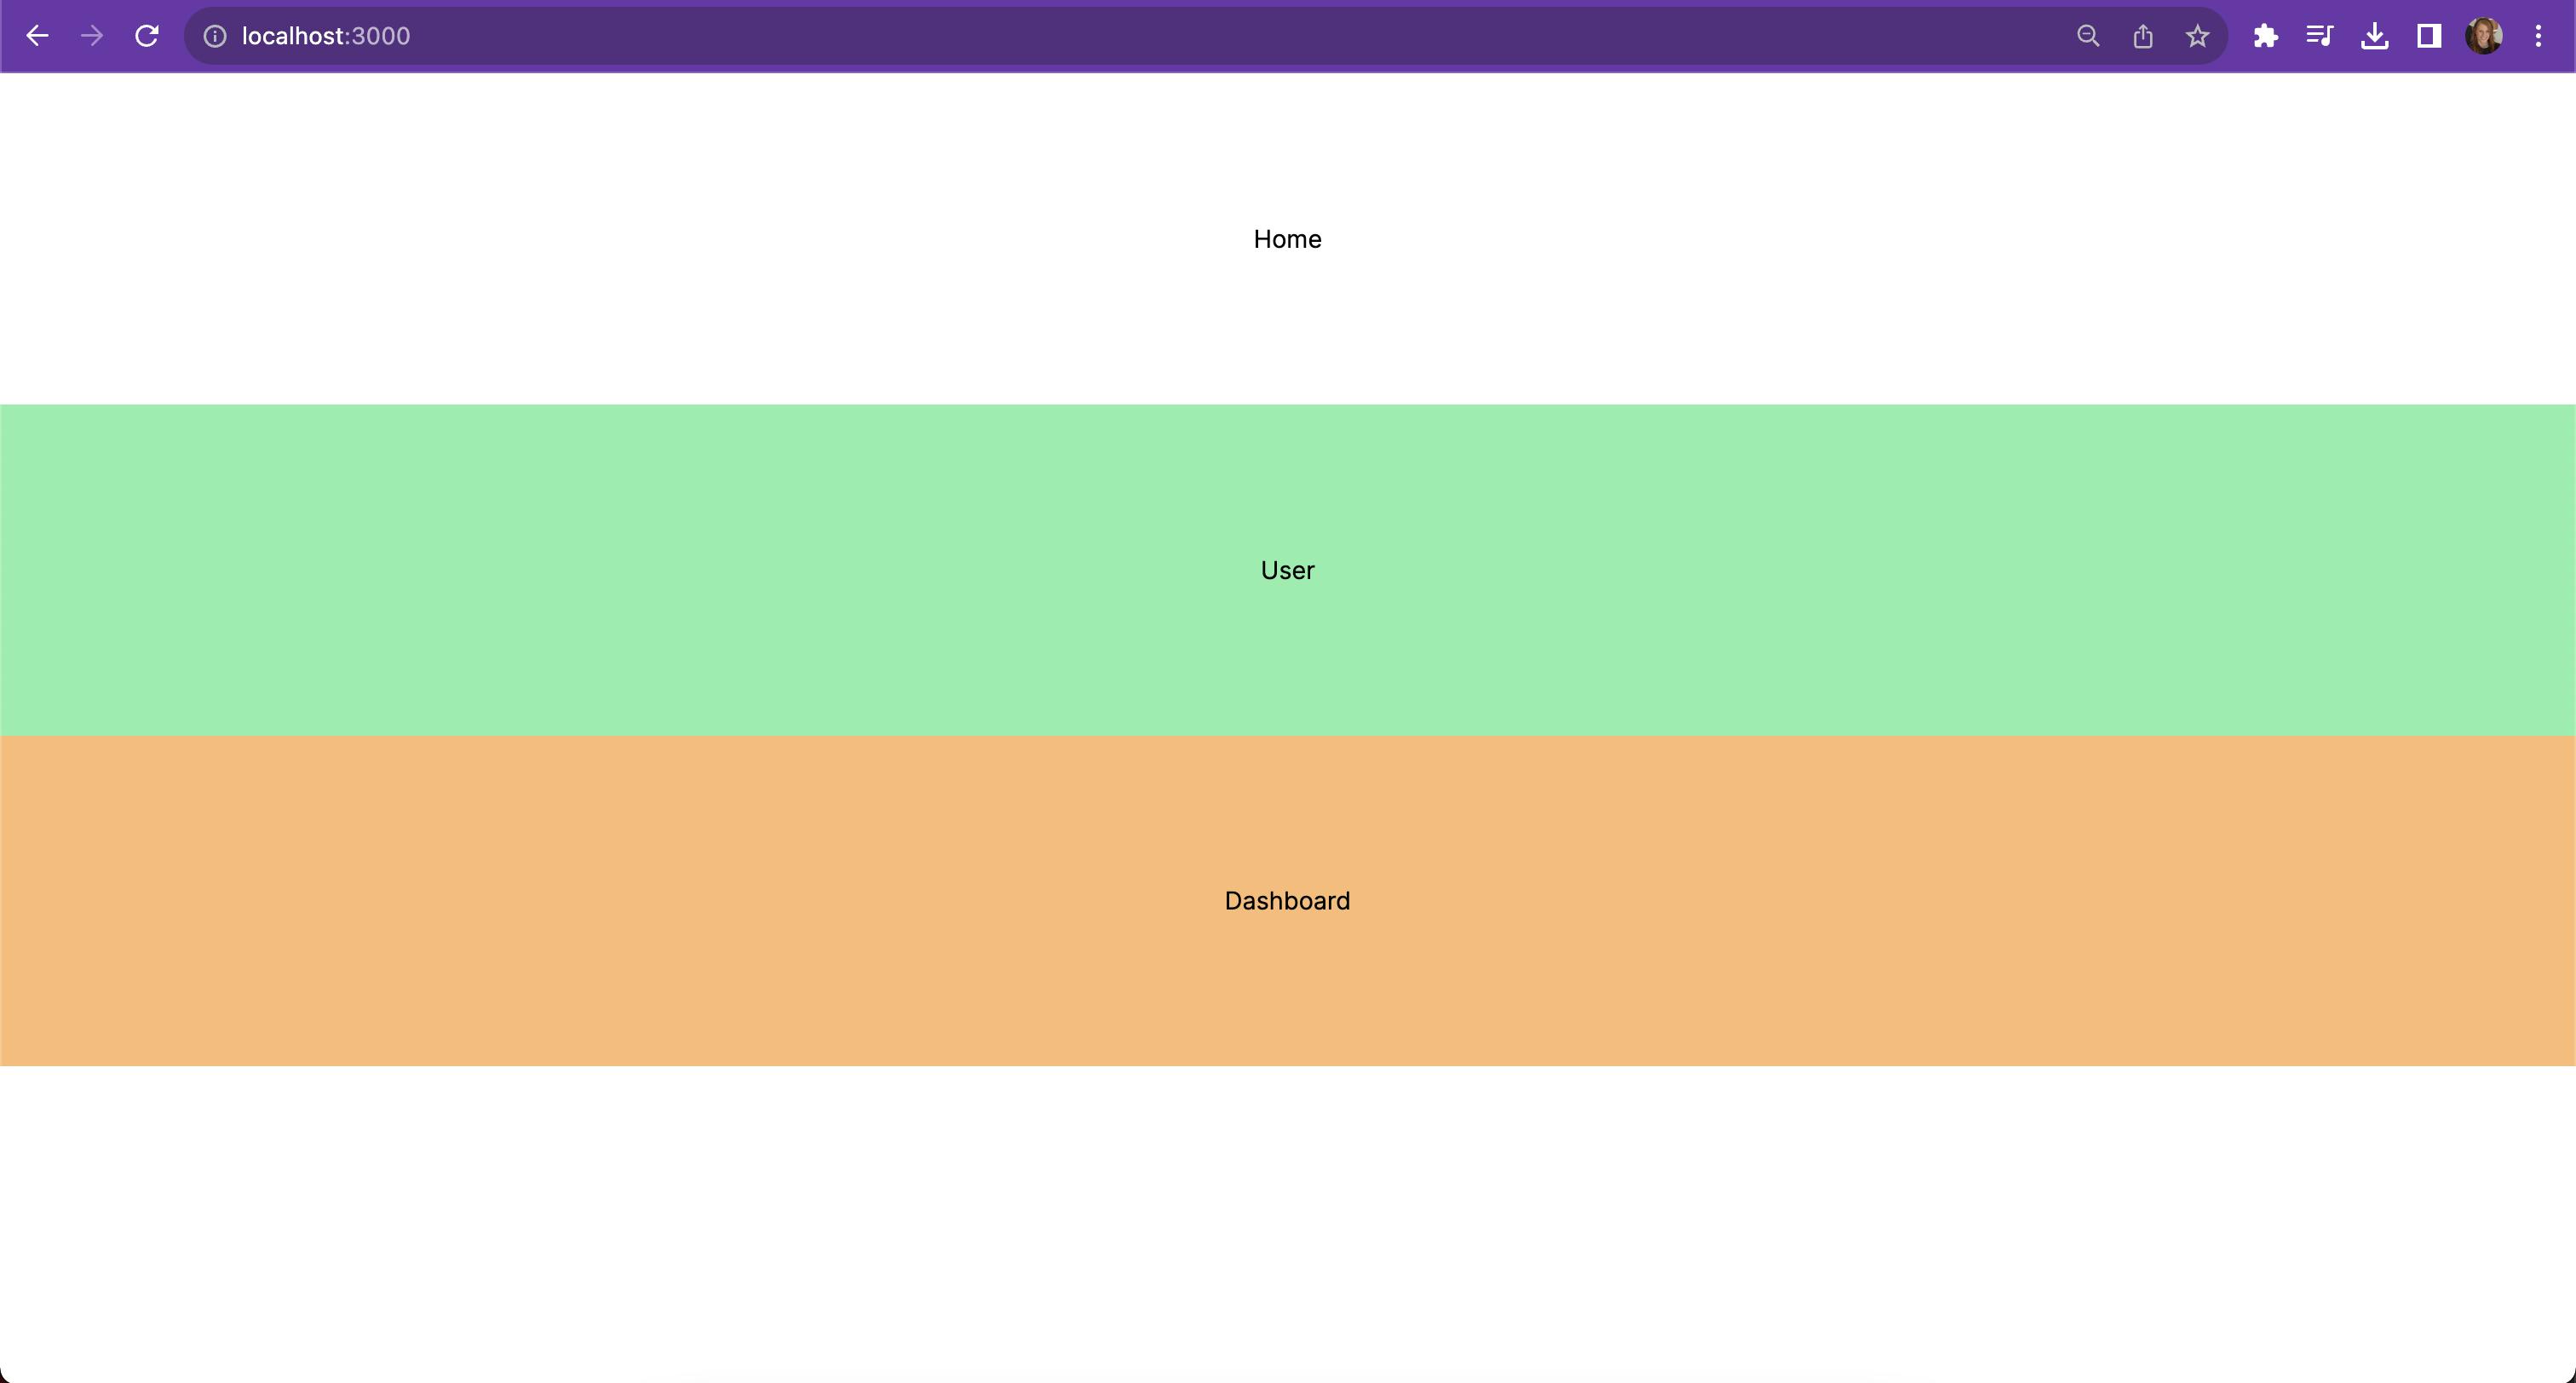
}Now, when you visit the home page of our project at http://localhost:3000, you should see a similar UI to below, where our two parallel routes are rendered underneath the children of our home page that comes from our ./app/page.tsx file.
Note: If you don't see the changes below, try stopping and re-starting your server in the terminal by re-running npm run dev.
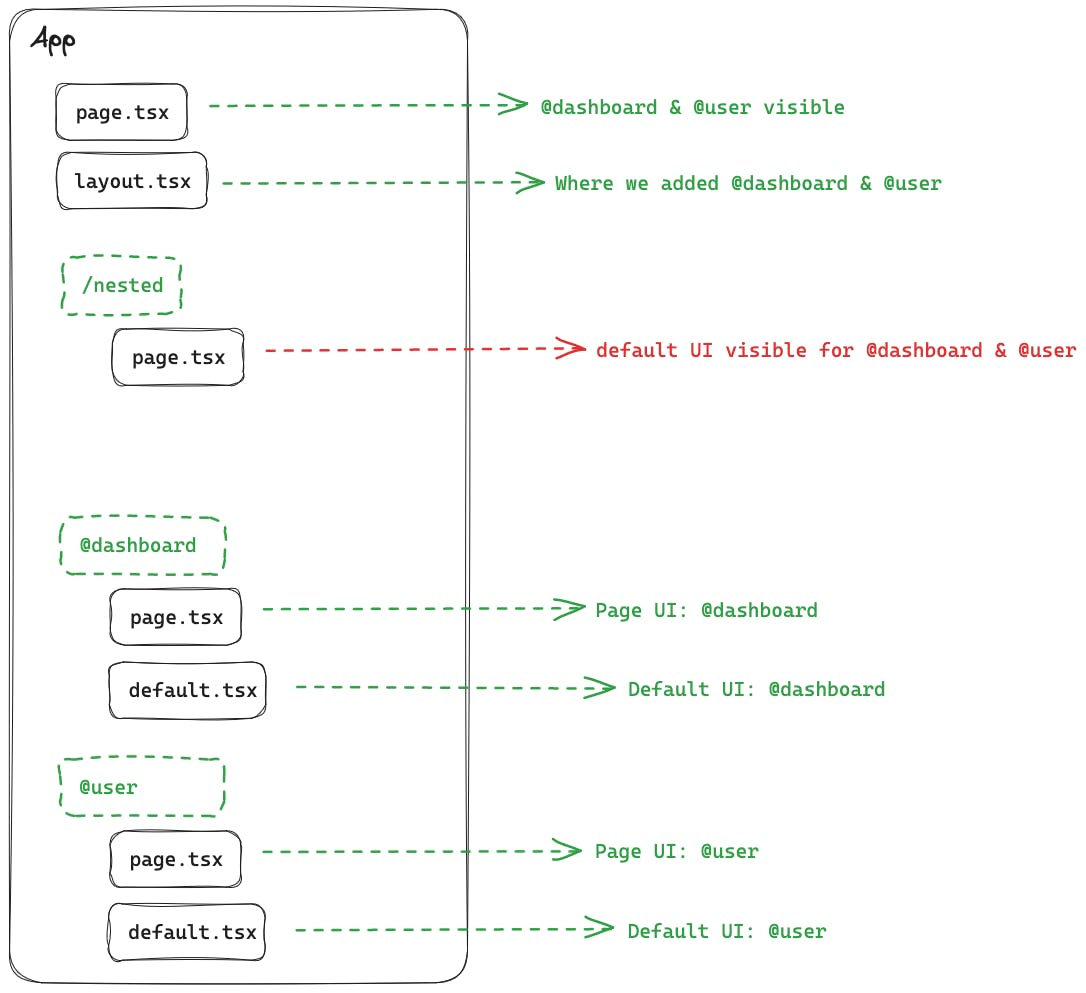
As a final note on parallel routes, it’s important to be aware that the contents we define in the page.tsx for our parallel routes will only be visible when we’re viewing the page.tsx at the same level as the layout.tsx file we rendered the parallel routes in. If you go to a page that is nested deeper but uses the same layout.tsx, you’ll see the contents defined in the default.tsx which, in our case, is null.
So, in the case of our example project, you’ll only see the contents of the parallel routes at / and would see the contents of the default.tsx at any of the other routes we defined like /about, /settings, and /nested. You can test this for yourself by updating the contents of one of the default.tsx to not be null and navigating to those pages.
Loading and Error States
The final feature we’re going to look at of the app directory is the loading and error files we mentioned earlier. For our example, we’re going to add them to the parallel routes we just defined. We’re going to make both of them have a period of showing the loading UI before having the @user one render successfully, and the @dashboard one throw an error and show the error UI.
To configure this, create a loading.tsx file in both the @user and @dashboard directories with the below contents.
export default function Loading() {
  return (
    <main className="flex flex-col items-center justify-between p-24 bg-gray-300 animate-pulse">
      <div className="text-black">
        <p>Loading...</p>
      </div>
    </main>
  );
}
Then, add an error.tsx file to the @dashboard directory with the below code.
'use client';

export default function Error() {
  return (
    <main className="flex flex-col items-center justify-between p-24 bg-red-300">
      <div className="text-black">
        <p>Something went wrong</p>
      </div>
    </main>
  );
}
Use client
Note the use of use client in the code to denote this as a client component, which is required for the error UI files.
Then we just need to update the contents of our parallel routes to make them asynchronous and have an artificial loading period using setTimeout while also, in the case of @dashboard, throwing an error after the timeout finishes. Here is the updated code for both of the parallel routes.
Now, if you visit the home page of our project at http://localhost:3000, you’ll see that both of the parallel routes show the loading UI for a few seconds before the @user route loads successfully, and the @dashboard one fails and shows the error UI we defined.

If you’d like to see the complete code at each of the stages we’ve shown above, make sure to check out the complete repository here, where each stage is separated into its own branch.
Final thoughts on the Next.js App Directory
In this guide, we have explored the Next.js 13 app directory, also known as the app router. We've covered what it is, the structure, data-fetching, and used a hands-on tutorial to look see how routing and error handling work with the app directory. Hopefully, this has been helpful! We'd love to know your thoughts on the app directory, so drop a comment below and let us know what you think. Cheers!
Try editing a page with Prismic
A visual page builder, configured to marketing team's needs. They can easily create on-brand website pages, release more, attract more visitors and convert quality leads.