

For as long as React has been around, there has always been the pain point of data fetching and showing loading UIs while the data is being fetched. There have been various attempts to fix this over the years, but there’s never been a true first-party solution from React itself to address this issue.
That is, until React Suspense came along. With its recent implementation in frameworks like Next.js 13, we finally have a convenient first-party solution that greatly improves the developer experience of displaying loading UIs and fetching data. So, in this post, we’re going to take a dive into React Suspense, what it is, as well as how you can get started using it!
What is React Suspense?
First of all, let’s look back at its beginnings. Suspense was originally introduced into React back in version 16, but since then, it’s largely been unused and under-appreciated. Now, that’s nice and all, but what exactly is Suspense? And how does it help me as a developer?
To answer the first of those questions, React Suspense is a first-party component available in React that we can use to wrap our own components that make asynchronous requests (think promises and data fetching). Then, when those components make these requests, Suspense automatically detects them happening and then allows us to show a custom loading UI.
In response to the second question, how does it help me as a developer? Well, it makes our lives a whole lot easier. No more handling custom isLoading props or manually setting state when something ‘should’ be loading. Now, React handles all of that for us. All we need to do is provide a component to show when the data is loading.
That sounds great, so why haven’t I heard of it before? Suspense has largely been underused because it doesn’t have many implementations or ways for it to be used. At the time of writing, the only major implementation of Suspense for data-fetching is Next.js 13, which we’ll take a look at later in the post. But I felt this should be mentioned, as React even notes this in their documentation.
Visualizing React Suspense
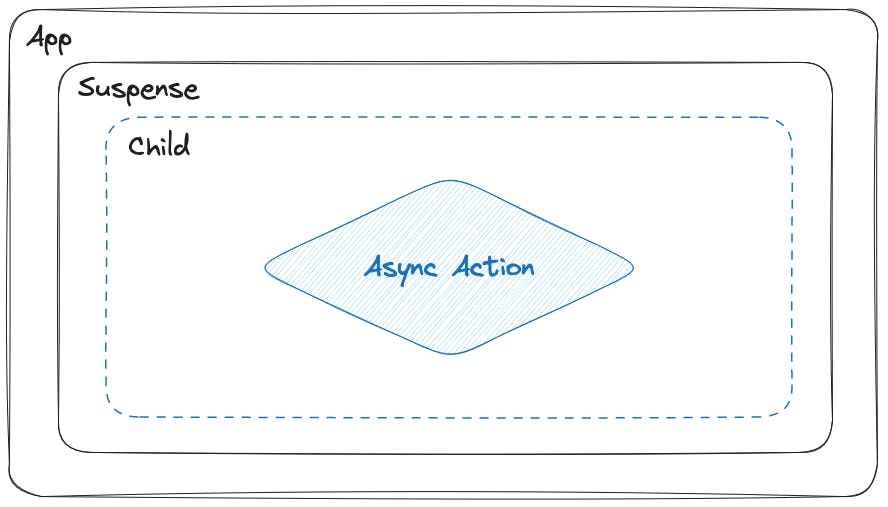
To help visualize Suspense a bit better, let’s take a look at a graphical representation of how Suspense works throughout its various stages and states.
To start with, we have our child component that performs some form of asynchronous action. Let’s assume this is fetching some data from an API.
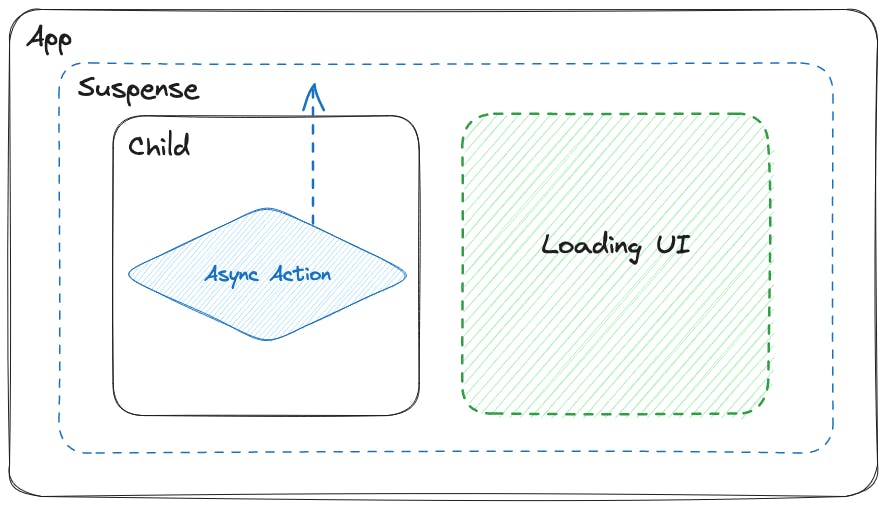
Once we perform the asynchronous action, in this case, sending the request to the API and awaiting the response, Suspense automatically detects this and shifts to rendering the loading UI we provided while the request is being performed.
Once the data has been returned to us from the API, Suspense detects that the request was completed automatically, removing the loading UI and rendering the original child component with the new data that was requested from the API.
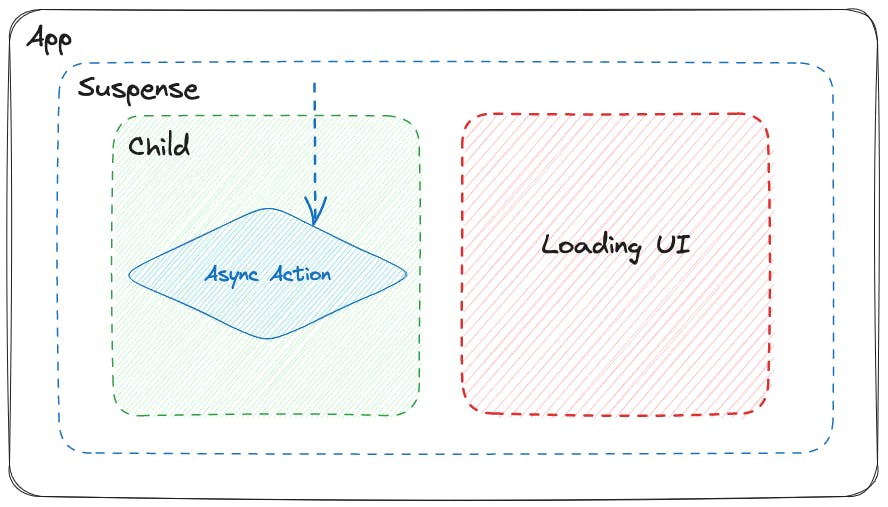
So, to recap, we have a three-step process that starts with our child component sending an asynchronous request, which Suspense detects and starts showing the loading UI. Finally, once the request completes, Suspense automatically switches back to the child component’s UI with the resolved data from the request.
Deliver a fast website with a visual Page Builder
Prismic is a headless solution, with a visual Page Builder for your marketing team to release pages independently

React Suspense Example
Now that we know about Suspense, what it does for us, and how it works, let’s take a look at some code examples for it. Let's begin by examining a more traditional example of data fetching in a React application. In this example, we utilize useState and useEffect to handle the retrieval of data and setting it to state. We also determine whether the data is still loading or not.
import { useEffect, useState } from "react";

interface IPokemon {
  name: string;
  url: string;
}

interface IResponse {
  count: number;
  next: string;
  previous: string | null;
  results: IPokemon[];
}

export default function App() {
  const [isLoading, setIsLoading] = useState(false);
  const [data, setData] = useState<IPokemon[] | null>(null);

  useEffect(() => {
    async function dataFetcher() {
      setIsLoading(true)
      const response = await fetch("https://pokeapi.co/api/v2/pokemon");
      const { results: pokemon } = await response.json() as IResponse;

      setData(pokemon);
      setIsLoading(false);
    }

    dataFetcher()
  }, []);

  return (
    <div>
      <h1>Hello CodeSandbox</h1>
      <h2>Start editing to see some magic happen!</h2>

      {isLoading ? (
        <p>Loading...</p>
      ) : (
        data?.map((p) => <p key={p.name}>{p.name}</p>)
      )}
    </div>
  );
}
You can see there is quite a bit of code that we’ve had to add to support the data fetching as well as control if the data is loading and then showing the loading UI to the user.
So, now, let’s contrast that previous non-suspense example with a React Suspense version.
Setting up our React Suspense project
For this, we’re going to start by using this base repository. To follow along, you can clone it by running:
git clone https://github.com/prismicio-community/nextjs-suspense-tutorial.gitTo get our app running, we can follow these simple steps:
- From terminal, run
cd nextjs-suspense-tutorial - Run
npm install - Run
npm run dev
Our app is now running on http://localhost:3000/, but it doesn’t have any content yet. So let’s add that! 👇
Create a new component
To start with, we’re going to create a new component to handle the fetching and displaying of our Pokemon. In our app directory, we will add a folder called components and a file called Pokemon.tsx. Then add the code below to that file.
// ./app/components/Pokemon.tsx

interface IPokemon {
  name: string;
  url: string;
}

interface IResponse {
  count: number;
  next: string;
  previous: string | null;
  results: IPokemon[];
}

export default async function Pokemon() {
  const response = await fetch('https://pokeapi.co/api/v2/pokemon');
  const { results: pokemon } = (await response.json()) as IResponse;

  // Add an artificial delay to simulate a slow API and show the loading UI
  await new Promise((resolve) => {
    setTimeout(resolve, 4000);
  });

  return (
    <div className="flex flex-col items-center justify-center">
      {pokemon?.map((p) => (
        <p key={p.name}>{p.name}</p>
      ))}
    </div>
  );
}
After creating this component, we’re then going to update our ./app/page.tsx file to render our new component inside a Suspense component, where we’ll also pass in our loading UI to display while the asynchronous request is performed.
// ./app/page.tsx

import { Suspense } from 'react';
import Pokemon from './components/Pokemon';

export default function Home() {
  return (
    <main className="flex min-h-screen flex-col items-center justify-between p-24">
      <Suspense
        fallback={
          <p className="text-orange-600 text-2xl font-bold">
            Loading pokemon...
          </p>
        }
      >
        <Pokemon />
      </Suspense>
    </main>
  );
}
So, with that code added, let’s refresh our page running on http://localhost:3000 in our browser. We should see something like the GIF below, where we have our loading UI displayed while our request is being performed (with our artificial delay) before it switches to our list of Pokemon returned from the API.

So, now if we compare our Suspense example with our non-suspense example, you can see that we’re using considerably less code related to detecting and controlling the loading state. In fact, we’ve had to write 0 lines of code related to this! Instead, all we do is provide the loading component to Suspense and perform our data request in our child component, and it handles the rest for us!
Another method utilizing the loading UI
At this point, it’s also worth mentioning that while in Next.js you can use the Suspense component as shown in our example project above (check out the code with Suspense added on this GitHub branch here), you can also use the loading.tsx file (shown in the docs) instead to handle this as it implements Suspense for you, so all you need to do is provide the loading component. You can see an example of this in Next.js’s documentation.
Error Handling
Now we know that Suspense can take care of all of our loading UI requirements, the next logical question is what about if something goes wrong? Can Suspense show an error UI for us if the data fetching fails for some reason?
The answer to that question is no, Suspense can’t. However, another feature of React can, and that is error boundaries. Error boundaries allow us to catch and gracefully handle errors that occur in our components and/or data fetching. For example, in our situation with data fetching, if it was to error for some reason, we can use error boundaries to show an error message to inform the user in a very similar way to Suspense with loading UI.
Unfortunately, there is currently no built-in component for error boundaries like Suspense. But we can write our own class for it, as shown here in React’s documentation. Or, if you don’t fancy writing it yourself, you can make use of the react-error-boundary package, which handles it all for you.
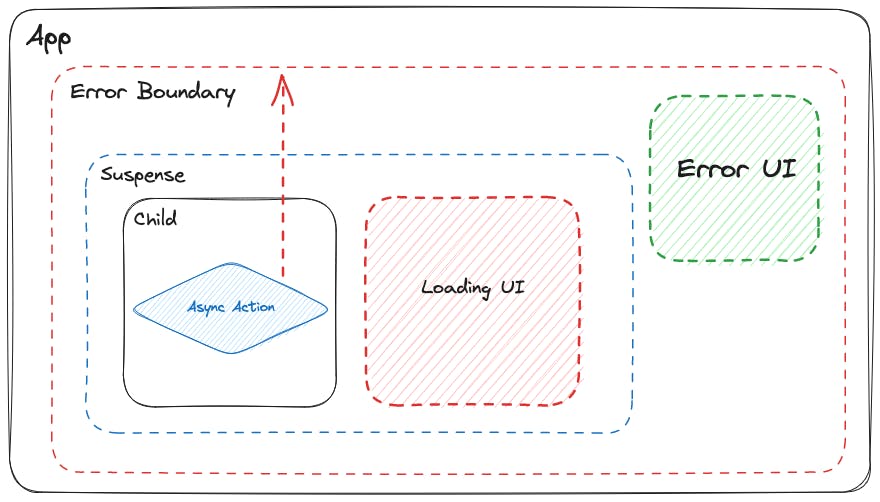
Before we take a look at implementing error boundaries, let’s take a look at them in a diagram like we did earlier for the loading UI. At first, everything is like before: the asynchronous action is performed, and the loading UI is displayed to the user while the request is being processed. At this point, the error UI is not displayed because no error has occurred.
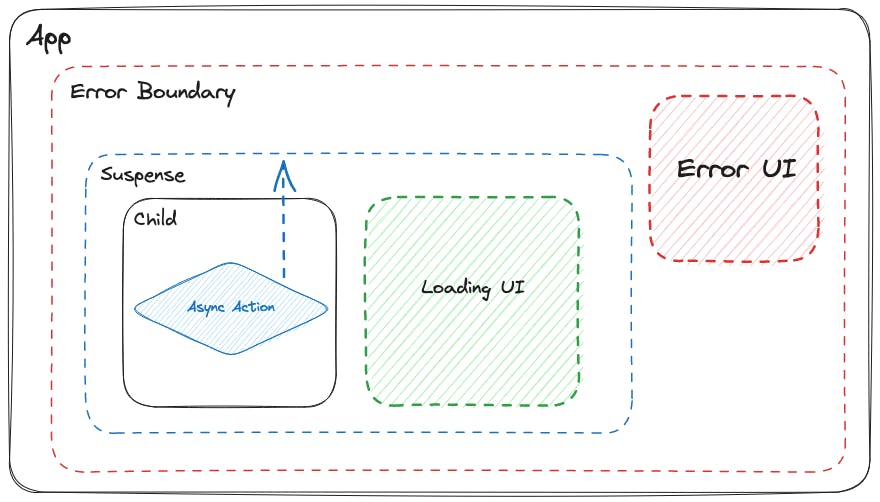
However, if an error does occur, then the error boundary will catch it, remove the loading UI, and then automatically display the error UI that has been configured. So, then our diagram will look like this.
Implementing Error Boundaries in our React Suspense project
To show error boundaries in action, let’s implement them into our Suspense example from earlier.
First of all, install the react-error-boundary package by running the command npm install react-error-boundary in a new tab in the terminal, and then we can update our ./app/page.tsx file to use our new error boundary.
// ./app/page.tsx

import { Suspense } from 'react';
import { ErrorBoundary } from 'react-error-boundary';
import Pokemon from './components/Pokemon';

export default function Home() {
  return (
    <main className="flex min-h-screen flex-col items-center justify-between p-24">
      <ErrorBoundary
        fallback={
          <p className="text-red-600 text-2xl font-bold">
            Something went wrong...
          </p>
        }
      >
        <Suspense
          fallback={
            <p className="text-orange-600 text-2xl font-bold">
              Loading pokemon...
            </p>
          }
        >
          <Pokemon />
        </Suspense>
      </ErrorBoundary>
    </main>
  );
}
As you can see, we’ve now imported our new ErrorBoundary component from react-error-boundary and used it to wrap our Suspense component from before. We then provide an error component to the fallback prop, which will be shown in case an error occurs during the data fetch in our Pokemon component.
Then to simulate an error occurring during the data fetch, let’s update our Pokemon component to throw an error after the timeout finishes. This will allow us to see the loading UI displayed first and then the error UI once the error is thrown. Here is the updated code with the error being thrown to add to our ./app/components/Pokemon.tsx file.
// ./app/components/Pokemon.tsx

interface IPokemon {
  name: string;
  url: string;
}

interface IResponse {
  count: number;
  next: string;
  previous: string | null;
  results: IPokemon[];
}

export default async function Pokemon() {
  const response = await fetch('https://pokeapi.co/api/v2/pokemon');
  const { results: pokemon } = (await response.json()) as IResponse;

  // Add an artificial delay to simulate a slow API and show the loading UI
  await new Promise((resolve) => {
    setTimeout(resolve, 4000);
  }).then(() => {
    throw new Error('Something went wrong');
  });

  return (
    <div className="flex flex-col items-center justify-center">
      {pokemon?.map((p) => (
        <p key={p.name}>{p.name}</p>
      ))}
    </div>
  );
}
And, with those changes made when we run the app and visit http://localhost:3000 in our browser, we should see something like the GIF below where we see the loading UI as before, but then instead of switching to our list of Pokemon, it displays an error message that something went wrong.

Another method of error handling
As a final note on error boundaries, if your project is using the Next.js 13 app router, you can use the error.tsx file (as shown in the docs) to handle the error boundaries for you in a similar way to how the loading.tsx file can handle Suspense and the loading UI for you, as mentioned earlier. Also, if you’d like to see the finished project’s code with error boundaries implemented into it, check it out on the GitHub branch here.
Closing thoughts on React Suspense
In this post, we’ve looked at React Suspense, what it is, its benefits to us as developers, as well as how we can implement it in a project using a framework such as Next.js 13. Hopefully, this has been helpful! If you have any questions or issues, feel free to drop a comment below! 👇
Try editing a page with Prismic
A visual page builder, configured to marketing team's needs. They can easily create on-brand website pages, release more, attract more visitors and convert quality leads.


