Next.js SEO Guide: Build a Next.js Site with SEO Super Powers
 By Alex Trost
While Next.js comes packed with tools to help you develop faster, it’s still possible to ship a site with lackluster SEO. Next.js has a ton of great features for things like rendering and routing, but how can we make the sites we build with it rank better on search engines like Google?
In this article, I’ll explain all the ways developers using Next.js can impact a site’s SEO.
Along the way, you might be wondering which rendering method is best for SEO. SSG? SSR? ISR? We’ll discuss the benefits of each and give you a solid recommendation.
I’ll also walk you through a tutorial where we upgrade a Next.js site into an SEO powerhouse. We’ll touch on how to handle both directory routing methods: the classic pages/ and the app/ directory that was introduced in Next.js 13.
So if you’re looking to make your Next.js website as SEO-friendly as possible, you’re in the right place.
Why is SEO important?
Good SEO gives your site the best chance at ranking high on Google, giving you more visitors. You can have the nicest site in the world, but it doesn’t matter if no one sees it. If you’re not in the top 10 sites of Google search results you’ll be seen by almost no one.
Better SEO leads to increased traffic, which means you’ll get more of whatever your site’s goals are. More sales, more leads, or a bigger audience.
Compared to other methods like advertising, SEO is a cost-effective way to get people to your site. Especially as a developer, if you can nail the technical SEO up front, the site will reap the rewards for years to come.
If you want to learn more about how you as a developer impact SEO, dig a little deeper in my other post.
Stay on Top of New Tools, Frameworks, and More
Research shows that we learn better by doing. Dive into a monthly tutorial with the Optimized Dev Newsletter that helps you decide which new web dev tools are worth adding to your stack.

How does Next.js improve SEO?
Vercel, the creators of Next.js, know just how important SEO is to building successful websites. That’s why they’ve packed the framework with a bunch of SEO-friendly features.
Next.js vs Create React App for SEO
Before we can fully appreciate what Next.js offers us, let’s look at the early days of building with React. You were encouraged to use Create React App, which builds out your page with client-side rendering (CSR). CSR means that the user gets sent an empty shell for their HTML along with JavaScript files. When the JavaScript loads and runs, it injects all of the needed elements into the DOM, building the content on the user’s machine.
Not only is this slower because it takes time for the page to load and render, but it comes with the assumption that the JavaScript is going to load and execute perfectly on whatever machine it’s being run on. That’s risky when you consider that Google’s web crawler can run JavaScript, but it’s not known how well it performs, leaving far too much to chance.
Instead of sending an empty HTML document, it’s better to have all of the content already baked into the HTML when you send it to the user. This way if JavaScript takes a while to load or fails outright, users (and Google) can still read and access your content.
Next.js rendering methods: SSG, SSR, ISR
Now that we know we don’t want to render client-side for best SEO results, let’s run down the different rendering methods that Next.js has built-in that solve the issues above.
Static site generation (SSG)
With SSG all of your HTML, CSS, and JavaScript are created at build time, which is when your site deploys. When a user requests a page, they’re sent a pre-rendered HTML file that already contains all of the page’s content, making it great for SEO and performance.
Server-side rendering (SSR)
With SSR all of your HTML, CSS, and JavaScript are created on the server when a user requests the page. It’s also pre-rendered, so it’s great for SEO. It might take slightly longer than SSG, but it’s great when you have highly dynamic content.
Incremental static regeneration (ISR)
ISR gives us the benefits of SSG and SSR without their downsides. With ISR you statically generate your pages, but when a user requests a page, Next.js checks to see if it needs updating. If so, it updates that one page and sends it to the user. This way you can keep your site’s content up to date without needing to rebuild potentially thousands of pages every time someone updates one of your pages.
Which rendering method should I use?
Because ISR gives us the initial load speed of static pages, with the dynamism of SSR, it’s a great choice for just about any site.
The best part is that Next.js allows for hybrid rendering, which means that you can use different rendering methods on your different pages. You can use SSG on a page that won’t change much, and ISR on a more dynamic page that might need to update hourly.
If you’re deploying your Next.js app on Vercel for hosting, you get the benefit of on-demand ISR, which adds further efficiency to the rendering method.
Next/Image
As mentioned above, optimizing images is a huge part of nailing your website performance. Luckily, Next.js has a wonderful built-in image component to make that job easy.
next/image serves your user the perfect image for their device and browser. Mobile users will get small images, and desktop users will get large ones. If the browser supports a modern image format like AVIF, that’s what the user will receive. It uses lazy loading so that your users don’t download images they never see.
It’s a powerful tool for building performant websites. It even throws an error when you forget to include an alt attribute, further helping you on your SEO quest!
Automatic code splitting
One of the biggest performance bottlenecks can be big bundles of JavaScript. Next.js automatically splits up your JavaScript code into smaller bundles for each page. This way when a user requests the homepage, they don’t also receive the JavaScript needed for every other page on the entire site. This improves page speed, which improves SEO performance by improving key Core Web Vitals metrics.
These fantastic features will help us create optimized, high-ranking websites. Let’s see them in action as we dive into a real Next.js project.
Deepen your understanding of Next's SEO benefits

Next.js SEO best practices in an example tutorial
This tutorial will use the `pages/` directory method.
In this tutorial, we’re building a site that uses the pages/ directory method of page routing. I’ll touch on how to get better SEO with the app/ directory after the tutorial. If that's what you're here for, you can jump to that section below.
Getting started
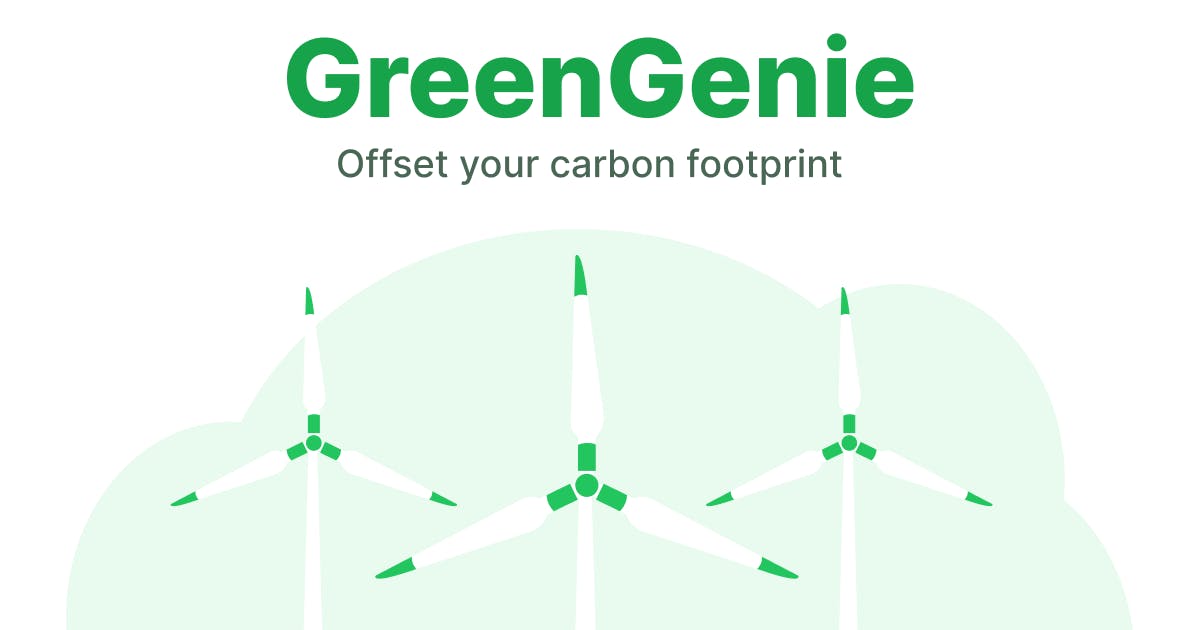
We’re starting with an example project that has some pretty rough SEO overall. I’m building a marketing site for a fake eco-friendly energy app called GreenGenie.
It’s a Next.js app with Tailwind for styling, getting its content from Prismic. Because your content is the other half of the SEO equation, it’s important to choose a tool that empowers content creation. We’re choosing Prismic because it empowers your content team to easily ship pages that stay on brand with the high performance of your Next.js app. It’s a headless page builder, which means that Prismic takes care of the content management side of things and allows you to include the content in your Next.js app with an API.
If you’d like a full tutorial on how to build a full Next.js site with Prismic, check out this tutorial.
You can follow along with the project, and as we go you’ll learn how to improve the SEO on any Next.js site in a bunch of great ways. To follow along you can clone my repo at the beginning-state branch:
git clone https://github.com/a-trost/next-js-seo.git next-js-seo
cd next-js-seo
git checkout beginning-state
Let’s take a quick tour of the project to see where everything is.
We have our site’s pages at pages/index.js and pages/[uid].js.
index.js is our home page and queries the homepage content from Prismic.
[uid].js is our dynamic page and allows our editors to build whatever pages they want.
The content of the pages is built with editable page sections called Slices. Slices live in the slices/ folder and are just React components with a special designation in Prismic and that pull content from its API. In Prismic’s page builder interface, content editors can choose the Slices they want to appear on the page, as well as the order, and the SliceZone component on the page is where they’ll appear.
We also have some other React components to help with the page structure. In components/ we have our Navbar.js, Footer.js, and a Layout.js component that contains the Navbar and Footer.
Next/Head
When you create a brand new Next.js website, you get a page that comes with some SEO basics already. Next.js provides a component called next/head that lets you add code inside the <head> element of your site. We’ll use this to easily update metadata like the title and meta description on each of our pages.
We’re putting our <Head> element in our Layout.js file like this:
// components/Layout.js

import Navbar from "./Navbar";
import Footer from "./Footer";
import Head from "next/head";

export default function Layout({ children, metadata, settings }) {
  return (
    <>
      <Head>
        <title>
          {metadata.meta_title} - {settings.data.website_name}
        </title>
        <meta name="description" content={metadata.meta_description} />
        <meta name="viewport" content="width=device-width, initial-scale=1" />
        <link rel="icon" href="/favicon.ico" />
      </Head>

      <Navbar settings={settings} />
      <div>{children}</div>
      <Footer />
    </>
  );
}
Right now it doesn’t have much going on, just a title, viewport metatag, and the favicon.
If you inspect the page, you’ll see it lifted up into the <head> of our HTML:
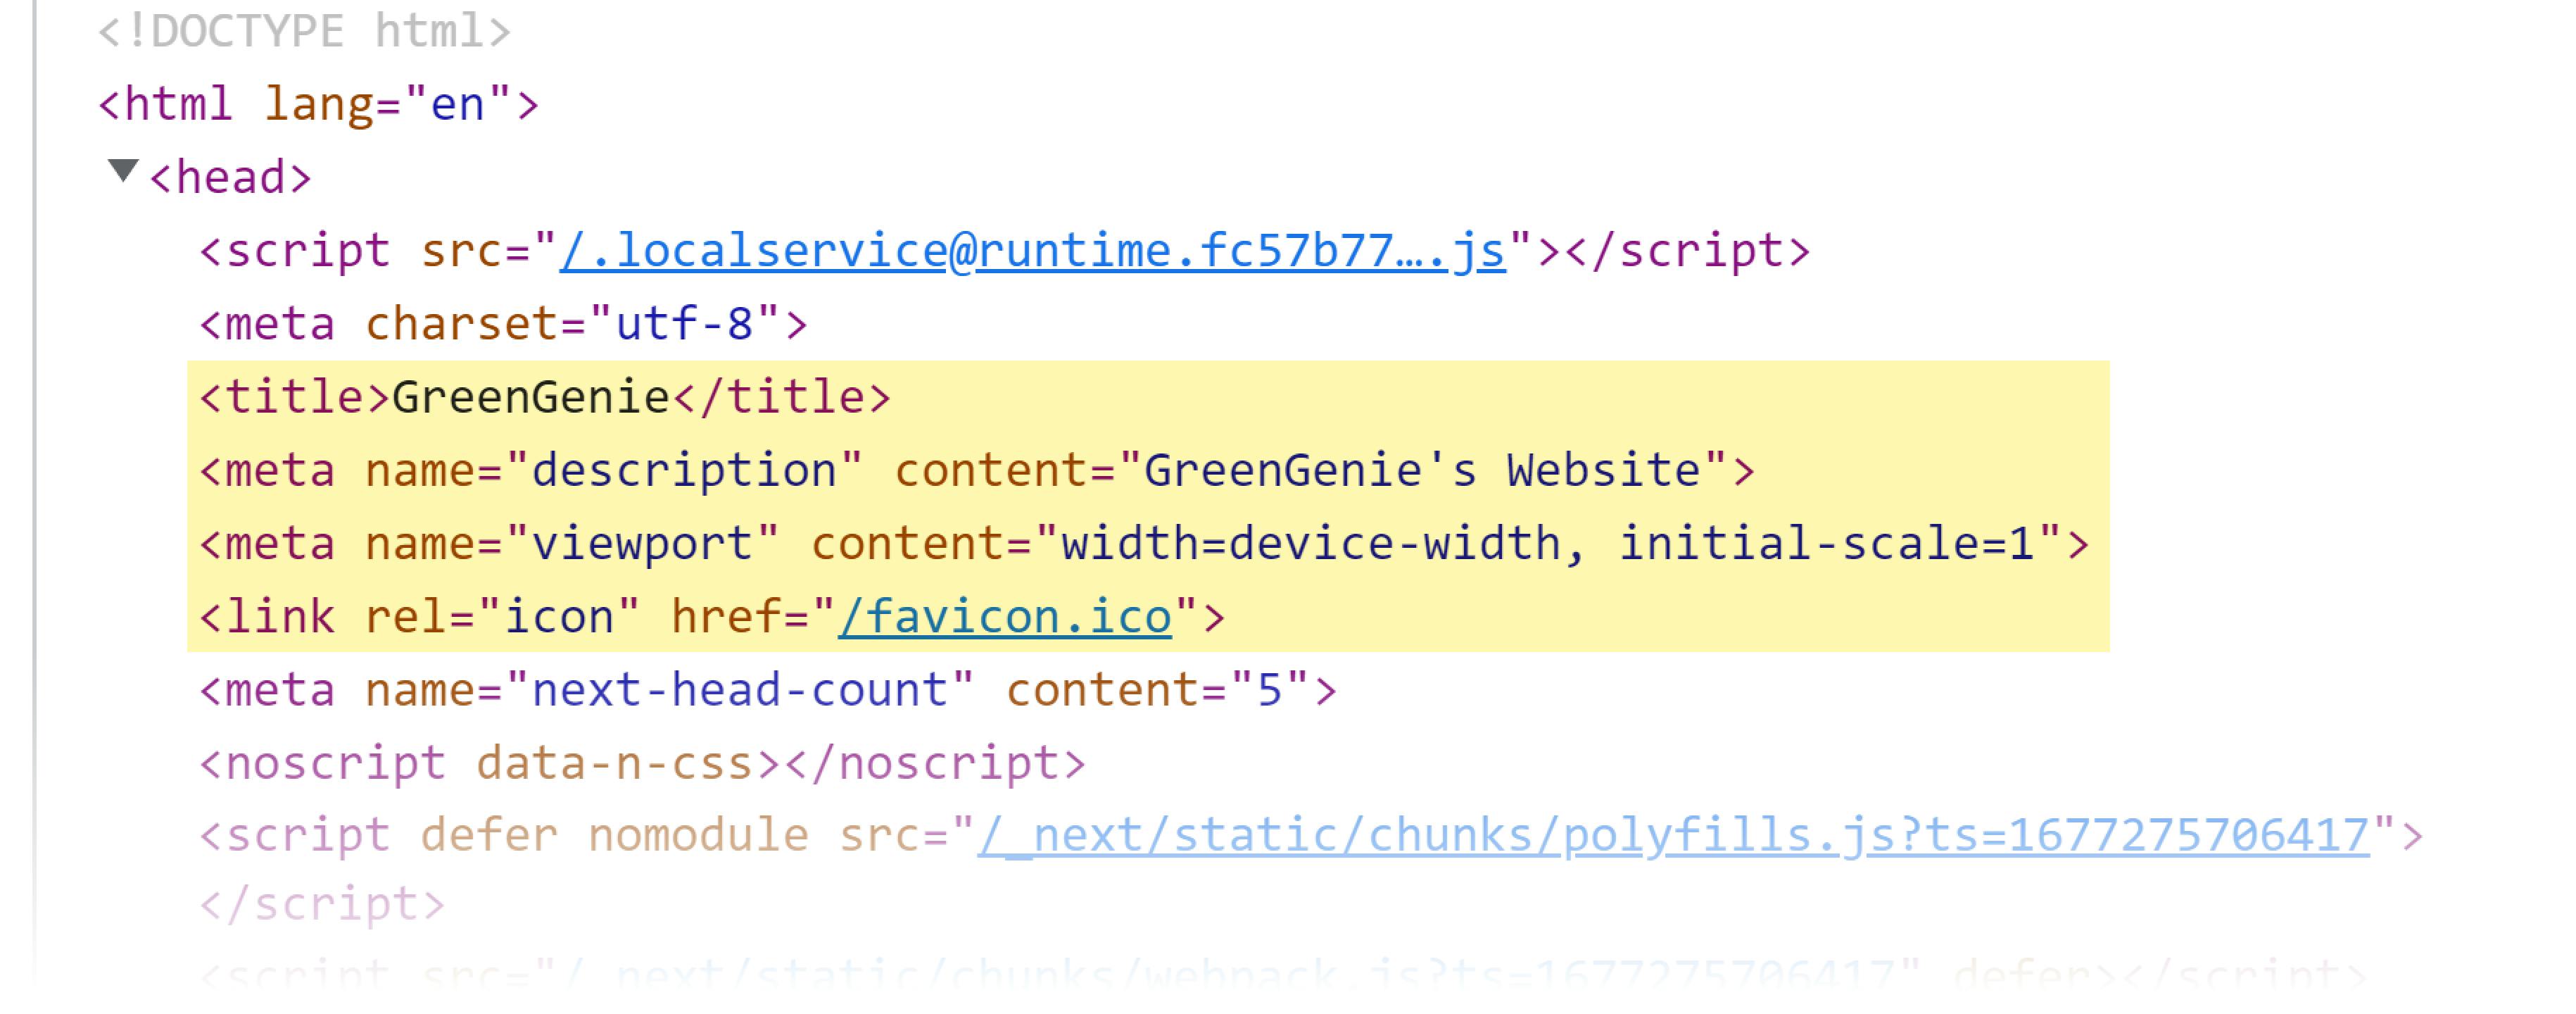
next/head makes it simple to edit our metatags from anywhere in our project.
Using semantic HTML elements
Our project is already using semantic elements, but this is entirely up to us. Next.js doesn’t do it for us, and won’t throw any errors or warnings if you create a project entirely with divs. Semantic elements are how Google figures out the content structure of your site, so they’re critically important.
First, let’s talk headings. Every single page needs to have just one <h1>. Most pages will have several <h2> elements. The more complex your content, the deeper your headings will go, from h1 to h6. Headings need to go in order as your information nests. This example outline shows what I mean:
- h1 - GreenGenie
    - h2 - Why GreenGenie
        - h3 - Easy to use
        - h3 - Affordable
    - h2 - Types of green energy we offer
        - h3 - Solar
        - h3 - Wind
I made sure all of our Slices are wrapped in <section> elements. the <section> element defines a section of a webpage with related content. So a Pricing Table Slice would be a <section> because everything inside is related to Pricing. Sections should always contain a heading.
I also used the <header>, <footer>, and <nav> elements in specific places.
The <header> element wraps your primary navigation, and typically contains the title and logo of your site, too. Inside that <header> you’ll typically have the <nav> element, which wraps the primary set of links for your site. You should really only use these once per page.
Most sites contain a visually distinct footer, but you should also use the <footer> element to make it clear to Google.
The semantic HTML elements you choose to use depend on the content you’re working with. If this was a blog post or something similar, we’d be sure to include an <article>. This isn’t a full tutorial on semantic HTML, but there are some great resources out there that you can reference for your use case:
Fetching with incremental static regeneration (ISR)
The way we render our pages can have a large effect on SEO. We have two main goals:
- Send pre-built pages with content baked into our HTML
- Keep our content fresh and up to date
If we fetch our content with Incremental Static Regeneration, Next.js gives us both benefits.
The best part? It takes just one line of code.
If we export the getStaticProps() function from our homepage, we’re telling Next.js that we want to use Static Site Generation. But to upgrade to Incremental Static Regneration, we just need to add a single property to the return object: revalidate.
// pages/index.js
export async function getStaticProps({ previewData }) {
  const client = createClient({ previewData });

  const page = await client.getSingle("homepage");

  const settings = await client.getSingle("settings");

  return {
    props: {
      page,
      settings,
    },
    // Next.js will attempt to re-generate the page:
    // - When a request comes in
    // - At most once every 10 seconds
    revalidate: 60, // In seconds
  };
}
No longer do your editors need to wait for long rebuilds of the entire site. Pages can stay up-to-date but load as quickly as static sites!
You can read more about the feature in the official docs.
Nested and dynamic pages
Another thing that helps with the overall user experience and SEO is having good, readable URLs.
There's a big difference between: https://greengenie.io/guides/how-to-install-green-genie and https://greengenie.io/g/01.
The first is human-readable and gives some hint of what the content of the page is going to be.
Note that this used to be a much bigger deal to Google, but because it led to keyword stuffing, its importance has diminished somewhat.
For dynamic routes, we want to give our editors the power to decide the URL. In Prismic we do that with the UID (unique identifier) field for each page. In Next.js we put brackets around the filename to declare a dynamic route. So pages/[uid].js will catch the URL parameters and set them to the uid in the params object.
Then inside the getStaticProps() function for that page, we can query Prismic for that page’s content with the uid, as well.
// needs a page path

export async function getStaticProps({ params, previewData }) {
  const client = createClient({ previewData })
  // Here we query our page based on the URL path with params.uid
  const page = await client.getByUID('page', params.uid)

  return {
    props: {
      page,
    },
    revalidate: 60,
  }
}


export async function getStaticPaths() {
  const client = createClient()
  // To build all potential page URLs we query for all pages
  const pages = await client.getAllByType('page')

  return {
    paths: pages.map((page) => prismicH.asLink(page)),
    fallback: false,
  }
}
Then inside Prismic, our editors can create a uid. Prismic will make sure it's encoded for URLs, enforcing lowercase, hyphenation, and other character standards.

If you want to dig deeper into dynamic routes and how getStaticProps() works, check out the Next.js docs.
Handling images in Next.js
I mentioned above just how dramatic a difference optimizing images can make for your page's SEO. We also touched on next/image and all of the excellent benefits it provides. Now it's time to put it into practice.
We can use both local and remote images with next/image.
Local images are files in your Next.js project, typically placed in the public/ folder. Let's upgrade our regular <img /> element to use next/image.
//Here's where we're importing the Image component from next/image.
import Image from 'next/image'
import windTurbinesImage from '../public/wind-turbine.png'

const Hero = ({ slice }) => (
  <section>
    <span>{slice.primary.heading}</span>
    <PrismicRichText field={slice.primary.description} />
    <Image
      src={windTurbinesImage}
      alt=""
    />
  </section>
);
Because this image is only decorative, it gets alt="" so screen readers don’t announce it. We’ll talk about good alt text in a moment.
Remote images come from another source; maybe a CMS like Prismic, or an image CDN like Imgix. Let's instead get that same image from Prismic so that our editors have the control to change it.
import Image from 'next/image'

const Hero = ({ slice }) => (
  <section>
    <span>{slice.primary.heading}</span>
    <PrismicRichText field={slice.primary.description} />
    <Image
      src={slice.primary.image.url}
      alt={slice.primary.image.alt}
      width={slice.primary.dimensions.width}
      height={slice.primary.dimensions.height}
    />
  </section>
);
When we're using remote images we need to specify the image's height and width. This is a big part of how next/image cuts back on cumulative layout shift.
Just a heads up, if you're using next/image with an external source, you'll need to add the source domain to your next.config.js file for security.
Now if you're using Prismic, the image experience gets even better. We've built a special image component, PrismicNextImage, that takes the power of Prismic's image CDN and combines it with next/image to give you the best results possible.
import { PrismicNextImage } from '@prismicio/next'

const Hero = ({ slice }) => (
  <section>
    <span>{slice.primary.heading}</span>
    <PrismicRichText field={slice.primary.description} />
    <PrismicNextImage field={slice.primary.image} />;
  </section>
);
Because PrismicNextImage knows the shape of Prismic's image object, we just pass it the field and it handles the src, height, width, alt text, and more!
Now that our image is leveraging next/image through PrismicNextImage, we know that our users will get the best image for their browser and screen size. This results in super-fast load times, minimized layout shift, and top SEO marks.
For more on these components, check out the docs for next/image and the docs for PrismicNextImage.
Alt text in Next.js
Before wrapping up images, let’s talk about alt attribute text. It’s crucial for both SEO and accessibility to take alt text seriously. Vercel feels so strongly about this that the alt attribute is required with next/image.
Alt text helps the following visitors understand your content:
- Google’s crawler
- non-sighted people
- visitors with very slow connections
- visitors for whom the image fails to load
Harvard has a great guide on writing good alt text; here are their brief tips:
- Keep it short and descriptive, like a tweet.
- Don’t include “image of” or “photo of”.
- Leave
alttext blank (alt="") if the image is purely decorative
Most of your alt text will probably be written by your client or content team, so it’s a great idea to share this resource with them to help them understand.
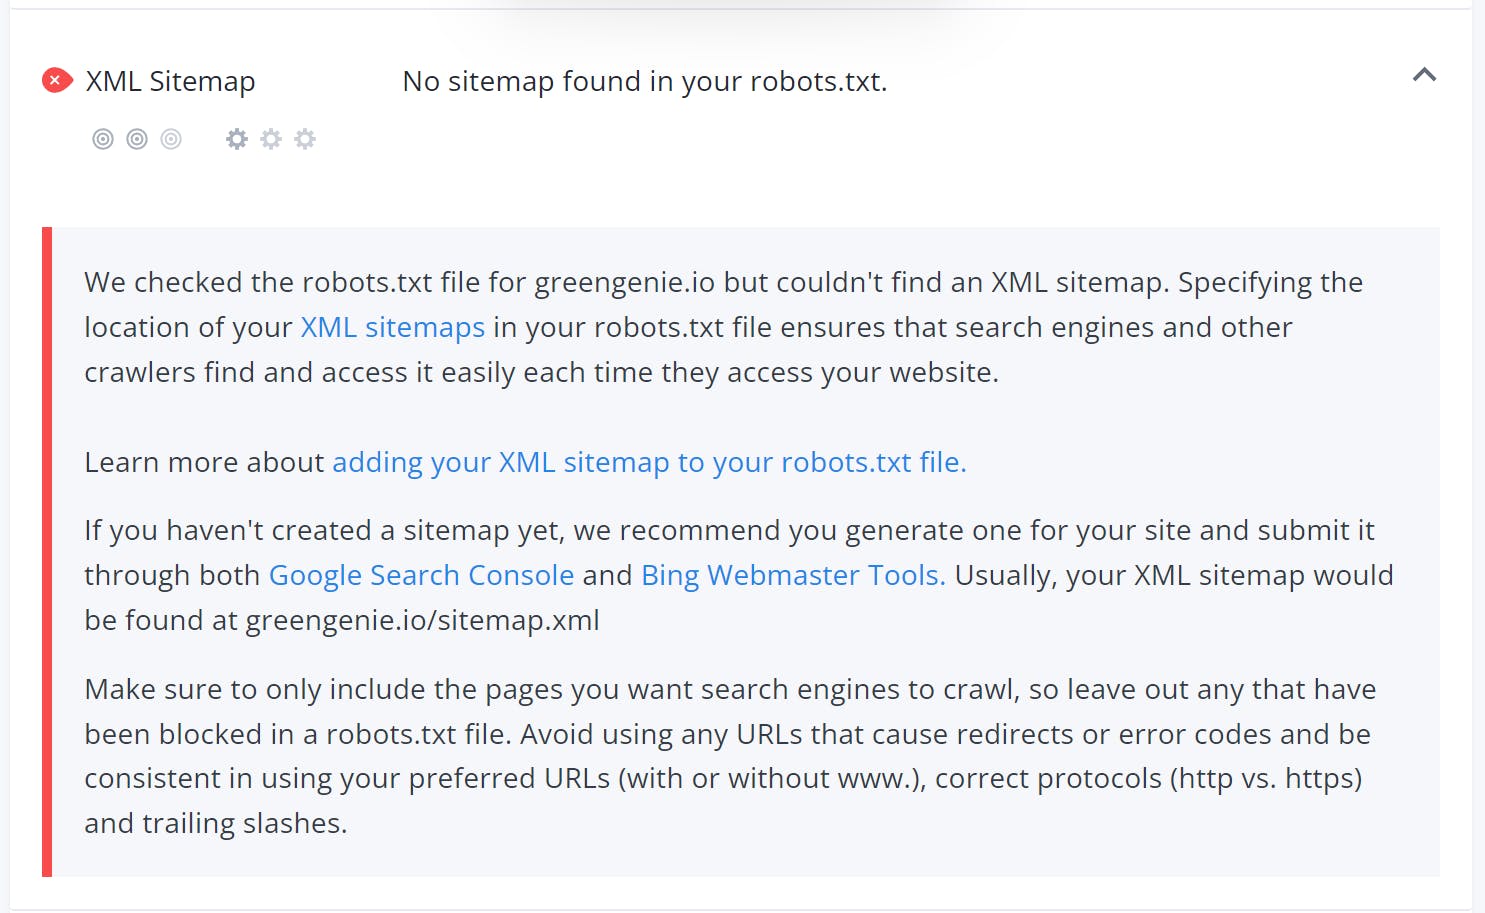
XML sitemaps
An XML sitemap is a file that gives search engines a structured list of all your website’s URLs. It’s like a little itinerary for Google so it doesn’t miss anything while crawling the website.
It might not help with small sites, since Google can easily crawl your site through the few hyperlinks you have. But as your site grows, the sitemap can help Google find and index all of your pages quickly and easily.
Many SEO tools will reduce your score if they don’t find an XML sitemap. Add it to your site to make your content team more confident in the site’s technical SEO.
Here’s the sitemap for the Prismic blog as an example.
To build the sitemap for Green Genie, we’ll add a file called sitemap.xml.js in our pages/ directory.
We want to collect all the data for our pages in order to build our list, so we’ll fetch what we have from Prismic. Then we’ll map across that data in a template literal to create the XML output.
import { createClient } from "../prismicio";

// Your site's root URL
const EXTERNAL_DATA_URL = "https://greengenie.io";

function generateSiteMap(pages) {
	// A helper function to generate the XML string.
	// Customize this to match your site's structure and needs
  return `<?xml version="1.0" encoding="UTF-8"?>
   <urlset xmlns="http://www.sitemaps.org/schemas/sitemap/0.9">
     <url>
       <loc>${EXTERNAL_DATA_URL}</loc>
     </url>
     ${pages
       .map(({ uid }) => {
         return `
      <url>
          <loc>${`${EXTERNAL_DATA_URL}/${uid}`}</loc>
      </url>
    `;
       })
       .join("")}
   </urlset>
 `;
}

function SiteMap() {
  // getServerSideProps will do the heavy lifting and build the XML file.
}

export async function getServerSideProps({ res }) {
  const client = createClient();

  // We fetch our pages first
  const pages = await client.getAllByType("page");

  // We generate the XML sitemap with the pages and blog posts data
  const sitemap = generateSiteMap(pages);

  res.setHeader("Content-Type", "text/xml");
  // we send the XML to the browser
  res.write(sitemap);
  res.end();

  return {
    props: {},
  };
}

export default SiteMap;
You can find more information on XML sitemaps with Next.js in the documentation.
Robots.txt
Robots.txt is a little file that gives permissions to search engine crawlers that visit the site. It tells them which pages can and cannot be indexed, giving you the power to remove certain pages from Google search.
Why would you ever want to block Google from indexing a page? Anything that might be private or require authentication is good to block Google from, if only to avoid confusing the bot or having it index low quality info.
Even if you want Google to index your entire site, it’s useful to have in order to explicitly say so. You also tell Google the URL for your sitemap inside your robots.txt file, so it’s very useful to have.
Like a sitemap, many SEO tools will reduce your score if you don’t have a robots.txt file.
We don’t need to change this content much, so we’ll just add a robots.txt file to our public/ directory.
Here’s my robots.txt file that allows all robots to access everything (*), blocks nothing, and provides our sitemap:
User-agent: *
Disallow:

Sitemap: https://www.greengenie.io/sitemap.xml
There are a lot of potential combinations so check out an example list like this for a deeper dive into robots.txt.
Robots metatag
Similar to the robots.txt file, the robots metatag tells search engine robots what pages they are allowed to crawl. The main difference is the robots metatag is an HTML tag that you can put on individual pages, giving you page-specific control for how search engines treat your website.
WooRank's SEO Analysis tool, which we'll use later to check our page, says, "Although not necessary to have on each page, it is highly recommended to include robots tags so you can control how your content is delivered."
This snippet tells all search engine crawlers to both index this page and follow the links on this page to other pages.
<Head>
  <meta name="robots" content="index,follow">
</Head>
This is the default behavior, so you don’t need to include it in your metadata, but I recommend it.
The robots metatag is so specific that you could change its value programmatically, where that’s much more difficult with robots.txt file. So if you wanted to block a specific blog post from getting indexed, while leaving other posts unaffected, reach for the robots metatag.
If you need other page-specific behavior, you can learn more about robots metatags in Next.js' guide and Google's documentation.
Open graph images
Open graph images are what you see whenever you share a link on Twitter, Facebook, Slack, and many other places.
While they don’t contribute directly to SEO, they can still have an effect. Links with Open Graph (OG) images catch the eye more than those without, resulting in more clicks on social media. If someone clicks that link on Twitter and then links to your site from theirs, Google considers that a “backlink” and will reward your site for it.
Plus, we put Open Graph metatags in next/head with the other metadata, so we might as well handle it while we’re here.
In case you’re wondering, Open Graph images are 1200px × 630px. I’m going to be using the following image:
<Head>
  <meta property="og:title" content={page.data.meta_title} />
  <meta property="og:url" content="https://www.greengenie.io" />
  <meta property="og:image" content={page.data.og_image.url} />
  <meta property="og:description" content="Reduce your carbon footprint and help fight climate change with GreenGenie. Our app makes it easy and affordable to purchase verified carbon offsets that fund renewable energy and conservation projects around the world. Join our community of conscious consumers and make a meaningful impact on the environment today." />
</Head>
If you have a single Open Graph image for the whole site you can put it in _app.js or a layout component. If you have lots of images for different pages or blog posts, you’ll want to define Open Graph metadata per page.
You can check and debug these on Facebook’s tool and Twitter’s tool.
Here’s our finished project!
Checking our Next.js site’s SEO
There are a bunch of tools that we can utilize in order to check our technical and content SEO. Some are simple and just check whether or not particular metatags are present, while others analyze the content and let you know how well you’ll do against a particular search query.
Lighthouse and PageSpeed Insights
Google Chrome’s built-in Lighthouse is a good first step to make sure you didn’t miss anything glaring in terms of technical SEO. To run it, open up Chrome DevTools and click the Lighthouse tab. There’s also a web version called PageSpeed, which is slightly different.
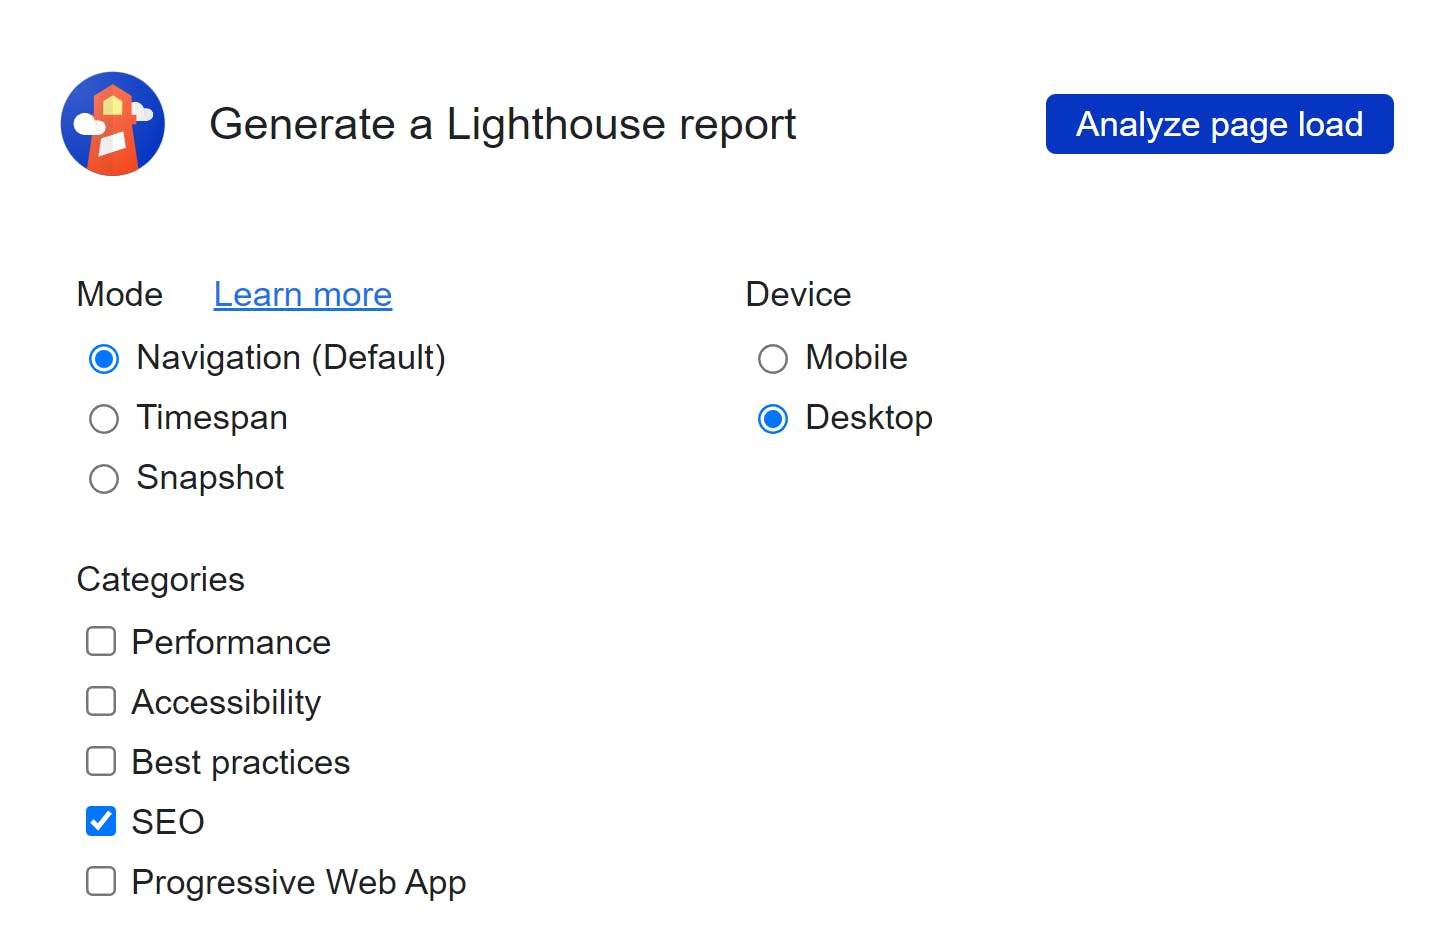
You can check as many categories as you’d like to test, but for this tutorial, we’re just assessing the SEO. Click “Analyze page load,” and Lighthouse will test your page on 15 different metrics.
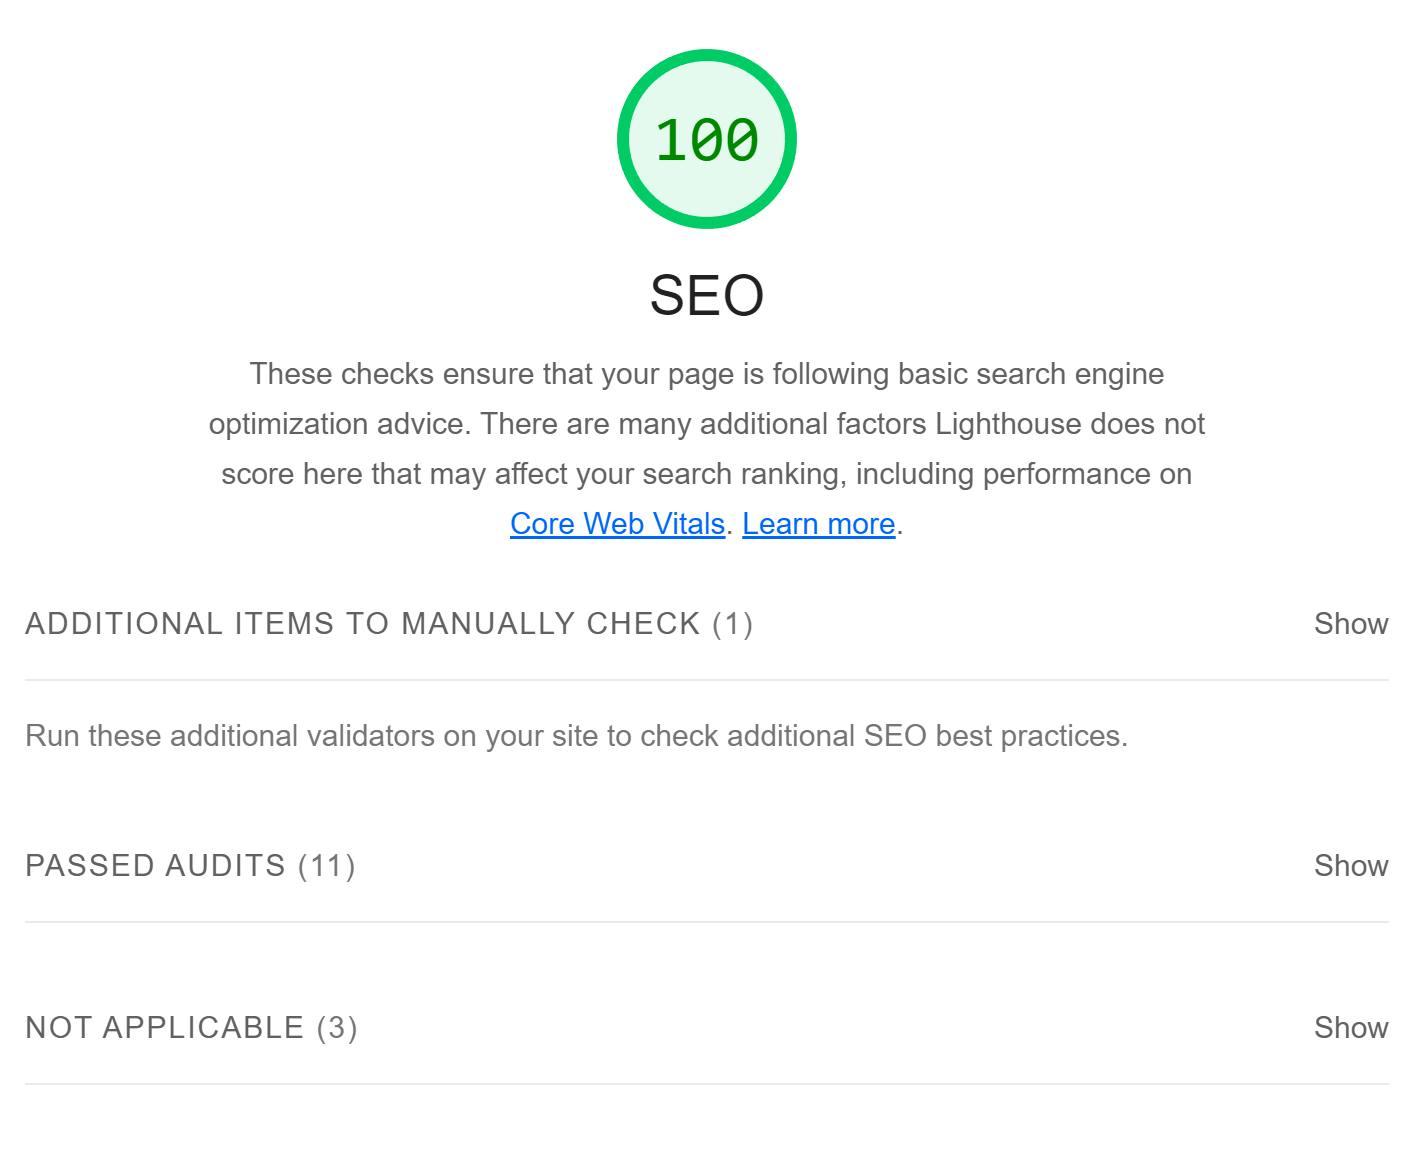
Lighthouse is just checking to see if these things are present and valid:
![An expanded "Passed Audits" section from a Lighthouse SEO report that shows the following passed audits: has a <meta name = 'viewport'> tag with width or initial-scale; document has a <title> element; document has a meta description; page has successful HTTP status code; links have descriptive text; links are crawlable; page isn't blocked from indexing; robots.txt is valid; image elements have [alt] attributes; document has a valid hreflang; document avoids plugins.](https://images.prismic.io/prismic-main/ODE4M2M0MTgtMGExYS00MWViLWFiYzEtZDQwOTI0NjYwMjNl_31a8ed29-de90-4c04-a101-0db84d23a784_lighthouse-seo-check.png?auto=compress%2Cformat&rect=0%2C0%2C1414%2C1421&w=3840&fit=max)
Woorank’s SEO and website analysis tool
A more in-depth tool for checking the overall SEO of your website is Woorank's SEO and Website Analysis Tool. Here is just some of what it analyzes:
- On-page SEO - Content, title tags, meta descriptions, headers, and more for potential optimization
- Mobile optimization - Are tap targets and font size big enough on mobile? (Among other things.)
- Usability - Site load time, layout shift, etc.
- Technical SEO - XML sitemap, robots.txt, URL structure, and JSON-LD.
- Backlink analysis - What sites are linking to this page and how quality are they?
- Social Media - Are people engaging with your content on Twitter, Facebook, etc.?
The best part? It's as easy as installing a Chrome plugin and following a checklist.
Anywhere your site is lacking or can be improved, you'll get helpful feedback with a detailed explanation and resources on how to make changes. For example, here's the feedback we get for a missing Sitemap:
You can also check out SEOquake for a similar tool that also gives you feedback in Google search results and other places.
Scaling SEO and GEO Content with Next.js and Prismic
The technical SEO optimizations we've covered ensure your Next.js site is built on a solid foundation. But as some experts suggest, search is evolving toward conversational AI queries (averaging 25 words vs. traditional 6-word searches), teams face a new challenge: creating enough high-quality content to capture the expanding long tail of search queries.
Prismic's AI landing page builder for SEO and GEO works seamlessly with Next.js to automate the creation of hundreds of optimized landing pages from a single template and CSV file. The builder generates content that's optimized for both traditional search engines (SEO) and AI-powered systems (GEO), without sacrificing brand quality or consistency.
By leveraging Next.js's technical SEO benefits, such as fast rendering, automatic code splitting, and built-in optimization features, alongside Prismic's SEO and GEO landing page builder, you can enhance your organic visibility without needing additional resources for development or copywriting.
Explore the SEO and GEO landing page builder
Using an excellent SEO library: next-seo
There’s a library called next-seo that helps with some of the SEO concepts we’ve covered here. It’s great for structured data, and it provides an API for your content so that you know you’re not missing anything or getting something wrong. It also helps you cut down on boilerplate and configuration issues.
next-seo has a way of setting almost everything we've covered so far. Titles, descriptions, Open Graph images, JSON-LD, robots metatags, and more.
Like next/head, next-seo brings whatever we place in it up to the <head> of our HTML, so we can use it anywhere we need it.
Default SEO
You can add default SEO values for all of your pages with the DefaultSEO component. This ensures there's always something filled out, but still lets you easily override the values from any page.
If you use it, place it in _app.js above <Component /> for it to work properly.
// pages/_app.js

import Link from "next/link";
import { DefaultSeo } from "next-seo";
import { PrismicProvider } from "@prismicio/react";
import { PrismicPreview } from "@prismicio/next";
import { repositoryName } from "../prismicio";
import "@/styles/globals.css";

export default function App({ Component, pageProps }) {
  return (
    <>
      <DefaultSeo
      title="GreenGenie"
      description="Reduce your carbon footprint with GreenGenie, the easy and affordable way to offset your carbon emissions."
      />
      {/* ... Other components and <Component /> go here */}
    </>
  );
}
titleTemplate
One of my favorite features of next-seo is the titleTemplate. It's a great feature that handles the common use case where you combine the current page title with the brand name. For example: "About us | GreenGenie." Your editors shouldn't have to enter "| GreenGenie;" that should happen automatically.
If we combine next-seo's titleTemplate and defaultTitle properties, we've got an easy way to handle our title across the site. In our _app.js file, we'll remove our title and instead use these two properties:
// _app.js

<DefaultSeo
  titleTemplate="%s | GreenGenie"
  defaultTitle="GreenGenie"
  {/* ... */}
/>
next-seo will replace the %s with our page title. If we don't provide a title, like on our homepage, the defaultTitle will be used instead.
Then we'll set the title property on individual pages:
// [uid].js

<NextSeo
  title={page.title}
/>
Note: You don't need to put <NextSeo /> inside next/head; it automatically moves its output to the <head> of your document.
It's a robust tool, so refer to the next-seo docs for detailed information about everything you can accomplish through it.
SEO for Next’s app directory
If you’re using the new Next.js app/ directory, you’re going to need to handle SEO differently than our previous implementations. All of the recommendations and metatags remain the same, we just define them in a different way than with the pages/ directory.
When using React Server Components you can declare your metadata statically or dynamically.
If your content is going to remain static/hard-coded, you can just export a metadata object from your page.
export const metadata = {
  title: 'GreenGenie',
  description: 'Reduce your carbon footprint with GreenGenie',
};

export default function Page() {
  return '...'
}
If you need dynamic metadata based on fetched content, you’ll instead export a generateMetadata function from your page file.
export async function generateMetadata({ params }) {
  const client = createClient({ previewData });
  const page = await client.getSingle("homepage");

  return { title: page.data.meta_title, description: page.data.meta_description }
}

export default async function Page({ params }) {
  const client = createClient({ previewData });
  const page = await client.getSingle("homepage");
  // ...
}
For more details on the full Metadata API, check the Next.js Metadata docs. Like next-seo there’s a way to handle just about all potential SEO needs; you just need to find the right property.
Become a technical SEO ninja


Final thoughts
In this guide we covered everything that's needed to make you a Next.js SEO expert. We touched on what Next.js offers for top-notch page performance and got hands-on and improved the SEO of a website, explored next-seo and the new app directory, and lots more.
It's crucial to remember that technical SEO is only one half of the equation. Content is king on the web, and to rank high you'll need to match your excellent technical SEO with top quality content. That's where Prismic becomes your most valuable tool, empowering your editors to quickly create and ship on-brand webpages. You'll build reusable page sections called Slices as components in your code, using all of the SEO best practices you've learned. Your content team will independently use those Slices as building blocks to assemble endless landing pages, blog posts, product pages, and more! Don't let all your excellent technical SEO go to waste. Make sure your content team is prepared and empowered by their CMS or page builder.
Keep in mind that SEO is a continuous process. You won't get a top rank overnight, and on the flip side, if you're #1 for a search term, you won’t be forever without some effort. Over the years you'll need to keep optimizing your site, stay up-to-date on the latest search engine updates, and routinely scan with SEO tools. Also remember the content strategy that ranks well today might not work after Google's next big update.
But for today, rest easy that you’ve implemented excellent technical SEO as the foundation for that future in your Next.js app.


