
As a web developer, you've spent a lot of time learning how to create beautiful web applications by writing JavaScript, HTML, and CSS. Remotion is a framework of libraries and tools built on top of React and it lets you use your hard-earned web dev skills to create videos using code, such as:
- Create a slideshow with your Instagram's top photos and videos
- Send a personalized video when someone buys something in your Shopify store
- Make a generative art collection and sell them as NFTs
- Remake Spotify's Wrapped campaign (top score effort!)
We're going to use Remotion to create a video that fetches contributions from a GitHub profile and shows them in a video.

At the end, you'll have a project that generates a video with updated data every week.
You'll learn:
- How to set up a Remotion project with the command line interface (CLI).
- Use the Remotion Preview tool to view your video as you're coding.
- Learn what deterministic code is and why it's important.
- And, see how to fetch data from the GitHub API to dynamically change the contents of your video.
Not signed up for The Optimized Dev?
Staying on the leading edge of web development just got easier. Explore new tech with a fun, scaffolded coding challenge that lands in your inbox once a month.

Set up a Remotion project
Key Takeaway: How to create a new video using the Remotion CLI
The easiest way to get started with setting up a Remotion project is to follow the installation instructions on Remotion's docs. At the time of writing the steps are are:
- Ensure that you're using Node.js version
14.0.0or higher. Typenode -vin your console to find out. - Make sure you have FFMPEG installed on your computer. You can check this by running the command
ffmpegin your command line. If it's installed you should see the FFMPEG information for your machine printed to the console. Otherwise, follow these instructions.
With that out of the way, let's run this command in the console.
npm init videoYou'll be asked to name your video and choose a template. In this challenge, we'll be using the Blank template, but feel free to explore the other templates later.
When the command finishes you should have a fresh Remotion project for you to work in. Let’s change directories to the newly created video project. I put mine in my-video so I’ll run:
cd my-videoPreview your video
The first I want to show you is the Remotion Preview tool. I'll refer to this as "preview," or "preview tool" throughout the rest of the article.
It's conveniently added as the NPM start script so let's run it.
npm startIf the preview tool didn't automatically open in a browser window, take a look at the URL printed in the console after you ran the above command.
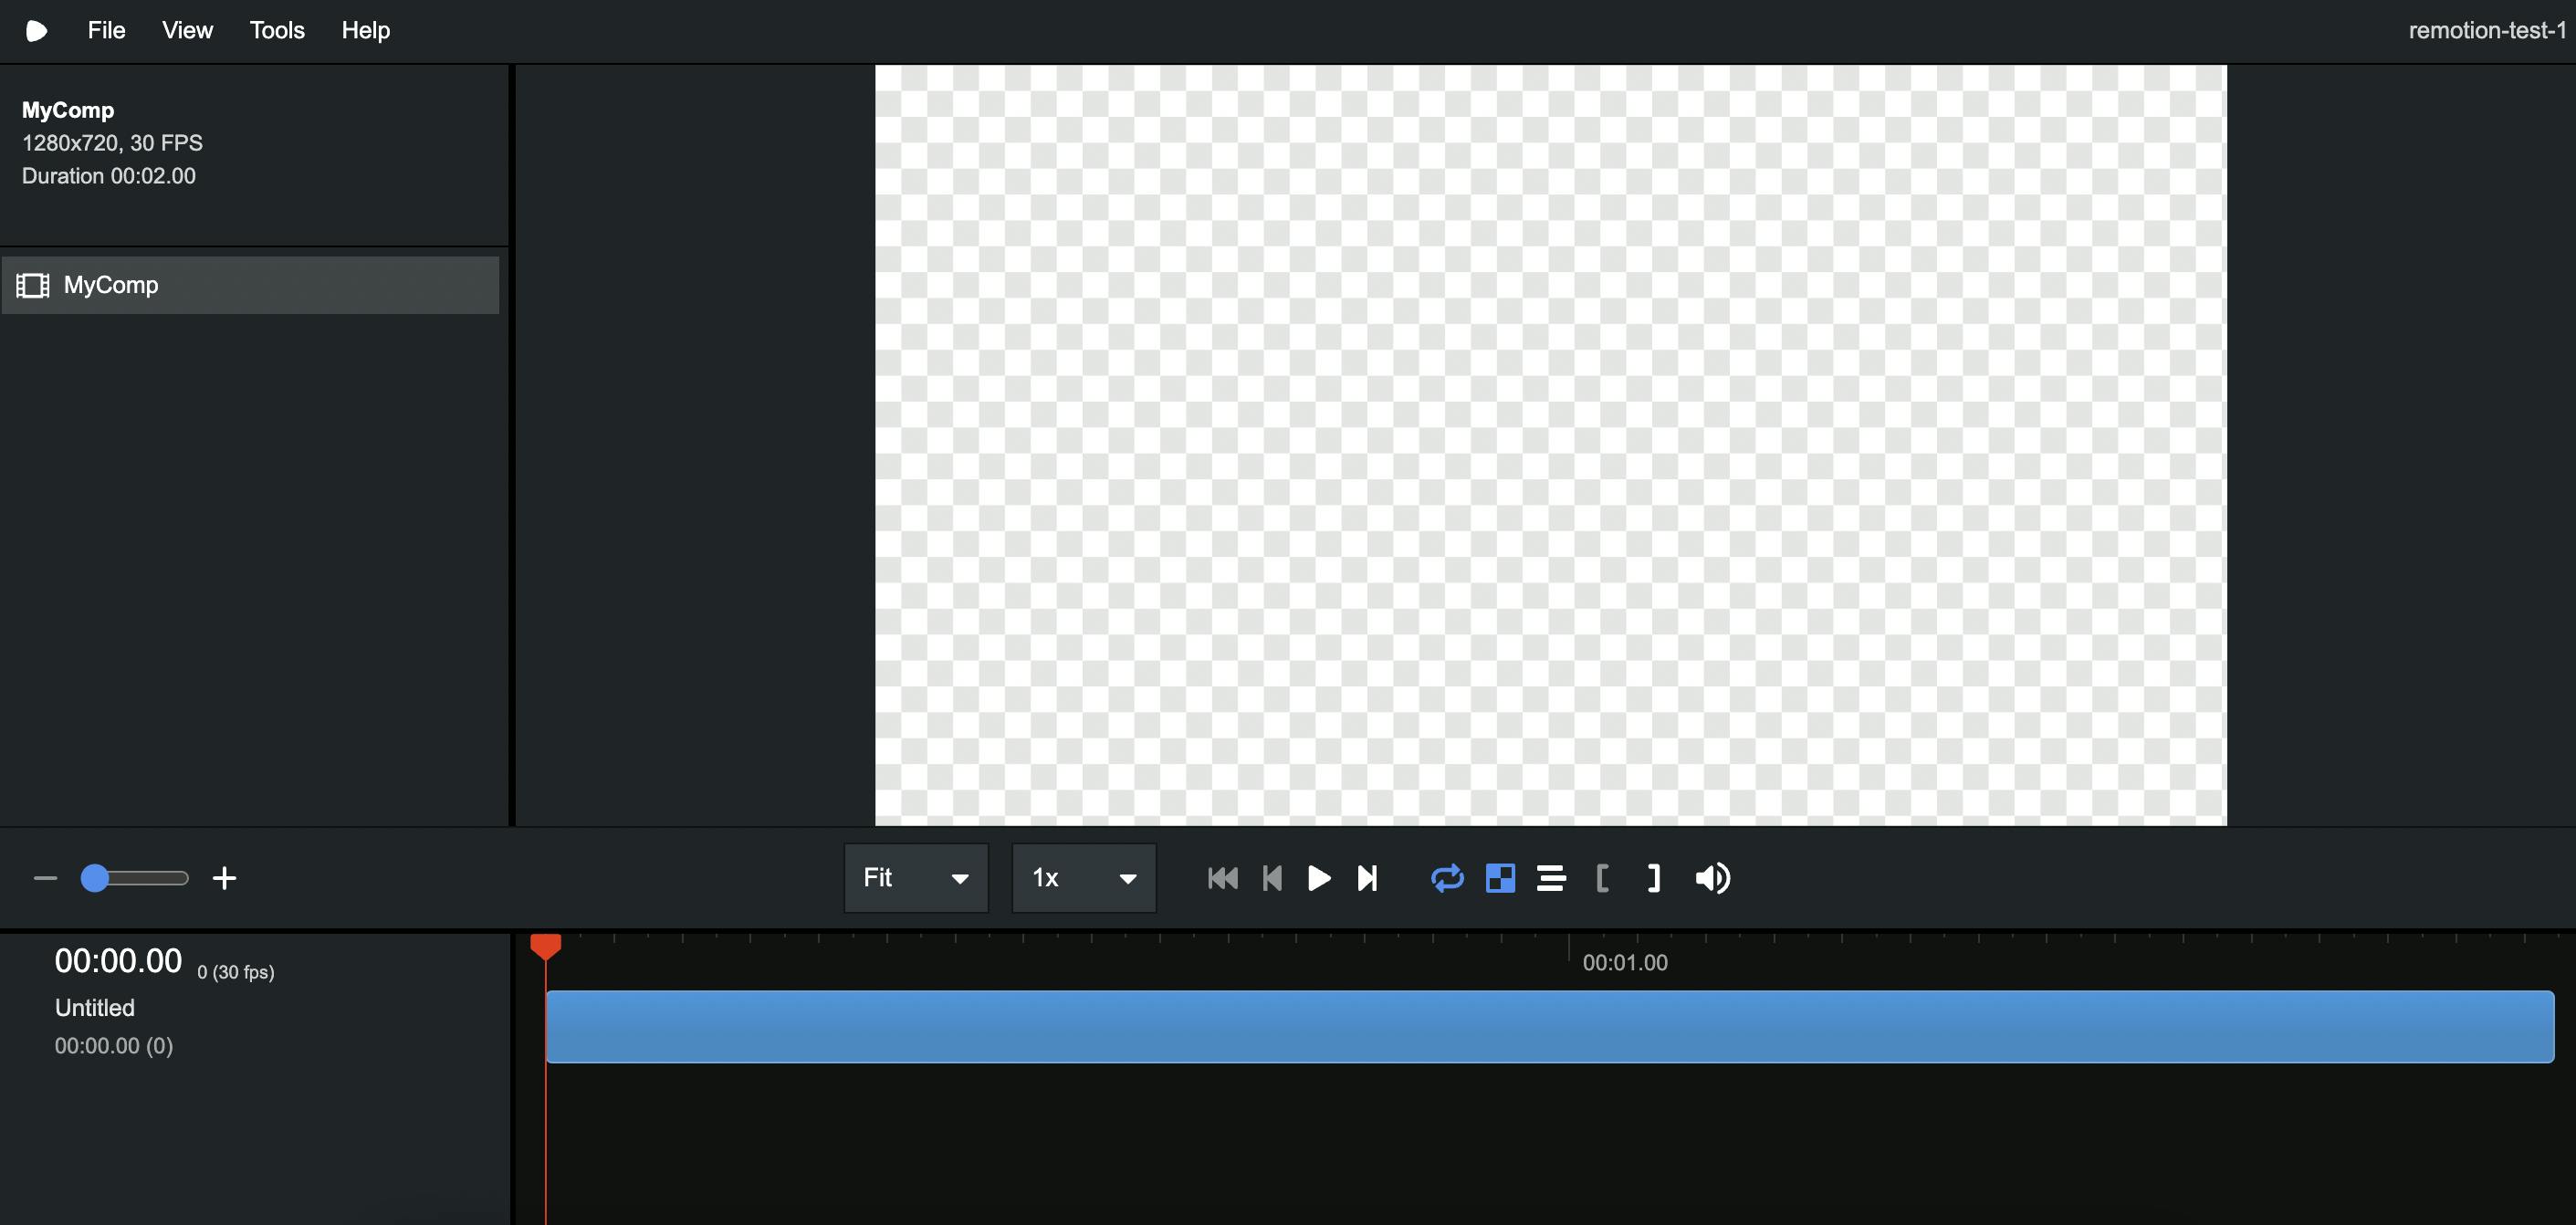
The preview tool lets you interact with the Remotion video in your project. It's the main developer tool that you'll use while creating your video. It'll automatically update when you make a change in the source code. We'll explore some of its basic functions now.
Press the play button in the lower part of the Preview tool. You should see the time indicator (the "playhead") move across the bottom of the browser window.
"But," you protest, "how much fun is this? The video is blank!"
And you're right. And this is a very boring video. And if it's the last thing we do we're going to fix that!
(It's actually not the last thing we'll do, it's the next thing, and after that we'll do many more things dammit!)
Project tour
Let's take a look at the files we will find in a base Remotion project, what they contain, and what they do.
There are three files in the src folder:
index.tsRoot.tsxComposition.tsx
In index.ts, we see:
// src/index.ts

import {registerRoot} from 'remotion';
import {RemotionRoot} from './Root';

registerRoot(RemotionRoot);
registerRoot() is a function that tells Remotion where the root is. Just like how ReactDOM.createRoot() creates the root of a React project, registerRoot() creates the root of a Remotion project.
Then we import the component that contains our root, RemotionRoot.
Finally, we use registerRoot(RemotionRoot) to register the root. All of this should feel very familiar if you've used React.createRoot().
In the Root.tsx file we see:
// src/Root.tsx

import {Composition} from 'remotion';
import {MyComposition} from './Composition';

export const RemotionRoot: React.FC = () => {
  return (
    <>
      <Composition
        id="MyComp"
        component={MyComposition}
        durationInFrames={60}
        fps={30}
        width={1280}
        height={720}
      />
    </>
  );
};
Here, we export a component containing one or more <Composition/> components. Right now there's only one.
When you read "composition" you might as well think "video." A composition will become a video when you tell Remotion to export it. Each <Composition/> registers a video in Remotion, and this allows you to do two important things:
- See your video in the preview tool.
- Export it with the
npx remotion render* command.
* Have a look at package.json. The build script uses remotion render to export your video.
You can add as many <Composition/>s as you want but only here in Root.tsx. Your video will be registered by its composition id, and if we look at our file now, there's only one composition, and it has id="MyComp".
Change the id to "MyGreatVideo" and take a look in the Preview tool. MyGreatVideo now shows up in the left panel!
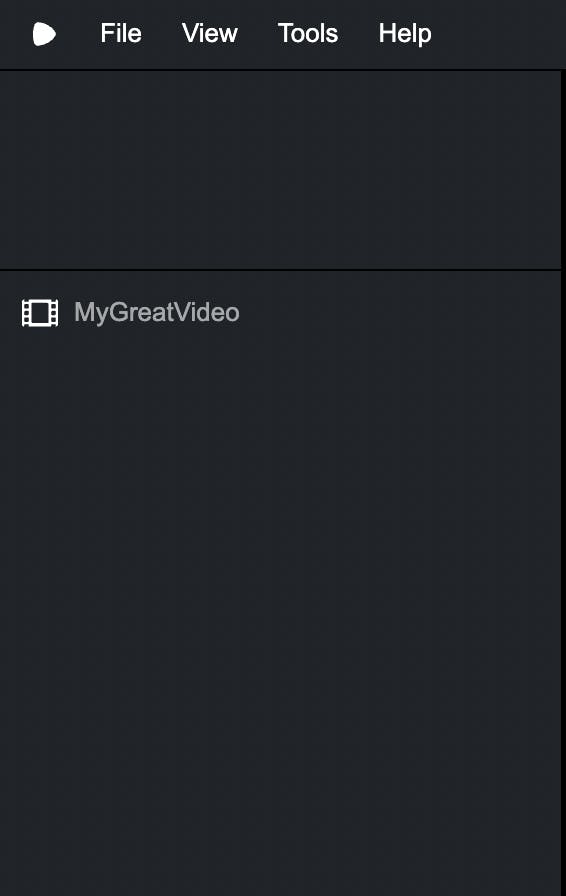
There's another important prop in <Composition/>, and that's the component prop. This prop tells Remotion what React component to use when exporting MyGreatVideo or displaying it in the preview tool. We're using MyComposition from the file Composition.tsx. We're going to spend a lot of time in that file soon!
The rest of the props of <Composition/> are other settings for your video. Have a look, but for now, let's leave those with their default values.
The final file, Composition.tsx, contains everything that'll show up in your video. It's your canvas. On it, you shall paint your masterpiece of motion!
// src/Composition.tsx

export const MyComposition = () => {
	return null;
};
And right now your masterpiece of motion is blank ...
Frame-by-frame animation with useCurrentFrame()
Key Takeaway: How to animate with useCurrentFrame().
Let's fix this blank canvas by adding something. You can use your React skills to add whatever you want.
I suggest using your sense of gravitas here to construct a deeply moving tribute to one of the masters of cinema.
Place the text Hello, Coppola! centered in the middle of the video in Composition.tsx. You can replace the contents of the file with the following:
// src/Composition.tsx

export const MyComposition = () => {
  return (
    <div
      style={{
        width: '100%',
        height: '100%',
        display: 'flex',
        justifyContent: 'center',
        alignItems: 'center',
        fontSize: 64,
      }}
    >
      Hello, Coppola!
    </div>
  );
};
Better, but still no motion. That won't catch anyone's attention...
wiggle wiggle
Good idea. Let's get wiggly with it.
Add the following changes to make our greeting wiggle horizontally.
// src/Composition.tsx

+ import {useCurrentFrame} from 'remotion';

export const MyComposition = () => {

+  const frame = useCurrentFrame();

  return (
    <div
      style={{
        width: '100%',
        height: '100%',
        display: 'flex',
        justifyContent: 'center',
        alignItems: 'center',
        fontSize: 64,
+        transform: `translateX(${Math.sin(frame)}px)`,
      }}
    >
      Hello, Coppola!
    </div>
  );
};
Now hit play in the preview tool. Finally, something's happening!
But... how?
A video is simply a series of pictures. The pictures are almost the same, but not exactly. Displaying the pictures one after another will create an illusion of motion.
You can prove that I'm not lying by using your smartphone's slow-motion effect — film your computer screen while playing a YouTube video and then have a look at the video. What you'll see is one picture, then another picture, then another...
Fun fact
You've now used your phone to prove that a video on your computer is just an iLLusIoN oF MotIOn, and you've done it by watching a video, AN ILLUSION OF MOTION, on your phone.
InCEpTionnnnnnnnnn...
Each picture is called a frame. And by now you should imagine that a video is just a series of frames.
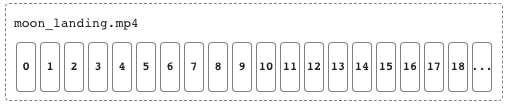
Remotion can tell us what the current frame number is with the function useCurrentFrame(), which returns:
0for the first frame,1for frame number two,2for the third frame,- etc...
Then it's up to us to draw (render) something to the screen. When the rendering is done Remotion takes a picture. This process is repeated for each frame. And when we're done, Remotion stitches the pictures together to create a video.
Let's render the frame number in the component.
// src/Composition.tsx

import {useCurrentFrame} from 'remotion';

export const MyComposition = () => {
  const frame = useCurrentFrame();

  return (
    <div
      style={{
        width: '100%',
        height: '100%',
        display: 'flex',
        justifyContent: 'center',
        alignItems: 'center',
        fontSize: 64,
        transform: `translateX(${Math.sin(frame)}px)`,
      }}
    >
      Hello, Coppola!
+      {frame}
    </div>
  );
};
Note: Every now and then, saving your changes may cause the preview tool to display an error. Often a simple refresh will get things going again, so give that a try before debugging.
Now play the video in the preview tool. You'll see it starts at 0 and increases with time.
Animation is math
Key Takeaway: Placing things on the screen is just math. Especially trigonometry!
To see this, let's have a look at the code that makes the text wiggle.
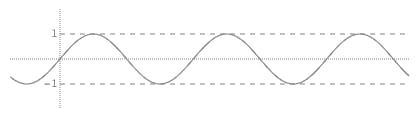
Math.sin(frame) will alternate between -1 to 1 as frame increases.
In order to see what's happening in our CSS transform, let's list some values for frame and see what the transform becomes.
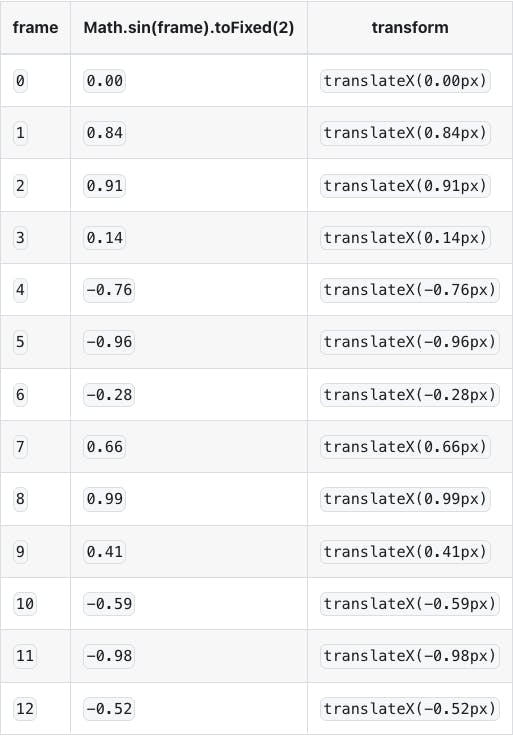
As you can see, translateX(frame) is alternating between positive and negative values, and the text moves back and forth between translateX(-1px) to translateX(1px).
Caution
Every animation in Remotion must be based on the value returned from useCurrentFrame().
This is a common source of confusion when doing frame-based animations. Many people will try using CSS animations or existing animation libraries, but this will almost never work.
A major issue we have at the moment is that the animation is very subtle. It's possible to ignore our Very Important Greeting™.
Let's fix that by rocking it back and forth between -5deg and 5deg, one time per second.
Since we want to animate things with a frequency of one second, we can use useVideoConfig() to get the fps ("frames per second") and use it to calculate the rotation for each frame.
If we divide frame by fps we get the number of seconds since the start of the video.
// src/Composition.tsx

//import useVideoConfig so we can use it below
- import {useCurrentFrame, useVideoConfig} from 'remotion';
+ import {useCurrentFrame} from 'remotion';


export const MyComposition = () => {

	const frame = useCurrentFrame();

	//get fps and then divide frame by it
+	const {fps} = useVideoConfig();
+	const seconds = frame / fps;

	return (
	  <div
		style={{
		  width: '100%',
		  height: '100%',
		  display: 'flex',
		  justifyContent: 'center',
		  alignItems: 'center',
		  fontSize: 64,
		  transform: `translateX(${Math.sin(frame)}px)`,
		}}
	  >
		Hello, Coppola!
-		{frame}
	  </div>
	);
  };
Remember the shape of a sine wave?
It's a wave that repeats itself every 2 * Math.PI.
const ONE_REPETITION = 2 * Math.PI;If we multiply seconds by ONE_REPETITION and pass it to Math.sin() we get a sine wave that repeats itself every second.
const rotation = Math.sin(seconds * ONE_REPETITION);Math.sin() returns a value between -1 and 1 ... but we want to rotate between -5deg and 5deg.
We can "scale" the return value by multiplying with the size we want.
5 * Math.sin()This will result in a value that alternates between -5 and 5.
Let’s change the last code block to this:
const rotation = 5 * Math.sin(seconds * ONE_REPETITION);And putting it all together we get:
// src/Composition.tsx

import {useCurrentFrame, useVideoConfig} from 'remotion';

+ const ONE_REPETITION = 2 * Math.PI;

export const MyComposition = () => {
  const frame = useCurrentFrame();

  const {fps} = useVideoConfig();
  const seconds = frame / fps;
+  const rotation = 5 * Math.sin(seconds * ONE_REPETITION);

+  const wiggling = `translateX(${Math.sin(frame)}px)`;
+  const rocking = `rotate(${rotation}deg)`;

  return (
    <div
      style={{
        width: '100%',
        height: '100%',
        display: 'flex',
        justifyContent: 'center',
        alignItems: 'center',
        fontSize: 64,
_        transform: `translateX(${Math.sin(frame)}px)`,
+        transform: `${wiggling} ${rocking}`,
      }}
    >
      Hello, Coppola!
    </div>
  );
};
What I want you to remember from doing the above exercise is this:
- Animations in Remotion are based on the value returned from
useCurrentFrame()(the “frame”). This means that you can't use CSS animations or existing animation libraries, but you must useuseCurrentFrame()to control your own animation. - Helper functions like
useVideoConfig()anduseCurrentFrame()are the building blocks of Remotion. They allow you to create animations that are in sync with the frames of the video.
Creating the example video with HTML and CSS
OK, I admit this isn't a very exciting animation. Let's spice it up a bit by adding data fetching. But first, let's get a layout in place.
I've prepared some HTML and CSS for the rest of this guide so we can focus on the Remotion specifics.
Create a file called styles.module.css in the src folder and paste the following code into it:
/* src/styles.module.css */

.background {
  background-color: #ebedf0;
}

.avatar {
  position: absolute;
  left: 3.5rem;
  top: 2.5rem;
  width: 14rem;
  height: 14rem;
  border-radius: 50%;
}

.username {
  position: absolute;
  left: 3.5rem;
  top: 17rem;
  width: 14rem;
  text-align: center;
  font-weight: bold;
}

.contributionsWrapper {
  position: absolute;
  right: 4.25rem;
  display: flex;
  flex-direction: column;
  justify-content: center;
  width: 15rem;
  height: 100%;
}

.contributionsTitle {
  margin: 0;
  padding: 0;
  font-size: 1.5rem;
  font-weight: bold;
  padding-bottom: 0.25rem;
}

.contributionsSubtitle {
  margin: 0;
  padding: 0;
  padding-bottom: 1rem;
  opacity: 0.4;
}

.contributionItems {
  display: grid;
  gap: 0.5rem;
  margin: 0;
  padding: 0;
}

.contributionItem {
  display: grid;
  grid-template-columns: 1fr max-content;
  gap: 1rem;
  align-items: center;
  margin: 0;
  padding: 0;
}

.contributionBadge {
  width: 1.5rem;
  height: 1.5rem;
  border-radius: 0.25rem;
  background-color: #ebedf0;
  display: flex;
  justify-content: center;
  align-items: center;
  box-shadow: 0 0 0 0.125rem rgba(27, 31, 35, 0.1);
}

.contributionWeekday {
  font-size: 1rem;
}
Then replace the contents of Composition.tsx with this:
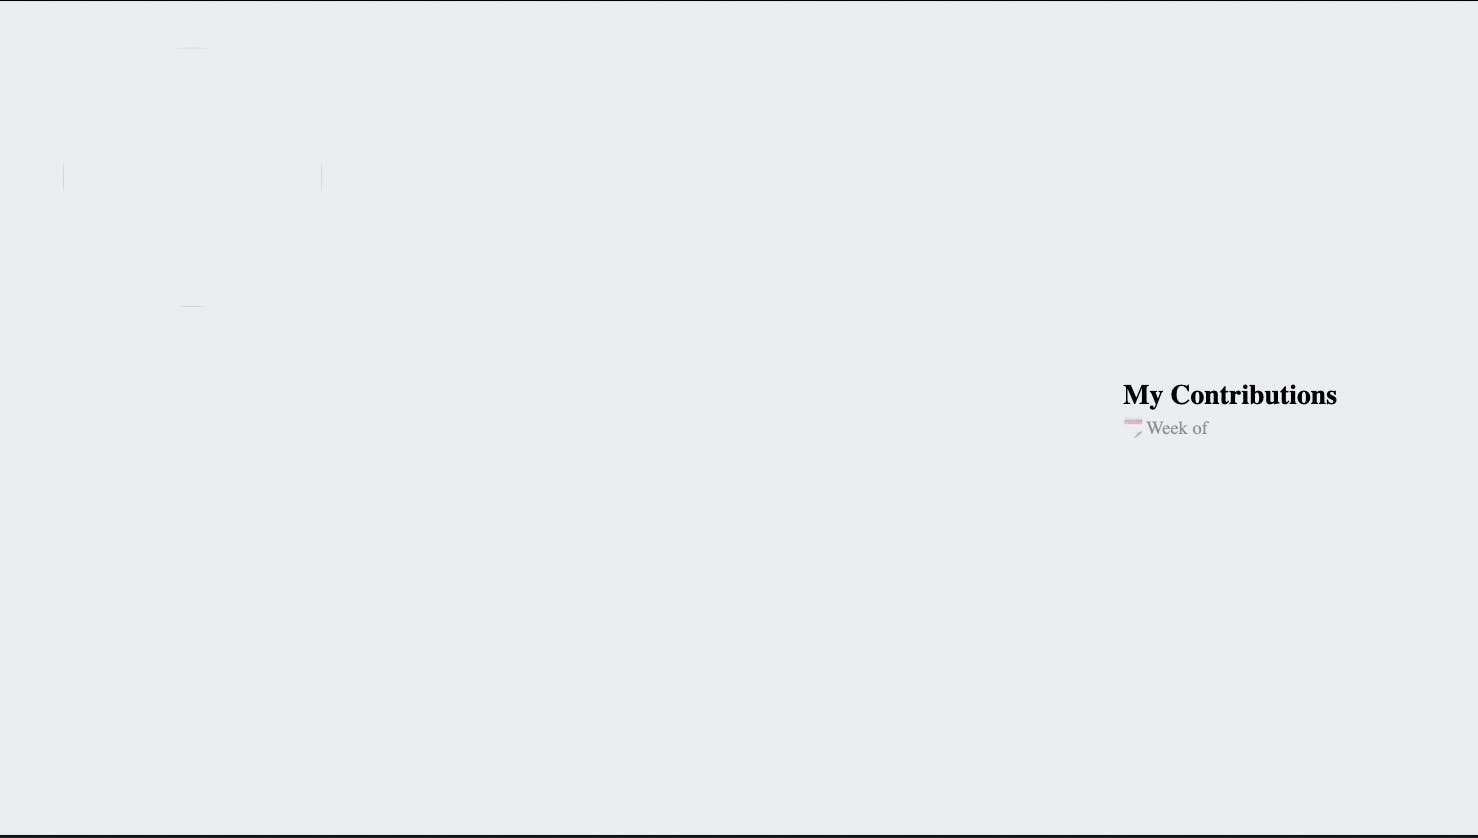
// src/Composition.tsx

import {useState} from 'react';
import {AbsoluteFill, Img} from 'remotion';
import styles from './styles.module.css';

// Weeks start on Sunday in the GitHub API response
const NUMBER_TO_WEEKDAY = [
  'Sunday',
  'Monday',
  'Tuesday',
  'Wednesday',
  'Thursday',
  'Friday',
  'Saturday',
];

export const MyComposition = () => {
  const [data, setData] = useState<any>(null);

  return (
    <>
      <AbsoluteFill className={styles.background} />

      <AbsoluteFill>
        <div className={styles.contributionsWrapper}>
          <h1 className={styles.contributionsTitle}>My Contributions</h1>
          <p className={styles.contributionsSubtitle}>
            🗓 Week of {data?.contributionsByDay[0]?.date}
          </p>

          <ul className={styles.contributionItems}>
            {data?.contributionsByDay.map((day, i) => (
              <li key={day.date} className={styles.contributionItem}>
                <div className={styles.contributionWeekday}>
                  {NUMBER_TO_WEEKDAY[day.weekday]}
                </div>
                <div
                  className={styles.contributionBadge}
                  style={{backgroundColor: day.color}}
                >
                  {day.contributionCount}
                </div>
              </li>
            ))}
          </ul>
        </div>

        <AbsoluteFill>
          <div className={styles.username}>{data?.username}</div>

          <Img src={data?.avatarUrl} className={styles.avatar} />
        </AbsoluteFill>
      </AbsoluteFill>
    </>
  );
};
Looking into the code you'll see two new Remotion components that we haven't seen before.
<AbsoluteFill/>is a component that fills the entire frame. It's useful for backgrounds and other elements that should be positioned absolutely. It's the same as a<div/>element withposition: absolute and top, left, right and bottomproperties set to0.<Img/>the same as the regular<img/>element, but it'll wait for the image to be loaded before rendering the frame.
Our composition now looks like this:
Next up, let's fetch and display some data!
Fetching data and waiting on things
Key Takeaway: You can tell Remotion to wait with delayRender() and to continue with continueRender(). By combining these we can fetch data and wait for it to arrive before rendering the video.
Let's fetch against GitHub's GraphQL API and read the contributions by the username passed into the function. I'm not going to go into detail about GraphQL or GitHub's GraphQL API here; instead, I'll just show you the code.
You'll need a personal access token to continue following along. You can create it here.
Choose Generate new token > Generate new token (classic) and give it the read:user scope.
Put the fetching code into a new file in the src directory called fetchUserContributions.ts:
// src/fetchUserContributions.ts

export type GithubData = {
  username: string;
  avatarUrl: string;
  contributionsByDay: {
    color: string;
    contributionCount: number;
    date: string;
    weekday: number;
  }[];
};

export async function fetchUserContributions(
  username: string,
  githubToken: string
): Promise<GithubData> {
  const {data} = await fetch('https://api.github.com/graphql', {
    method: 'POST',
    headers: {
      Authorization: `Bearer ${githubToken}`,
      'Content-Type': 'application/json',
    },
    body: JSON.stringify({
      query: `
        query {
          user(login: "${username}") {
            avatarUrl
            contributionsCollection {
              contributionCalendar {
                weeks {
                  contributionDays {
                    color
                    contributionCount
                    date
                    weekday
                  }
                }
              }
            }
          }
        }
      `,
    }),
  }).then((r) => r.json());

  // The last two elements of the array is
  // this week and the week before
  const lastTwoWeeks =
    data.user.contributionsCollection.contributionCalendar.weeks.slice(-2);

  // Show this week if it has data for all days
  // otherwise show last week
  const contributionsByDayForClosestCompleteWeek =
    lastTwoWeeks[1].contributionDays.length === 7
      ? lastTwoWeeks[1].contributionDays
      : lastTwoWeeks[0].contributionDays;

  return {
    username: `@${username}`,
    avatarUrl: data.user.avatarUrl,
    contributionsByDay: contributionsByDayForClosestCompleteWeek,
  };
}
That was a lot of code, but let's break it down.
- We're using the
fetchAPI to make a POST request to the GitHub API. - We're using
githubTokenin theAuthorizationheader to authenticate with the API. - The GraphQL query is a bit long, but it's just a way to tell the API what data we want. Note: this isn't the most beautiful way to work with GraphQL queries but it'll do for now.
- The response is a bit long too. We're only interested in the
avatarUrl,usernameandcontributionsByDayproperties so we pick them from the response and ignore everything else.
OK, enough about the code. Let's use it in our composition. Make the following changes in Composition.tsx.
// src/Composition.tsx

- import {useState} from 'react';
+ import {useEffect, useState} from 'react';
- import {AbsoluteFill, Img} from 'remotion';
+ import {AbsoluteFill, continueRender, delayRender, Img} from 'remotion';
+ import {fetchUserContributions, GithubData} from './fetchUserContributions';
import styles from './styles.module.css';

+ const GITHUB_TOKEN = process.env.GITHUB_TOKEN ?? '';
+ const GITHUB_USERNAME = 'marcusstenbeck';

// Weeks start on Sunday in the GitHub API response
const NUMBER_TO_WEEKDAY = [
  'Sunday',
  'Monday',
  'Tuesday',
  'Wednesday',
  'Thursday',
  'Friday',
  'Saturday',
];

export const MyComposition = () => {
-  const [data, setData] = useState<any>(null);
+  const [data, setData] = useState<GithubData | null>(null);

+  const [handle] = useState(() => delayRender());
+  useEffect(() => {
+    fetchUserContributions(GITHUB_USERNAME, GITHUB_TOKEN).then((data) => {
+      // save the data in React state
+      setData(data);
+      // tell Remotion we're done
+      continueRender(handle);
+    });
+  }, [handle]);

  return (
    <>
      <AbsoluteFill className={styles.background} />

      <AbsoluteFill>
        <div className={styles.contributionsWrapper}>
          <h1 className={styles.contributionsTitle}>My Contributions</h1>
          <p className={styles.contributionsSubtitle}>
            🗓 Week of {data?.contributionsByDay[0]?.date}
          </p>

          <ul className={styles.contributionItems}>
            {data?.contributionsByDay.map((day, i) => (
              <li key={day.date} className={styles.contributionItem}>
                <div className={styles.contributionWeekday}>
                  {NUMBER_TO_WEEKDAY[day.weekday]}
                </div>
                <div
                  className={styles.contributionBadge}
                  style={{backgroundColor: day.color}}
                >
                  {day.contributionCount}
                </div>
              </li>
            ))}
          </ul>
        </div>

        <AbsoluteFill>
          <div className={styles.username}>{data?.username}</div>

          <Img src={data?.avatarUrl} className={styles.avatar} />
        </AbsoluteFill>
      </AbsoluteFill>
    </>
  );
};
The GitHub token is read from a .env file, so don't forget to create one!
// .env
GITHUB_TOKEN=replace_with_your_token
Keep my GITHUB_USERNAME for now. 😉
You'll see two new function imports from Remotion: delayRender and continueRender.
Without delayRender the frame would render immediately. But we want to wait for the data to be fetched before rendering.
This is what delayRender does — it tells Remotion to wait and returns a number (a ”handle”) that Remotion uses internally to keep track of things it's waiting for.
When we're done fetching the data we call continueRender with the handle we got from delayRender. Remotion then understands that we're done and will continue rendering the frame.
And if you look in the preview tool you should now see the contributions from my GitHub account!
Was there a point to using my username instead of yours?
You bet there was! You're not limited to fetching just your own data. You can fetch other users' public data.* Now you can change the GITHUB_USERNAME to your own and see your contributions instead of mine.
* Also, you got to see my terrific profile picture.
But something doesn't look quite right yet. This doesn't look quite like the example video we saw in the beginning.
We're going to fix that, but first I'd like to show you a trick that’ll make your composition responsive.
Responsive video with rem units
Key Takeway: Setting a base font size on the html element and using rem units for all other font sizes is a great way to make your composition responsive.
If you change the resolution of your composition in the root you'll see that the size of the elements in the video changes.
//src/Root.tsx

import {Composition} from 'remotion';
import {MyComposition} from './Composition';

export const RemotionRoot: React.FC = () => {
  return (
    <>
      <Composition
        id="MyComp"
        component={MyComposition}
        durationInFrames={60}
        fps={30}
-        width={1280}
-        height={720}
+        width={1920}
+        height={1080}
      />
    </>
  );
};
In order to keep the size consistent across different resolutions we set a base font size on the html element that depends on the width of the composition. We used useVideoConfig() earlier to get the fps but we can also use it to get the width and height.
Then we'll set the base font size to a percentage of width. This way any time we use rem units they'll scale with the width of the composition.
While we're at it let's also set the default font. :) Make the following changes in Composition.tsx.
// src/Composition.tsx

import {useEffect, useState} from 'react';
import {
  AbsoluteFill,
  continueRender,
  delayRender,
  Img,
+  useVideoConfig,
} from 'remotion';
import {fetchUserContributions, GithubData} from './fetchUserContributions';
import styles from './styles.module.css';

const GITHUB_TOKEN = 'YOUR_GITHUB_TOKEN';
const GITHUB_USERNAME = 'marcusstenbeck';

// Weeks start on Sunday in the GitHub API response
const NUMBER_TO_WEEKDAY = [
  'Sunday',
  'Monday',
  'Tuesday',
  'Wednesday',
  'Thursday',
  'Friday',
  'Saturday',
];

export const MyComposition = () => {
+  const {width} = useVideoConfig();
  const [data, setData] = useState<GithubData | null>(null);

  const [handle] = useState(() => delayRender());
  useEffect(() => {
    fetchUserContributions(GITHUB_USERNAME, GITHUB_TOKEN).then((data) => {
      setData(data);
      continueRender(handle);
    });
  }, [handle]);

  return (
    <>
+      <style>
+        {`
+           html {
+            font-size: ${0.025 * width}px;
+            font-family: 'Courier New', Courier, monospace;
+          }
+        `}
+      </style>
      <AbsoluteFill className={styles.background} />
      <AbsoluteFill>
        <div className={styles.contributionsWrapper}>
          <h1 className={styles.contributionsTitle}>My Contributions</h1>
          <p className={styles.contributionsSubtitle}>
            🗓 Week of {data?.contributionsByDay[0]?.date}
          </p>

          <ul className={styles.contributionItems}>
            {data?.contributionsByDay.map((day, i) => (
              <li key={day.date} className={styles.contributionItem}>
                <div className={styles.contributionWeekday}>
                  {NUMBER_TO_WEEKDAY[day.weekday]}
                </div>
                <div
                  className={styles.contributionBadge}
                  style={{backgroundColor: day.color}}
                >
                  {day.contributionCount}
                </div>
              </li>
            ))}
          </ul>
        </div>

        <AbsoluteFill>
          <div className={styles.username}>{data?.username}</div>

          <Img src={data?.avatarUrl} className={styles.avatar} />
        </AbsoluteFill>
      </AbsoluteFill>
    </>
  );
};
Check the preview tool. Now the composition should look more like the example video.
If you change the resolution back to 1280x720 and the video should look exactly the same.
Animating the avatar and username
Start with the finished composition
Key Takeway: Start with the finished composition, then add animation on top.
OK, now we're getting somewhere. But there's still something missing. The video is still static. Let's add some animation.
The best way to add animation is to start with the finished composition and then add animation afterward. This way you can focus on animating and not worry about what the final layout is going to look like.
The spring() function
Key Takeway: Remotion's has animation helpers that helps us calculate the math needed to animate.
Remember that to animate something we start with the frame number and calculate positions, rotations, scales, etc. Remotion has a few helpers that make this easier.
Let's start by animating the avatar. We want it to start really small and "bounce" into its final size. We'll use Remotion's spring() function to do this. The spring() function calculates bouncy values, so it's perfect for this.
I like placing the animations in a single object and then referencing them in the JSX similar to how we've done with the className attributes, so let's do that.
// src/Composition.tsx

import {useEffect, useState} from 'react';
import {
  AbsoluteFill,
  continueRender,
  delayRender,
  Img,
+  spring,
+  useCurrentFrame,
  useVideoConfig,
} from 'remotion';
import {fetchUserContributions, GithubData} from './fetchUserContributions';
import styles from './styles.module.css';

const GITHUB_TOKEN = 'YOUR_GITHUB_TOKEN';
const GITHUB_USERNAME = 'marcusstenbeck';

// Weeks start on Sunday in the GitHub API response
const NUMBER_TO_WEEKDAY = [
  'Sunday',
  'Monday',
  'Tuesday',
  'Wednesday',
  'Thursday',
  'Friday',
  'Saturday',
];

export const MyComposition = () => {
-  const {width} = useVideoConfig();
+  const {fps, width} = useVideoConfig();
+  const frame = useCurrentFrame();
  const [data, setData] = useState<GithubData | null>(null);

  const [handle] = useState(() => delayRender());
  useEffect(() => {
    fetchUserContributions(GITHUB_USERNAME, GITHUB_TOKEN).then((data) => {
      setData(data);
      continueRender(handle);
    });
  }, [handle]);

+  const animations = {
+    avatar: {
+      scale: spring({fps, frame}),
+    },
+  };

  return (
    <>
      <style>
        {`
           html {
            font-size: ${0.025 * width}px;
            font-family: 'Courier New', Courier, monospace;
          }
        `}
      </style>
      <AbsoluteFill className={styles.background} />
      <AbsoluteFill>
        <div className={styles.contributionsWrapper}>
          <h1 className={styles.contributionsTitle}>My Contributions</h1>
          <p className={styles.contributionsSubtitle}>
            🗓 Week of {data?.contributionsByDay[0]?.date}
          </p>

          <ul className={styles.contributionItems}>
            {data?.contributionsByDay.map((day, i) => (
              <li key={day.date} className={styles.contributionItem}>
                <div className={styles.contributionWeekday}>
                  {NUMBER_TO_WEEKDAY[day.weekday]}
                </div>
                <div
                  className={styles.contributionBadge}
                  style={{backgroundColor: day.color}}
                >
                  {day.contributionCount}
                </div>
              </li>
            ))}
          </ul>
        </div>

        <AbsoluteFill>
          <div className={styles.username}>{data?.username}</div>

          <Img
            src={data?.avatarUrl}
            className={styles.avatar}
+            style={{
+              transform: `scale(${animations.avatar.scale})`,
+            }}
          />
        </AbsoluteFill>
      </AbsoluteFill>
    </>
  );
};
Now take a look at the preview. The avatar should be bouncing in!
Take a look at the spring() function. It needs to know the fps and the frame number. We can get fps from useVideoConfig() and frame from useCurrentFrame().
We've learned earlier that every animation in Remotion needs to be based on the frame number. This holds true for the spring() function as well. It's not really important to understand why it needs the fps value, so there’s no need to worry about that (but I’ve included an explanation if you’re really curious).
Why does the spring function need `fps`?
The spring() function is based on classic spring physics formulas to calculate the bouncy values. These formulas are the same as you're taught in physics class, and they depend on time in seconds.
We saw earlier that to calculate the time in seconds we divide the frame number by the fps value.
Did nobody ever tell you curiosity killed the cat?
Export your video
Key Takeway: Export a video by running remotion render in the terminal.
Wow... that was quite a bit of work. Let's enjoy the fruits of our labor so far and render our masterpiece!
But first, did you change your composition id to MyGreatVideo? If you changed the composition id to MyGreatVideo earlier, the build script in package.json should look like this:
"build": "remotion render src/index.ts MyGreatVideo out/video.mp4"Now, run this command in your project root:
npm run buildThis command will use the remotion render command to create a video file in the out folder.
Go on then ... open the video file and enjoy your work!
Extra credit
Next up, you could make your video look like this:

I've written down the differences below in the order of difficulty. For extra credit, try adding as many of these elements to your project as you can!
- All elements fade out at the end of the video.
- The avatar and the username have "floating" animation when they've settled on the left side.
- The avatar wiggles at the start, but the wiggle disappears as it settles in its place.
- The avatar is a little bigger in the start, and scales down into place.
* Tip for #1: Fade out the element that wraps everything except the background.
* Tip for #2: Create an animation for the element that wraps the avatar and username elements.
* Tip for #3 and #4: The values in outputRange don't have to be fixed.
Keep learning about Remotion
- Remotion
- remotionkit.com - If you like my style check out my full-stack course on how to build a Remotion powered video rendering app.
- @marcusstenbeck on Github
- @marcusstenbeck on Twitter - I may be available for work!


