

Research shows that a well-designed “mega menu” can improve user engagement. That’s because mega menus reduce scrolling and make website options easier to parse.
That’s why we decided to use a multi-level mega menu on our own Prismic site.
At the beginning of this year, we launched our new website, powered by…any guesses? Prismic! We were able to learn a lot through the process of using our own product to build our website. One of the challenges when structuring our navigation in Slice Machine, similar to many of our users, was how to best handle nested navigation items.
Of course, there are several approaches to modeling a complex navigation in Prismic. In this post, we’ll focus on the path we took and cover:
- Modeling a simple top-level menu.
- Modeling a nested, second-level submenu.
- Best practices for utilizing features like Slices, tabs, and Slice variations when building a navigation.
- How Slice Machine components translate to the Page Builder and frontend.
- Future plans to further simplify this process.
Our goal is to provide some inspiration and spark some ideas for how you can model your own nested navigations using Prismic. So let’s dive in! 🤿
Visualizing our multi-level navigation
Before diving into the technical details, let's briefly look at the navigation we're going to model. Having a clear picture of the final design in mind helps guide the content modeling process.
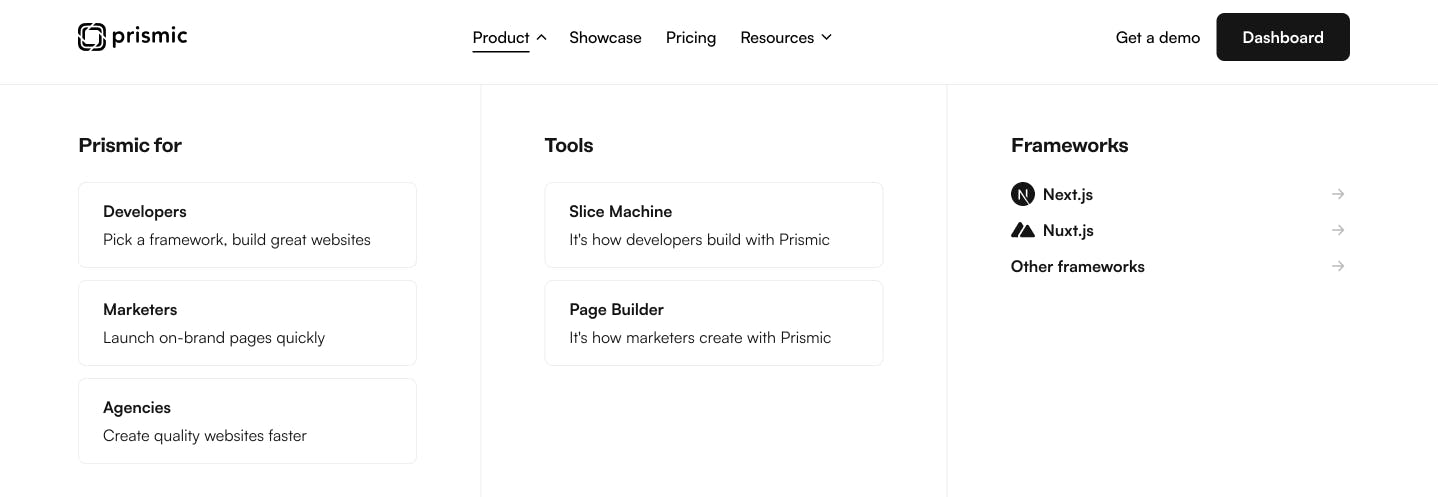
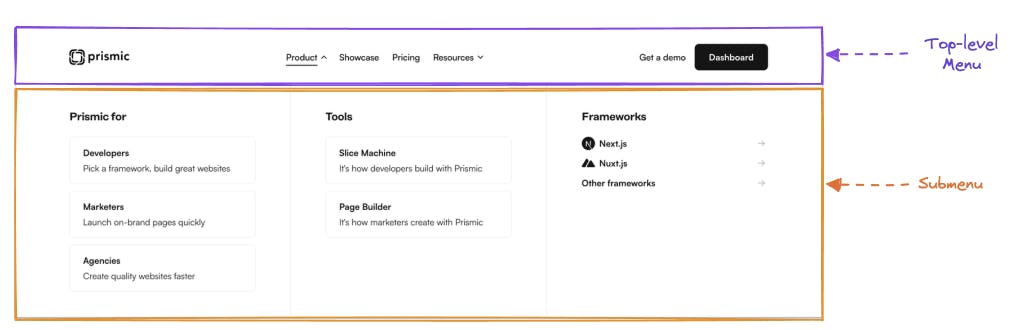
When visualizing our navigation, we can divide it into two levels:
- A primary top-level menu.
- A nested submenu that displays when specific top-level menu items are clicked.
Now let’s examine what a tree structure might look like for the primary menu items, including the four centered menu items and submenus.

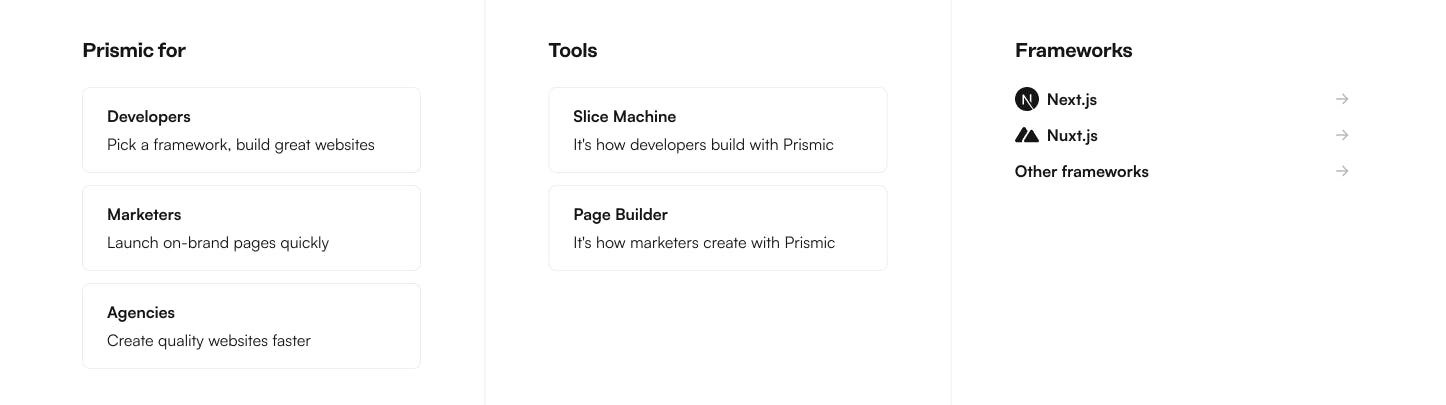
As shown in the tree structure, there are four main menu items, two of which have a nested submenu that appears when clicked. The submenus consist of three columns, each displaying:
- A text heading
- Links to various pages, which are displayed in four unique styles.
So now that we have visualized our navigation, how would we model this in Slice Machine? Let’s find out! 👇
How to model a simple top-level menu
Let’s take a look at one approach to modeling a simple top-level navigation in Slice Machine. To do this, we will need to:
- Create a layout custom type
- Create layout tabs
- Add single items (navigation CTAs) in the static zone
- Add a menu item Slice
- Create a menu item Slice variation
So let’s get started!
Create layout custom type
We can start by creating a ‘Layout’ custom type for our top-level navigation. We will use a ‘single type’ as opposed to a ‘reusable type’ to make sure there is only one document that will be created, serving as the content source for the layout (navigation and footer) across all pages.

Add layout tabs
Since the footer is included in our layout custom type as well, we utilized tabs to differentiate them in Slice Machine, like this:

Modeling the header and footer in a single layout custom type allows us to manage these recurring site elements in one place, which provides consistency across all pages and simplifies updates.
Now, let's add some fields to our header!
Add single items (navigation CTAs) in the static zone
To fully understand all the elements that we need to account for in our custom type, we first have to consider how it displays when a user is logged in vs. logged out.
Here’s what the top-level navigation looks like if you’re logged out:

Here’s what it looks like if you're logged in:

On the right side of the top-level menu, we have a total of four unique elements, including:
- When logged out, a link to ‘Login.’
- When logged out, a button for "Get started" that links to the signup page.
- When logged in, a button for "Dashboard" that links to the Prismic dashboard
- A “Get a demo” link that directs you to the demo page and displays regardless of if you are logged in or out.
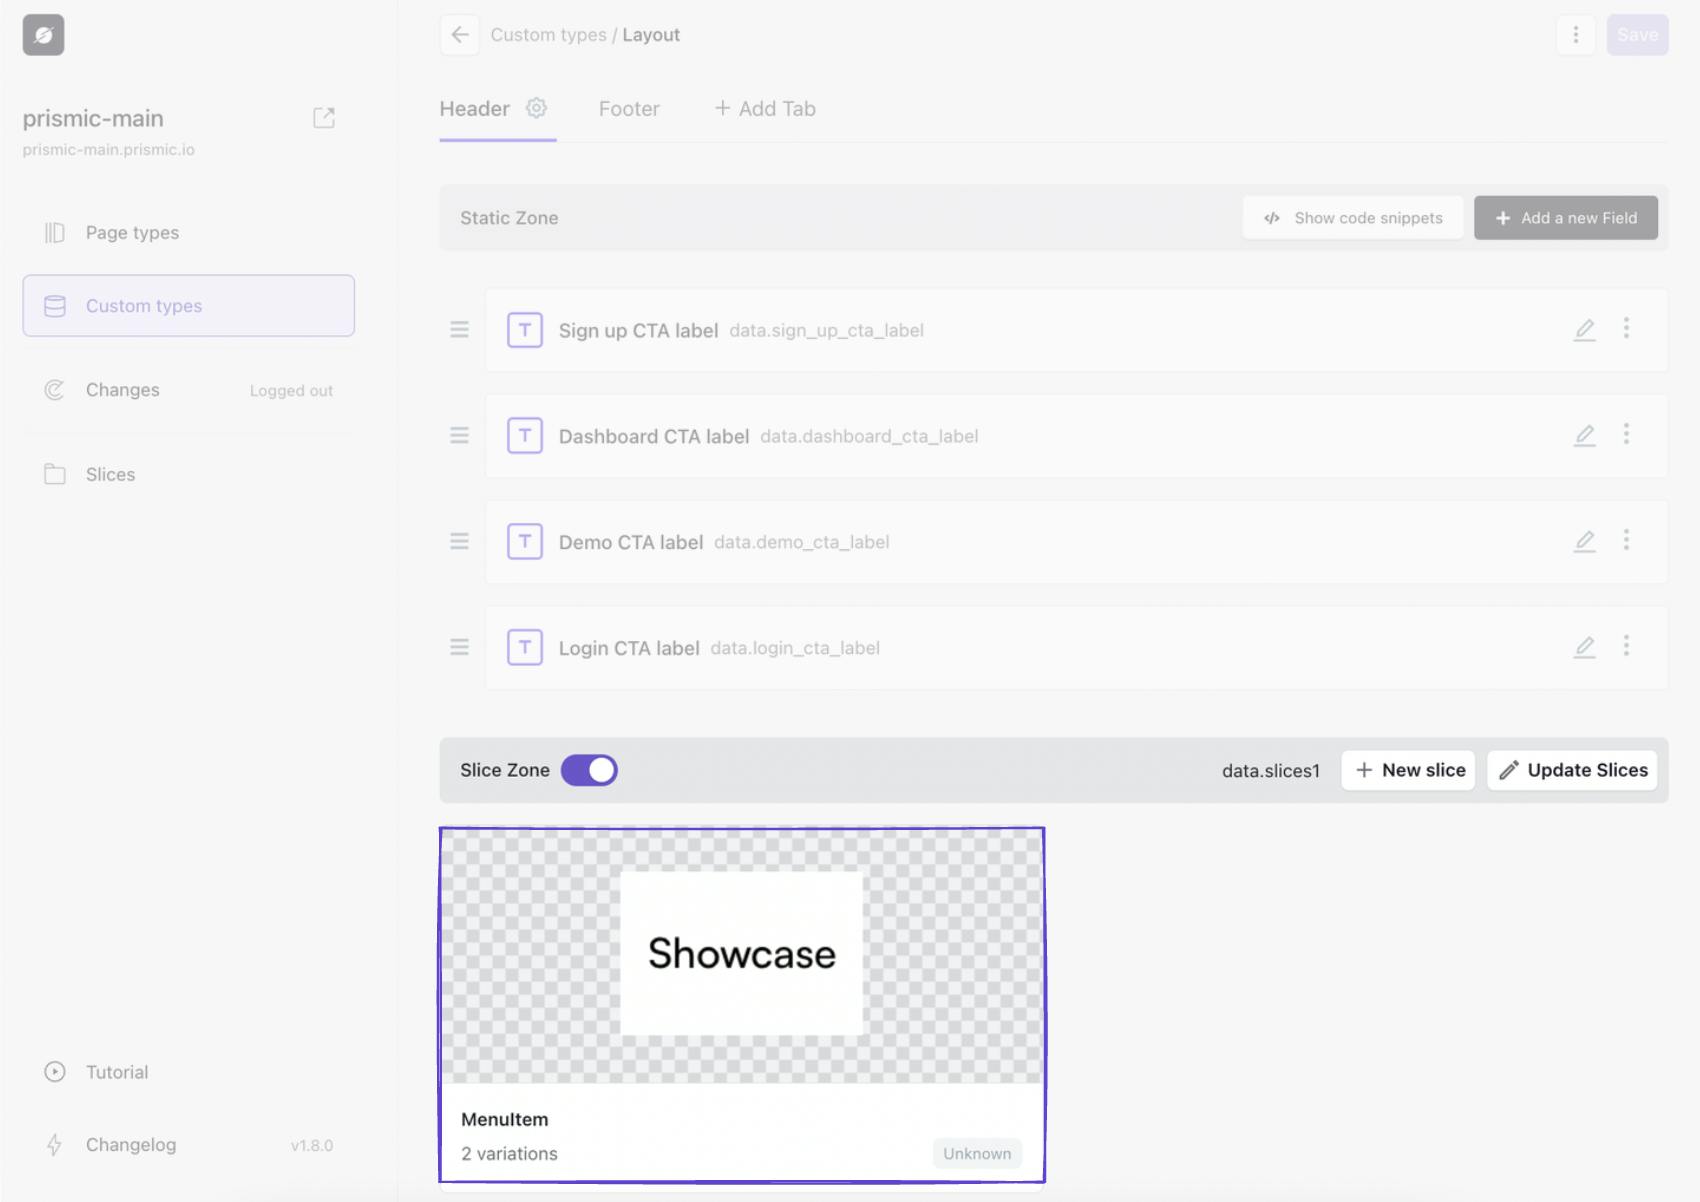
Since all of these items display just a single time, we can add them to the ‘static zone’ of our custom type in Slice Machine.
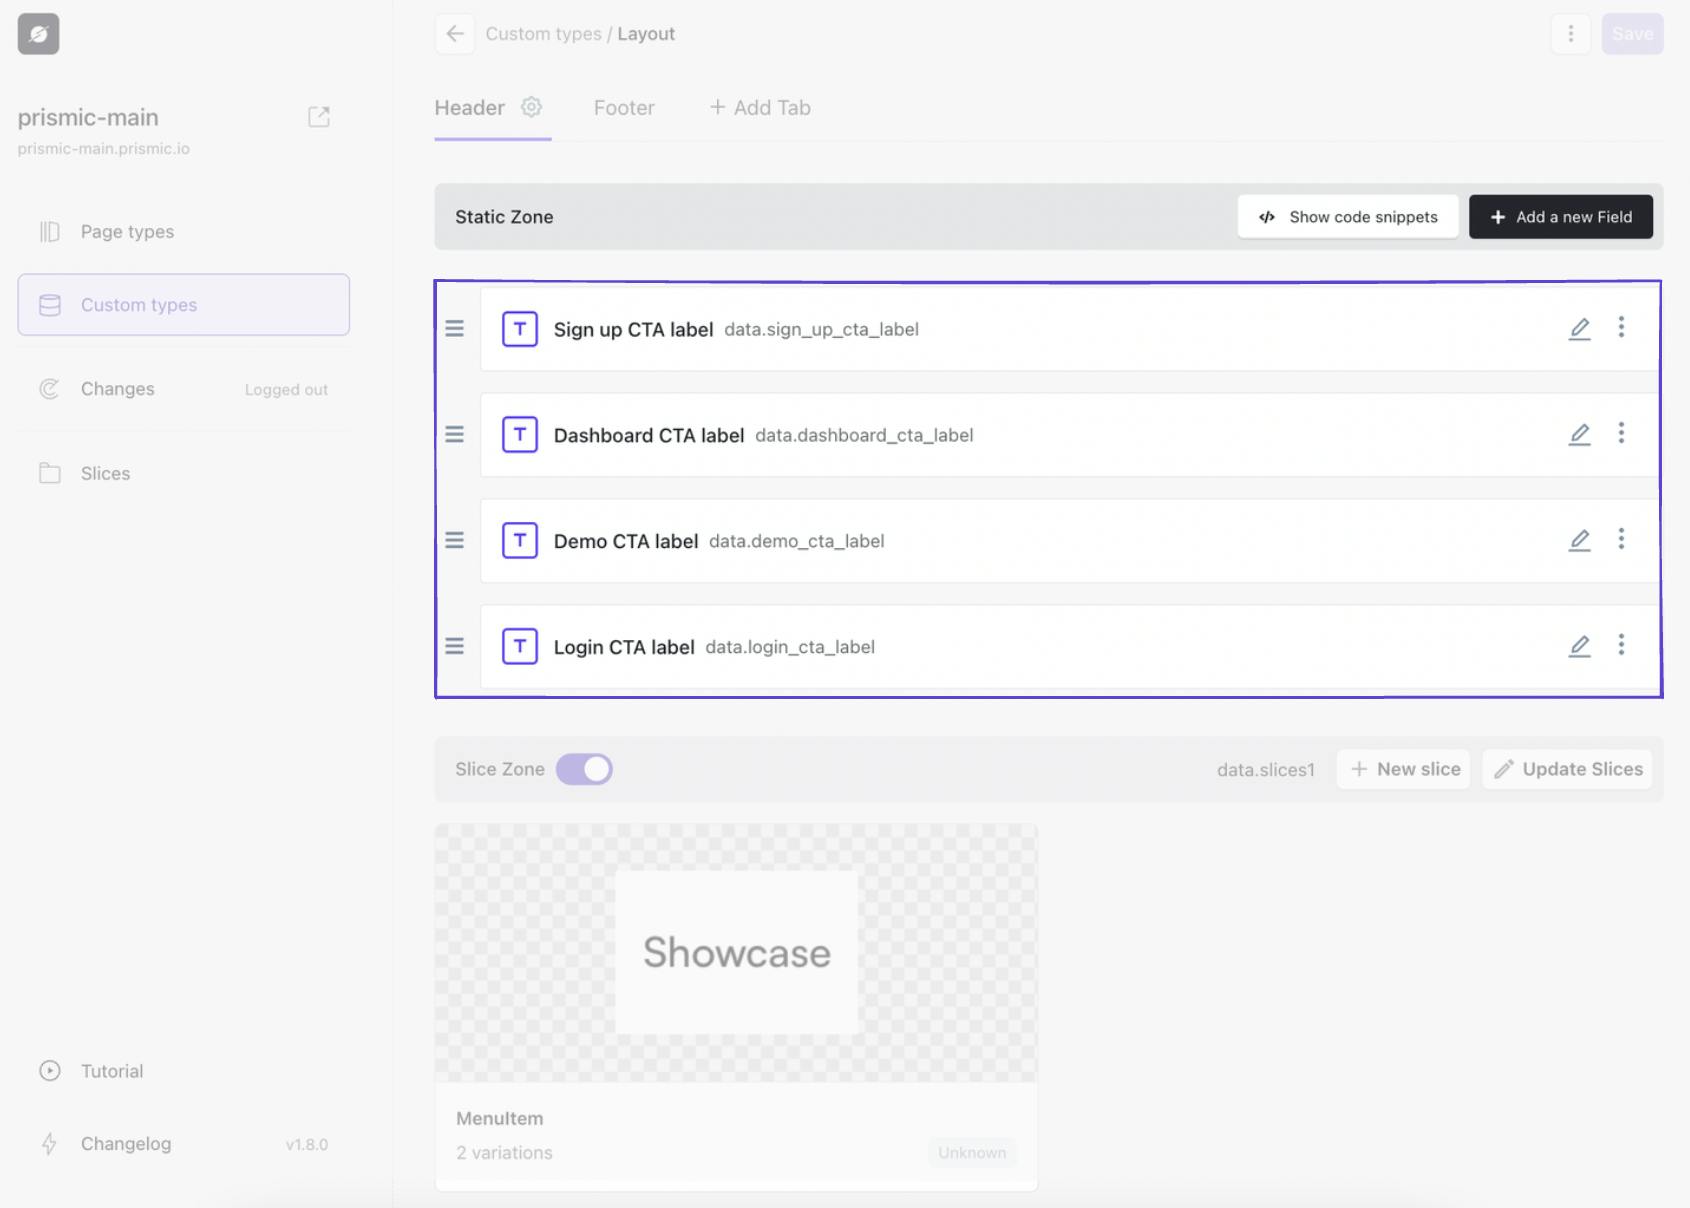
You will notice we added four text fields for these CTAs, which means we are giving our content team the ability to change the label of the CTA but not where the CTA links to. At Prismic, we knew where we wanted these top-level menu items to link, but we wanted our marketing team to be able to test different CTA verbiage, so we structured it accordingly.
If you wanted the flexibility to be able to frequently update where these links direct, you could simply add a corresponding link field for each label to give your content team the flexibility to change that as well.
A note on quality control
As a developer, it’s important to think about how much control you want to give your content or marketing team over different aspects of your website. With Prismic, you can give your team the right amount of flexibility while still implementing a layer of quality control, and it makes the entire website creation process easier if you consider these things from the start when you are modeling your content.
Add a menu item Slice
Now that we have created our static fields in Slice Machine, we need to do the same for our menu items.
If we look at our top-level navigation, we can see that we have two menu items in the middle that simply link to a different page. Then, on either side of those items, we have two menu items that have a toggle icon because, on-click, they display a submenu below them.
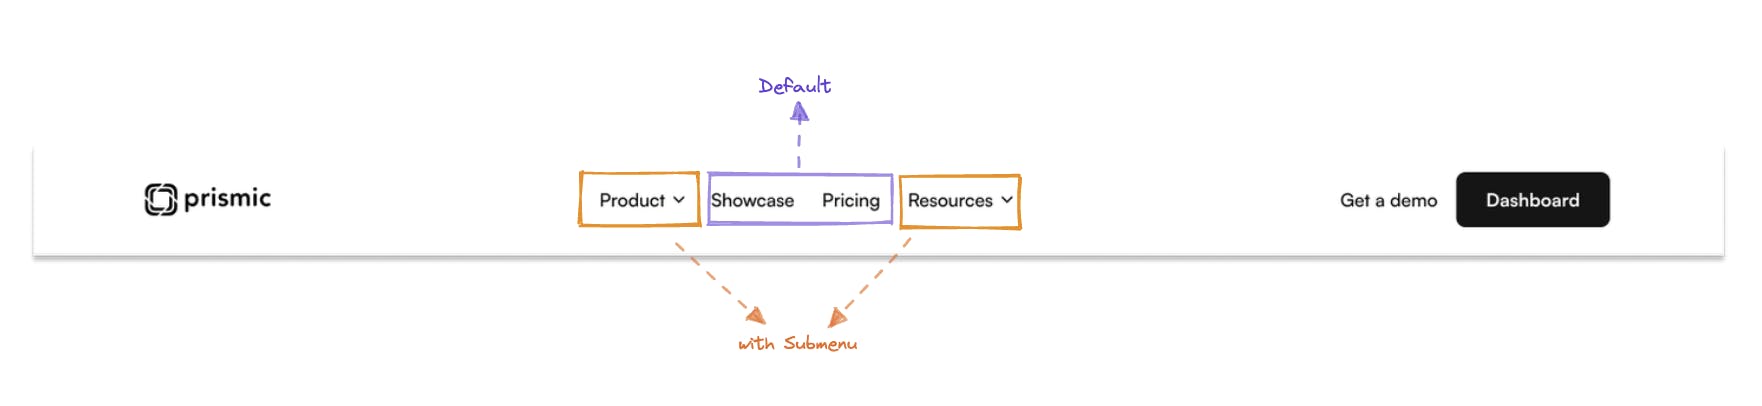
Since there are two different variations of these menu items, we decided that adding a ‘MenuItem’ Slice would be the best approach.
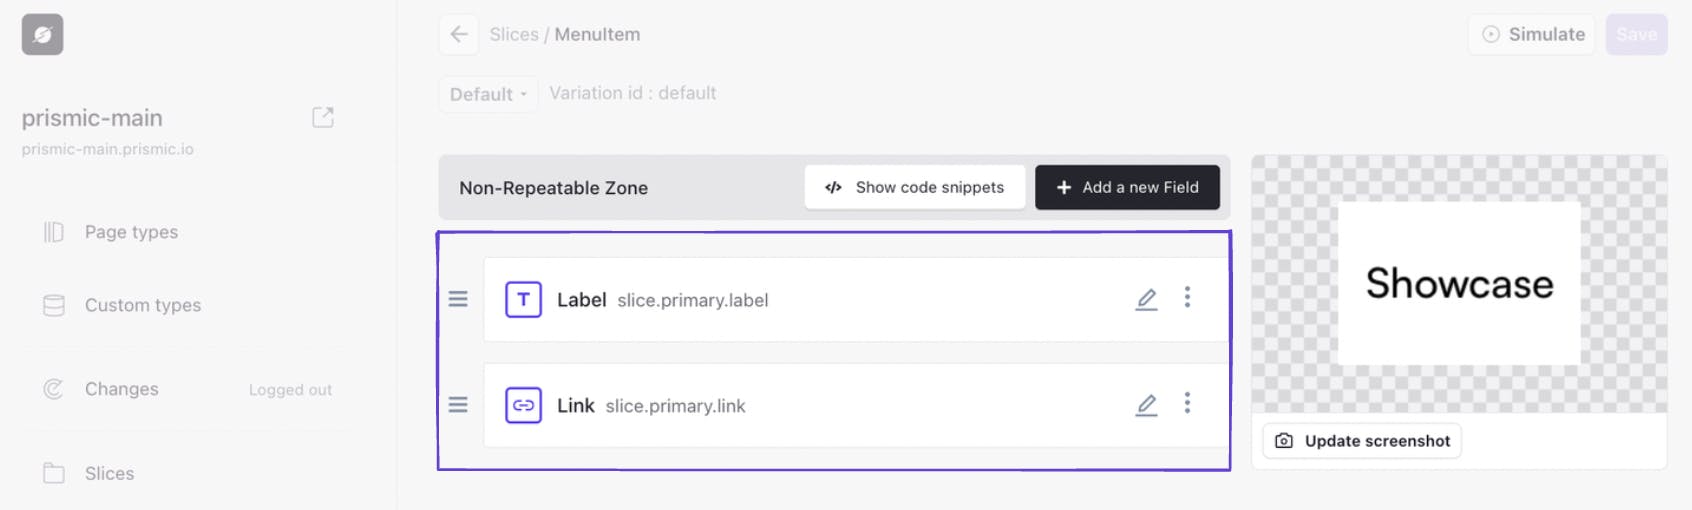
Our ‘Default’ MenuItem Slice has two fields:
- A text field for ‘Label’
- A link field for ‘Link’
We can utilize this Slice for top-level menu items that simply link to another page. But what do we do for the menu items that have a submenu nested below them?
Let’s create a Slice variation to solve this!
Create a menu item Slice variation
In Prismic, Slice variations allow a content team to choose from a variety of layouts or styles for sections or elements of a website. In this case, we can create a Slice variation for our MenuItem Slice since some menu items have a submenu, and some don’t.

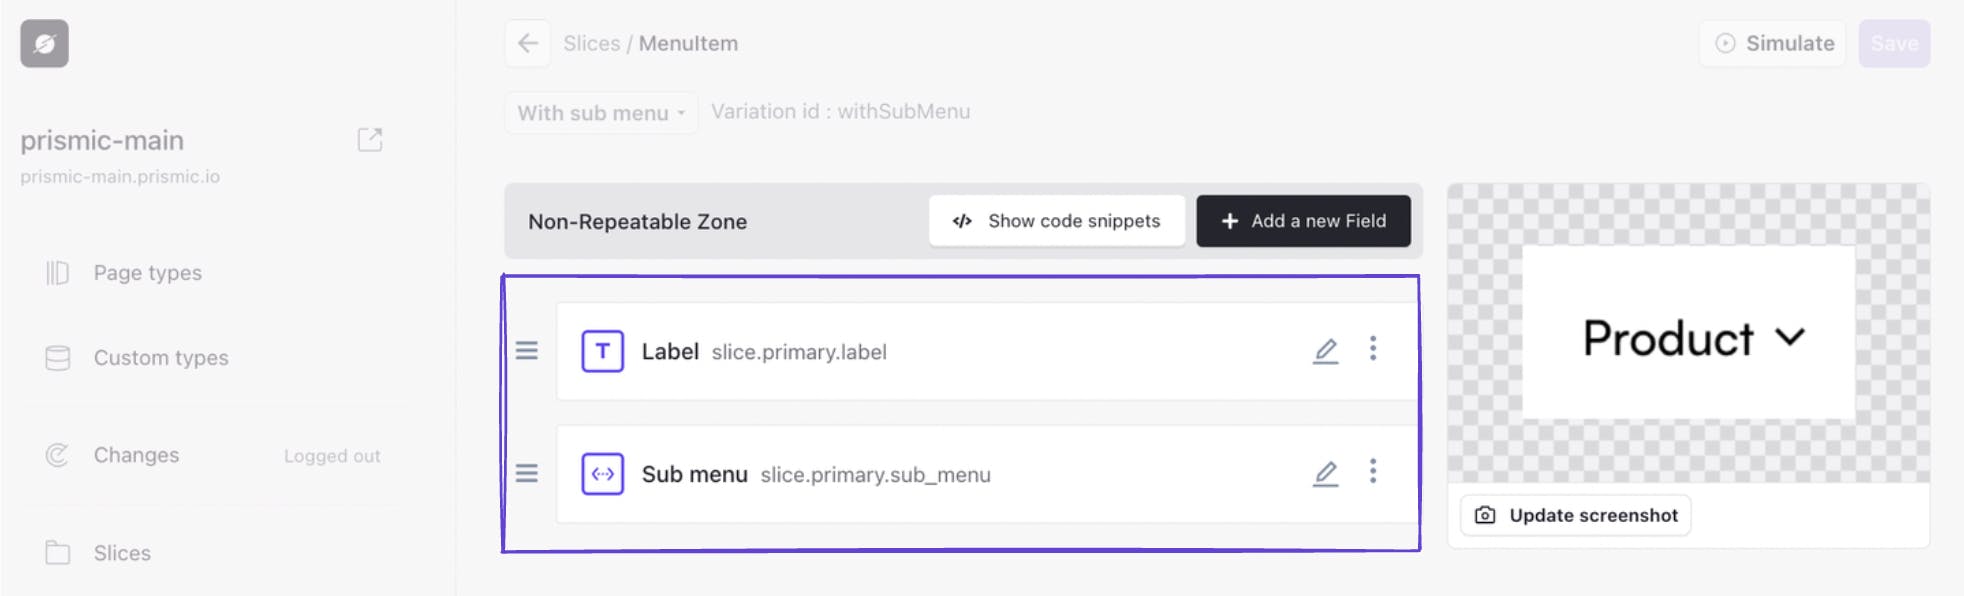
Our new “withSubMenu” variation was duplicated from the “Default” variation, so all we have to do is remove the link field and replace it with a content relationship field. So now, in our new variation, we have:
- A text field for ‘Label’
- A content relationship field for ‘Sub menu.’
** We will eventually connect this to our submenu custom type, but don’t worry about that just yet 🙂
So now that we have modeled our top-level menu in Slice Machine, what does this look like in the Page Builder? Let’s find out! ⬇️
How our top-level menu model translates to the Page Builder
Since our layout custom type was a single type, we only need to create a single document in the Page Builder.

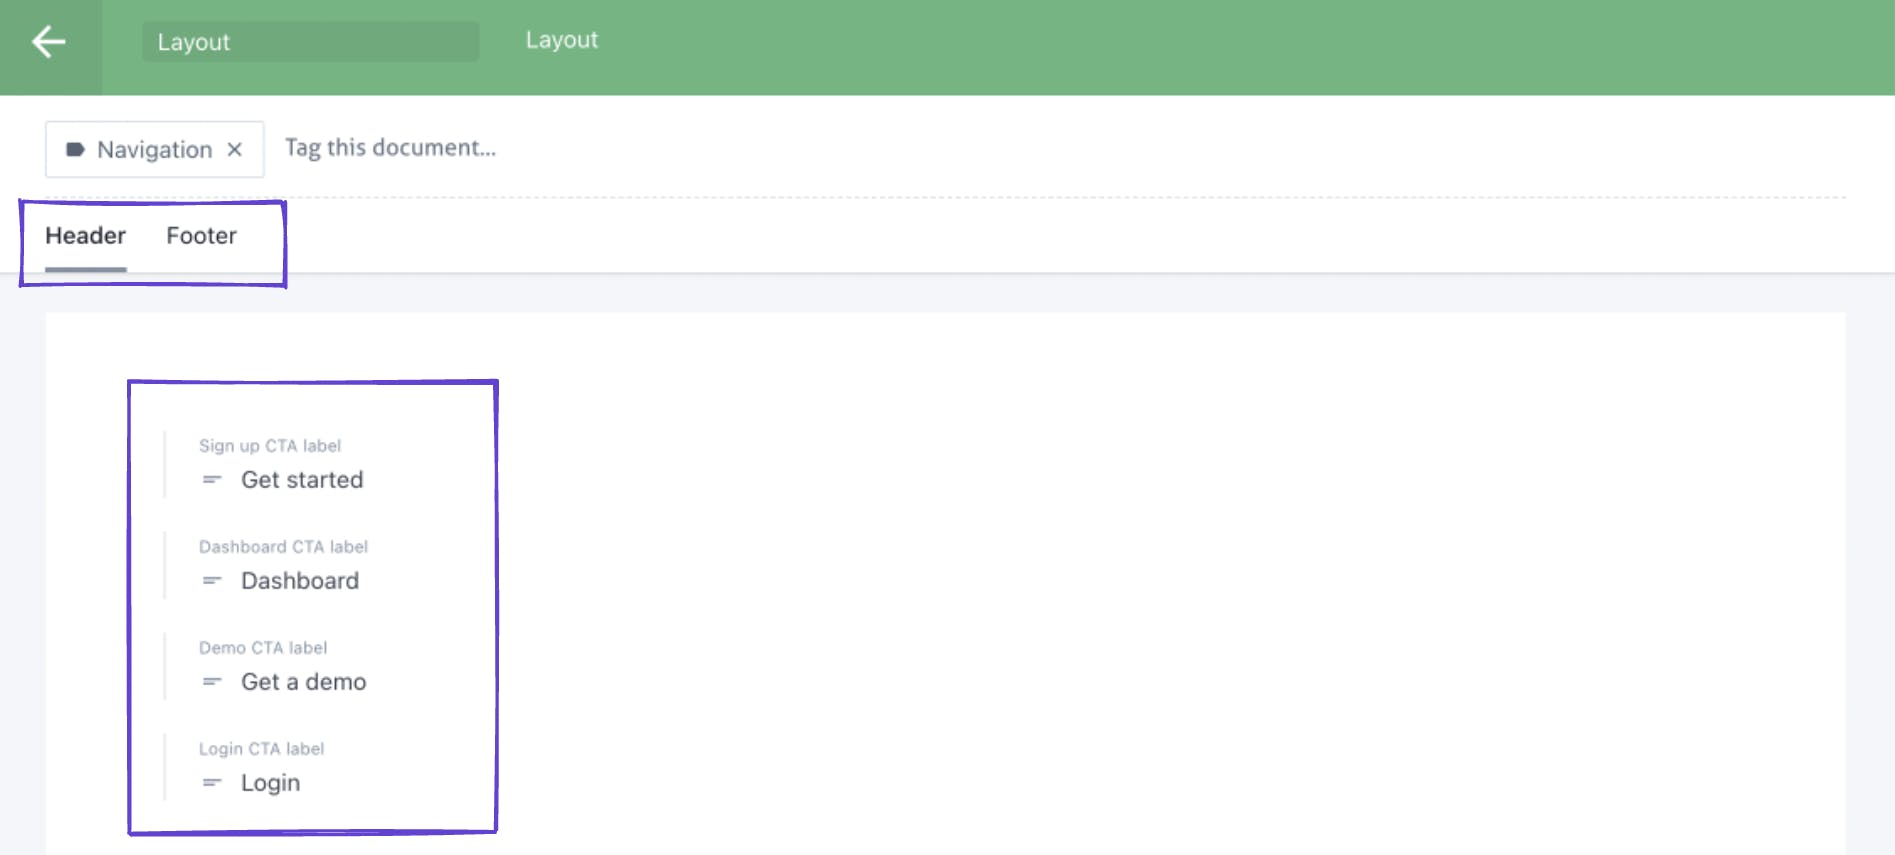
In this document, we can see our ‘Header’ and ‘Footer’ tabs at the top. We can also see our four static CTA text fields that we have given our content team the ability to update.
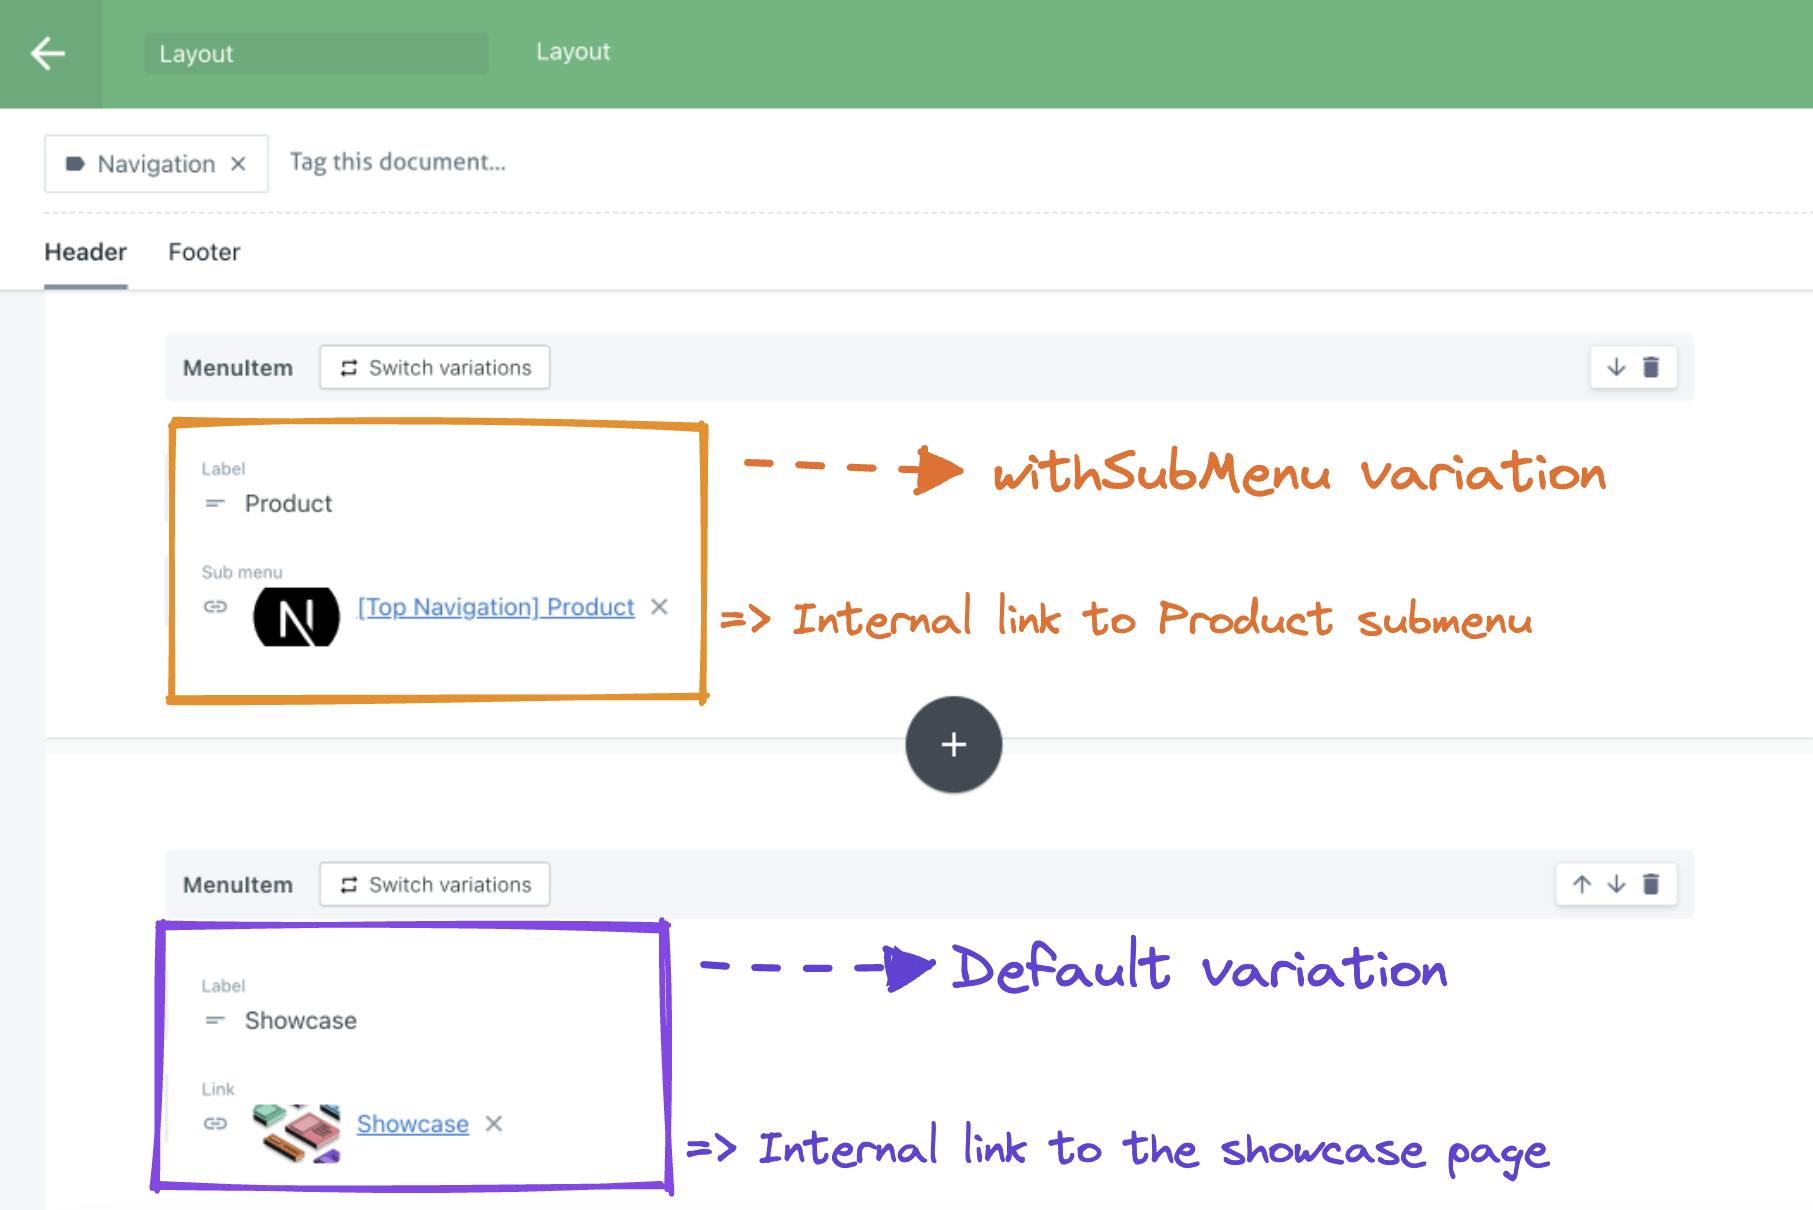
If we scroll down in the Page Builder document, we can see our MenuItem Slices.
For the ‘Default’ variation menu items, we have given our content team the ability to update:
- The Label [text field].
- The Link [link field].
For the ‘withSubMenu’ variation menu items, they can update:
- The Label [text field].
- The Sub menu [content relationship field]. ** We will create this submenu in the next section. ⏬
And that’s it! Our top-level navigation is complete. 🌟
Now let’s take a look at how we can connect our ‘Sub menu’ content relationship field to an actual submenu.
How to model a second-level nested submenu
We’ll assume you went through the steps in the previous section to create the top-level menu. To model our submenu, the process will be fairly similar to our top-level navigation. Let’s get a quick refresher on the submenu design:
To model our submenu, we will need to complete the following steps:
- Create a submenu custom type
- Add column tabs
- Create a heading Slice
- Create a submenu item Slice
- Create submenu item Slice variations
- Connect our submenu to the top-level menu items
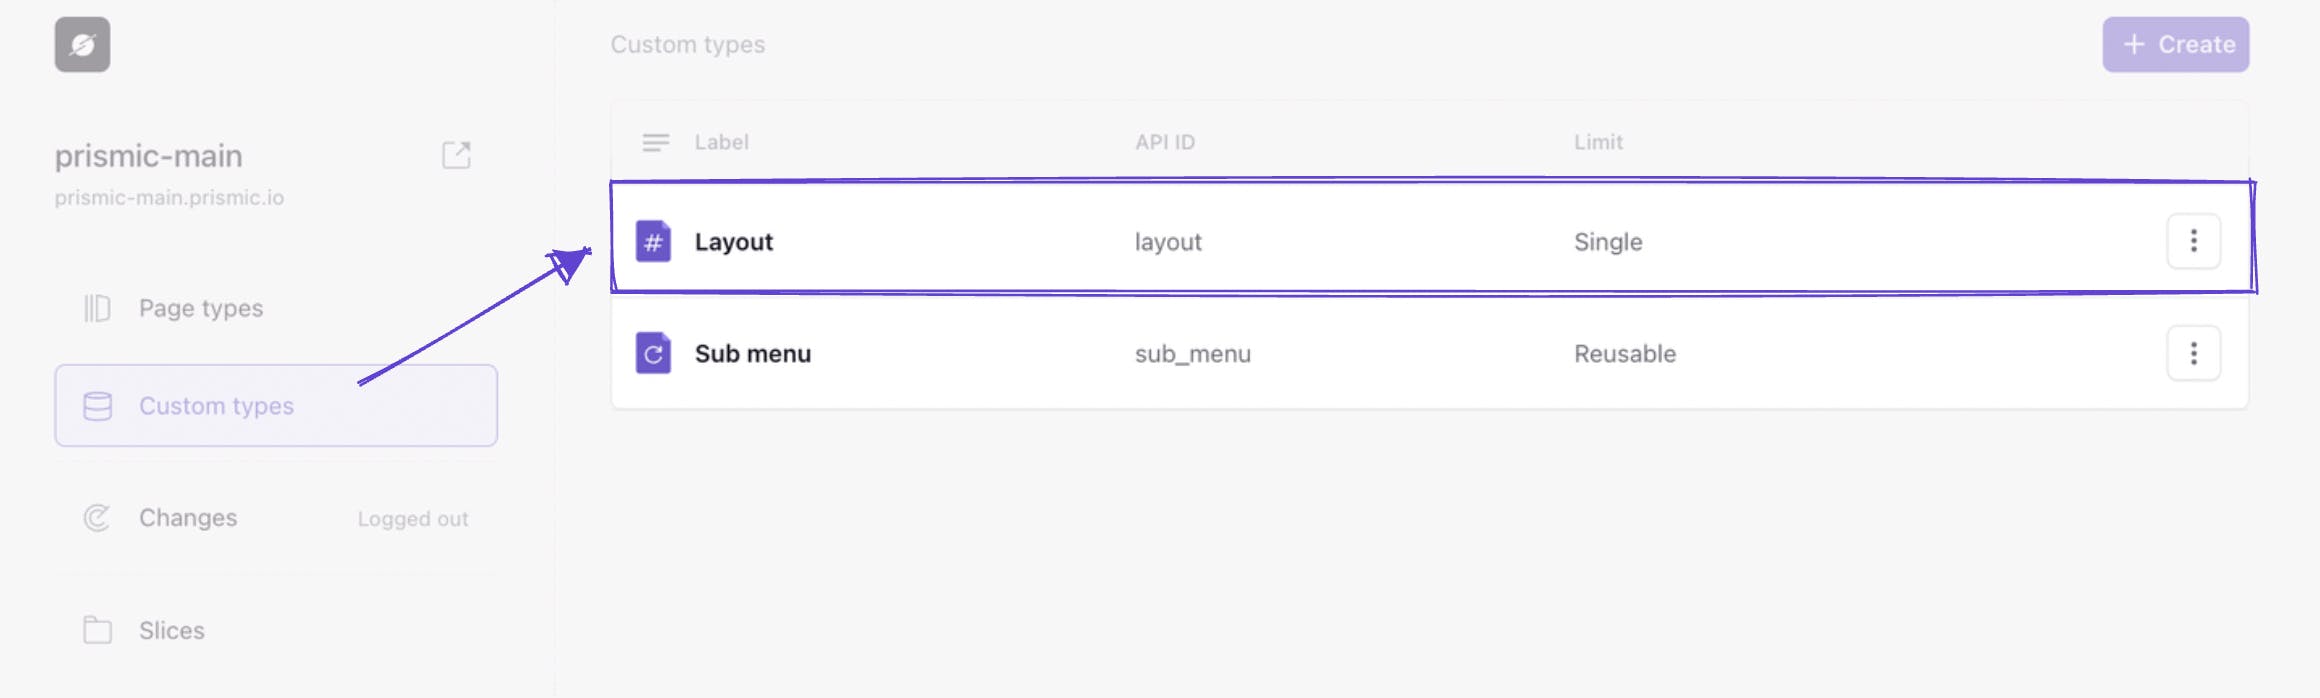
Create a submenu custom type
To start, we can create a ‘Sub menu’ custom type. When thinking about our design, multiple menu items have a submenu associated with them, so we want to make sure we select ‘reusable type.’

Add column tabs
Since the submenu design has 3 columns, we can utilize tabs in Slice Machine to create an intuitive process for updating submenu items.
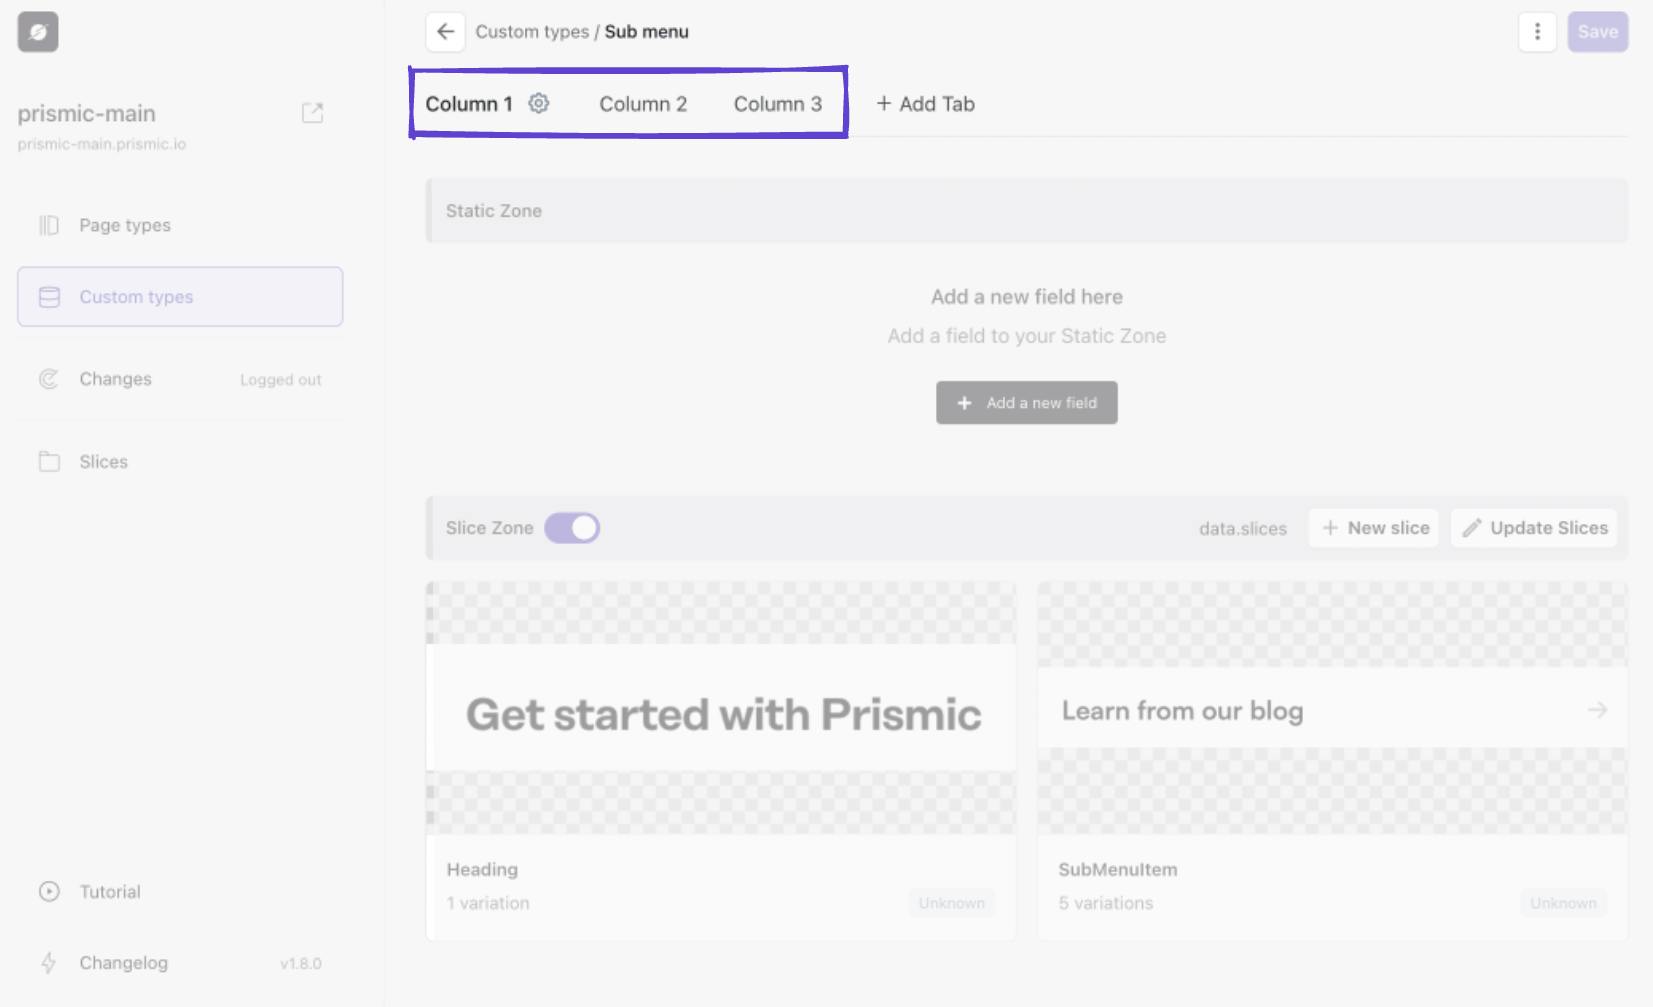
Balancing creative freedom and design guardrails
When modeling the Sub menu custom type, we opted to use three tabs. This provides flexibility for our content team to use one to three columns as needed based on the content. The design automatically adjusts - for example, just "Column 1" and "Column 2" would display as two columns if we left “Column 3” blank.
However, capping it at three columns allows for visual consistency and constraints. Limiting the maximum number of columns prevents things from potentially going off the rails from a design standpoint, therefore balancing creative freedom with intentional design boundaries.
Create heading Slice
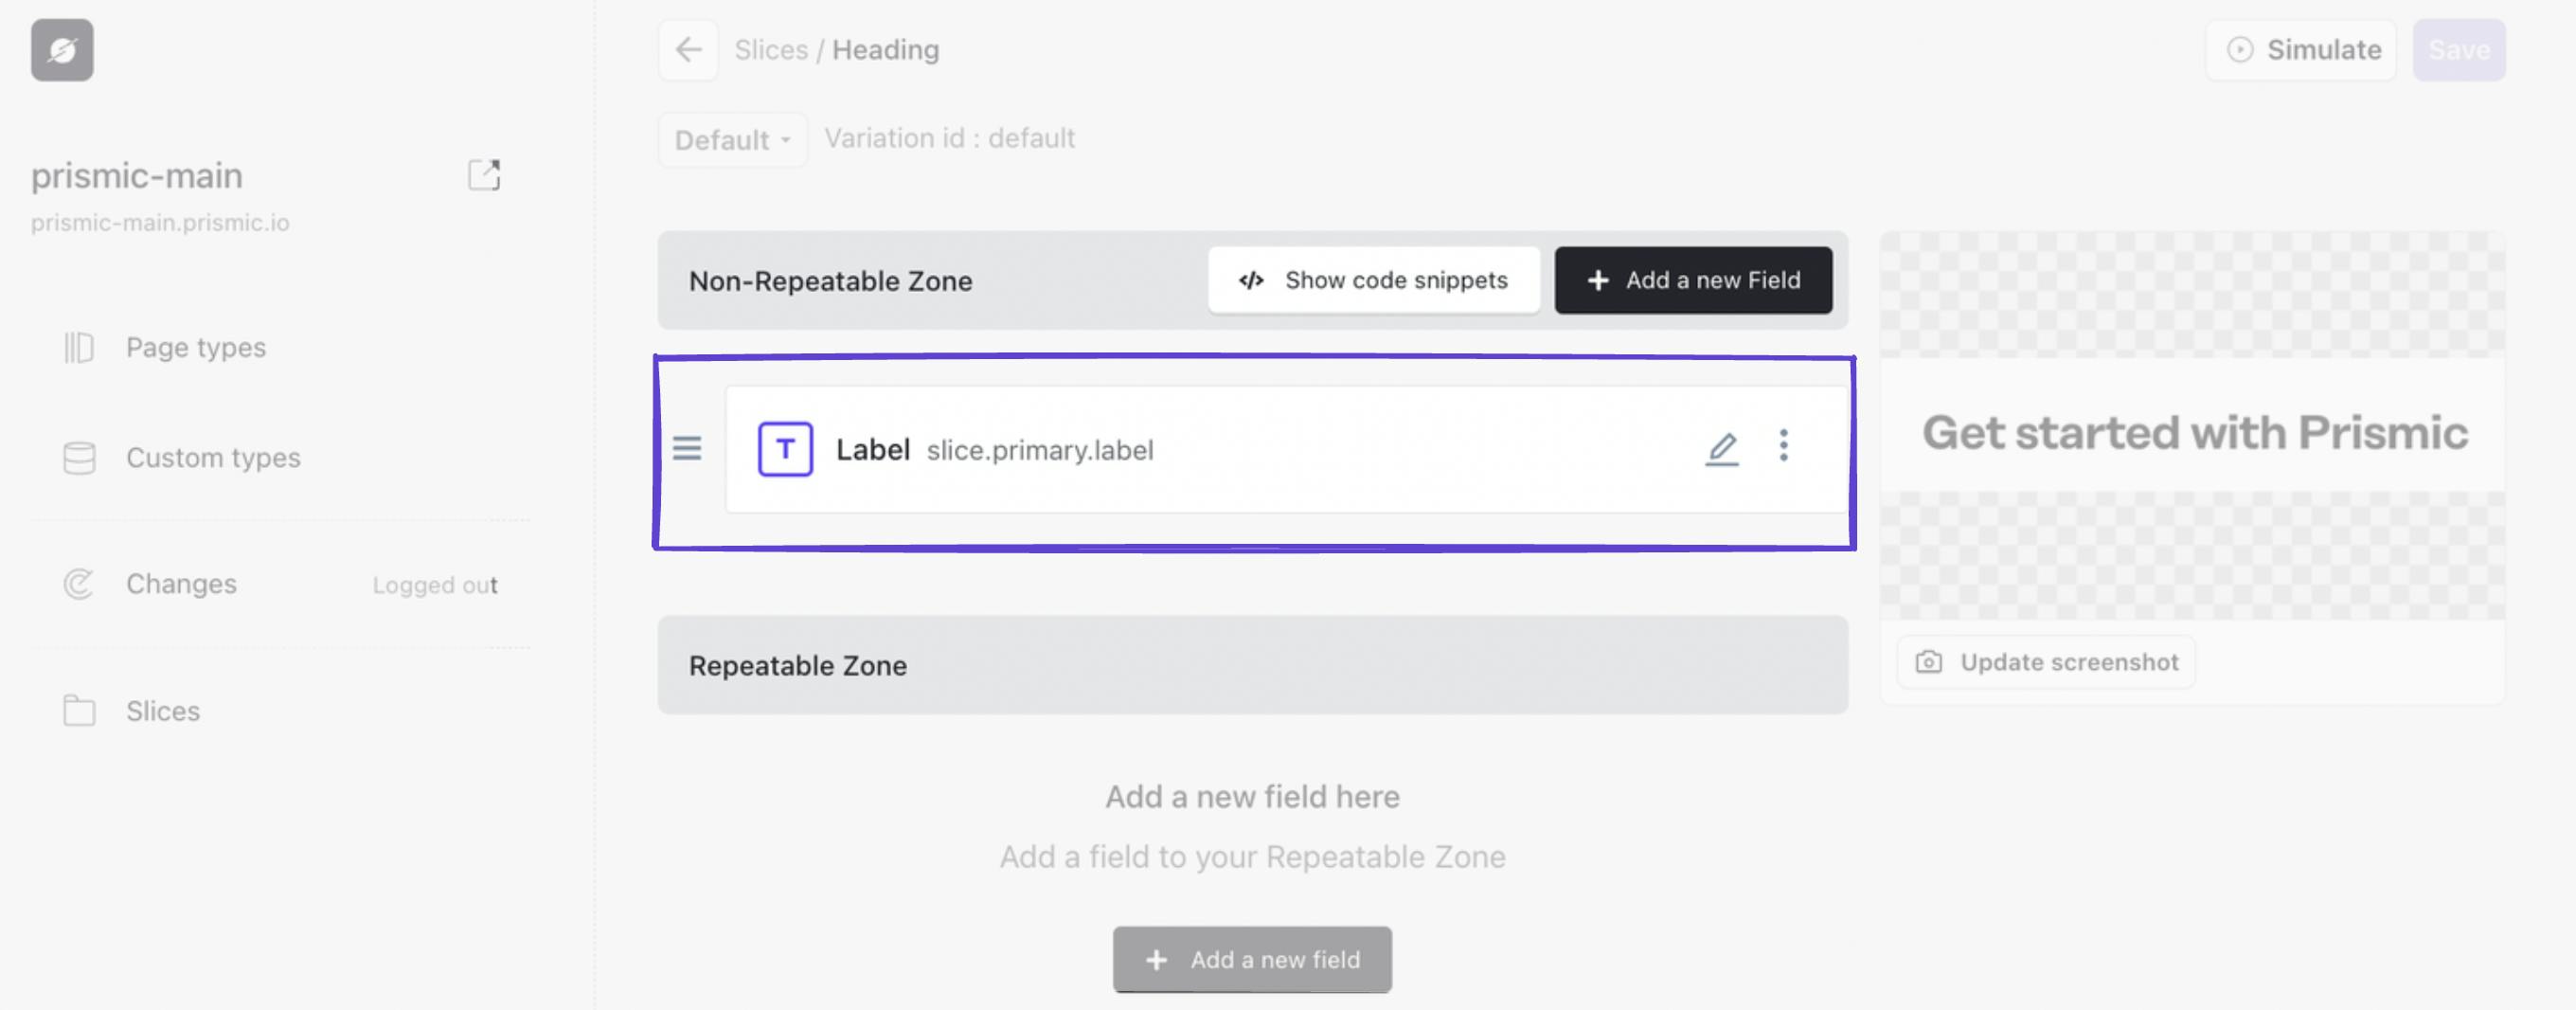
Within our submenu custom type, we can create a simple ‘Heading’ Slice.
This Slice has a single text field in the ‘non-repeatable zone.’
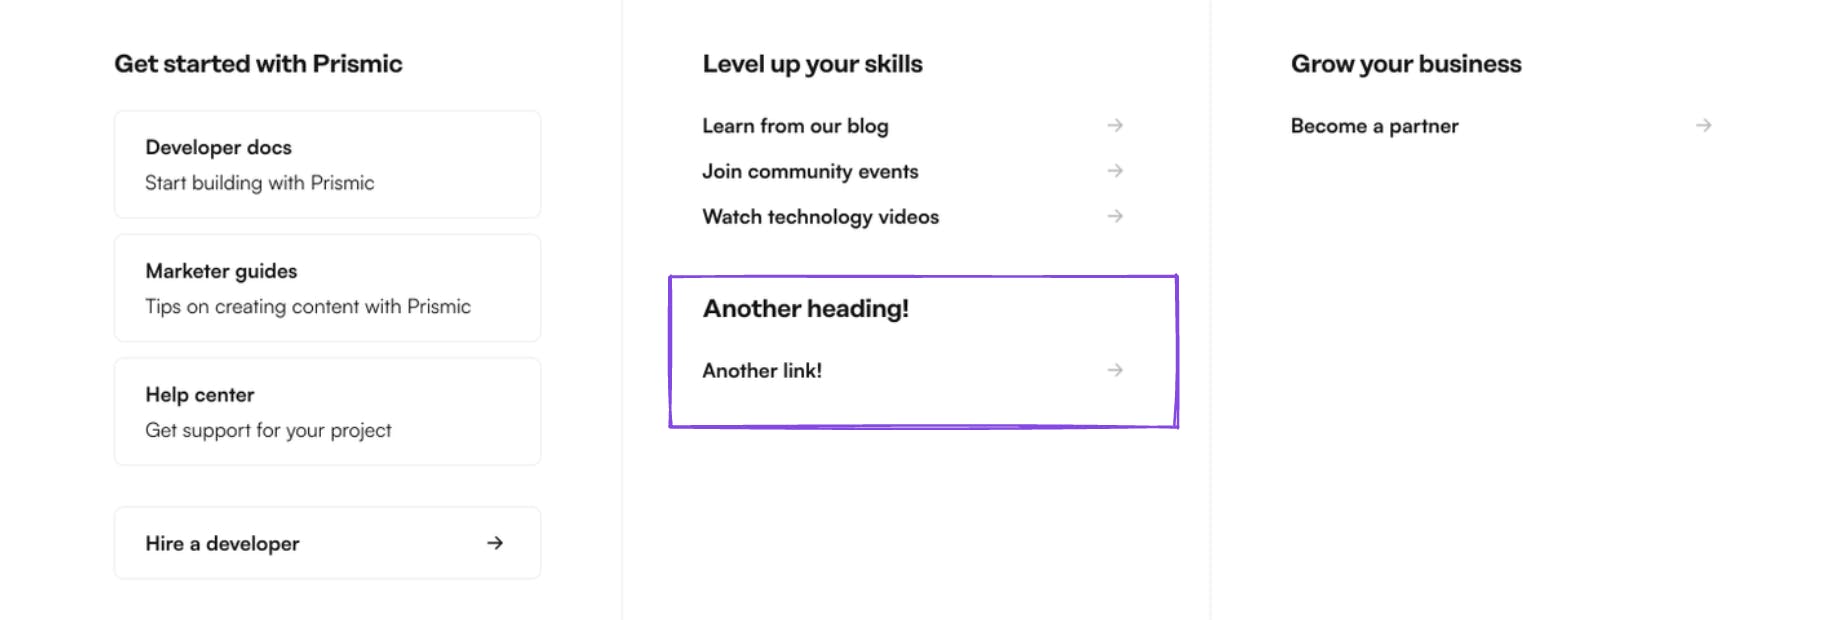
So why did we need a Slice for this? Couldn’t we just add a static ‘Heading’ field to each column?
The short answer is yes! However… adding this as a Slice provides more flexibility for our content team. If they choose to add another heading with relevant links in a given column, they have the ability to do so, for example:
Create a submenu item Slice
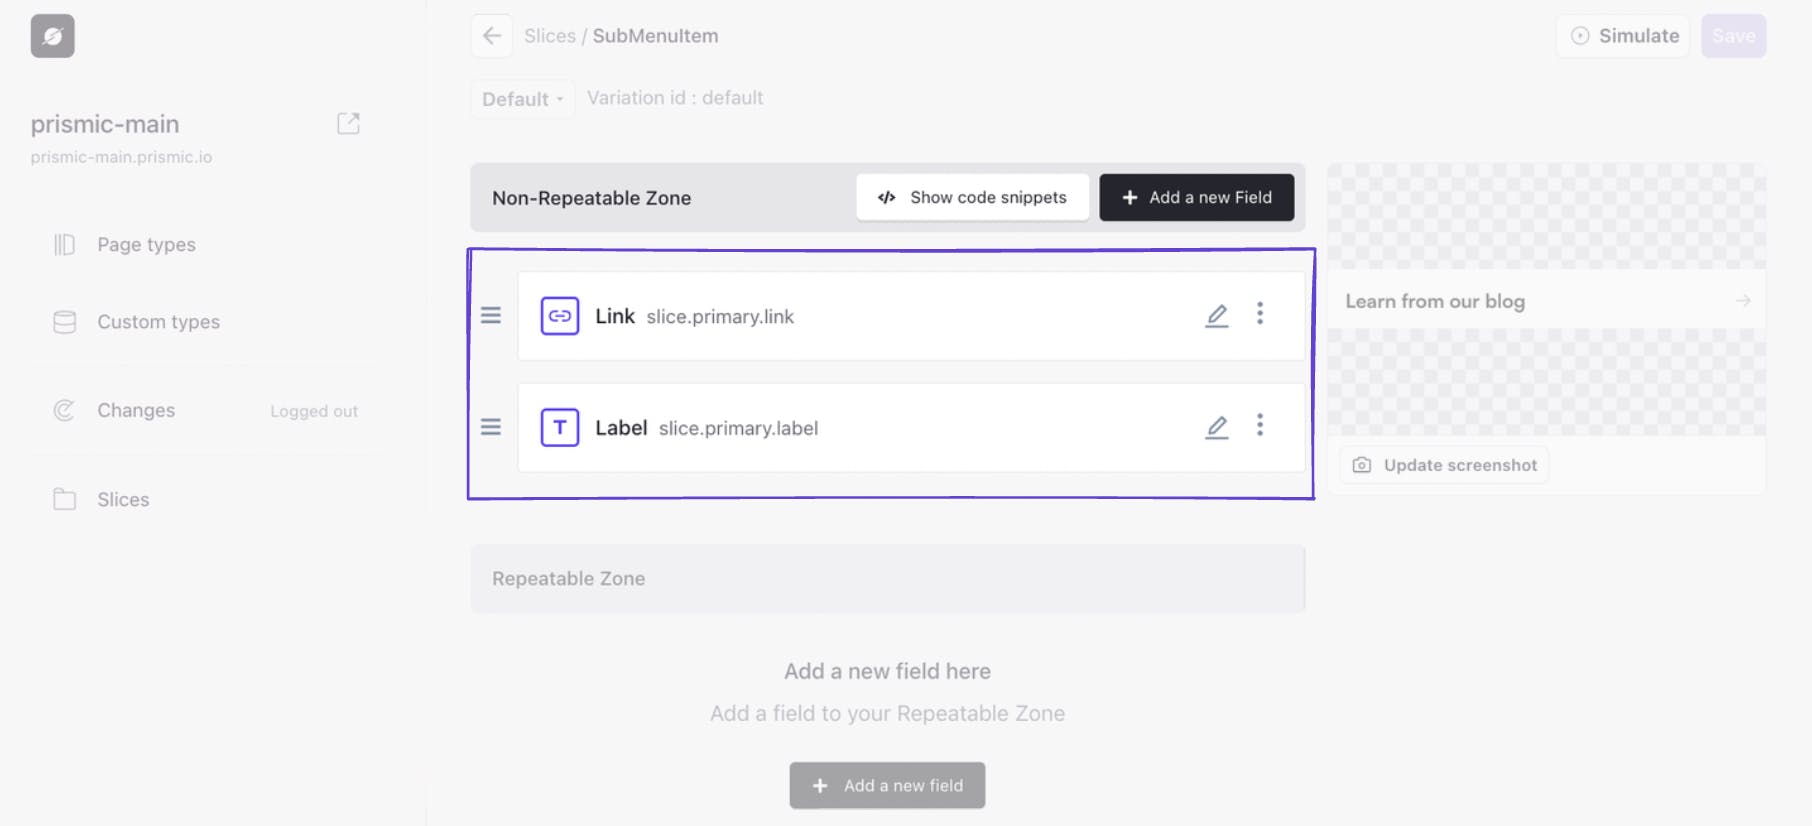
Now we need to account for the submenu items that appear in various styles below the heading in each column. To do this, we can create a ‘SubMenuItem’ Slice.
This Slice has two fields:
- A link field titled ‘Link’.
- A label field titled ‘Label’.
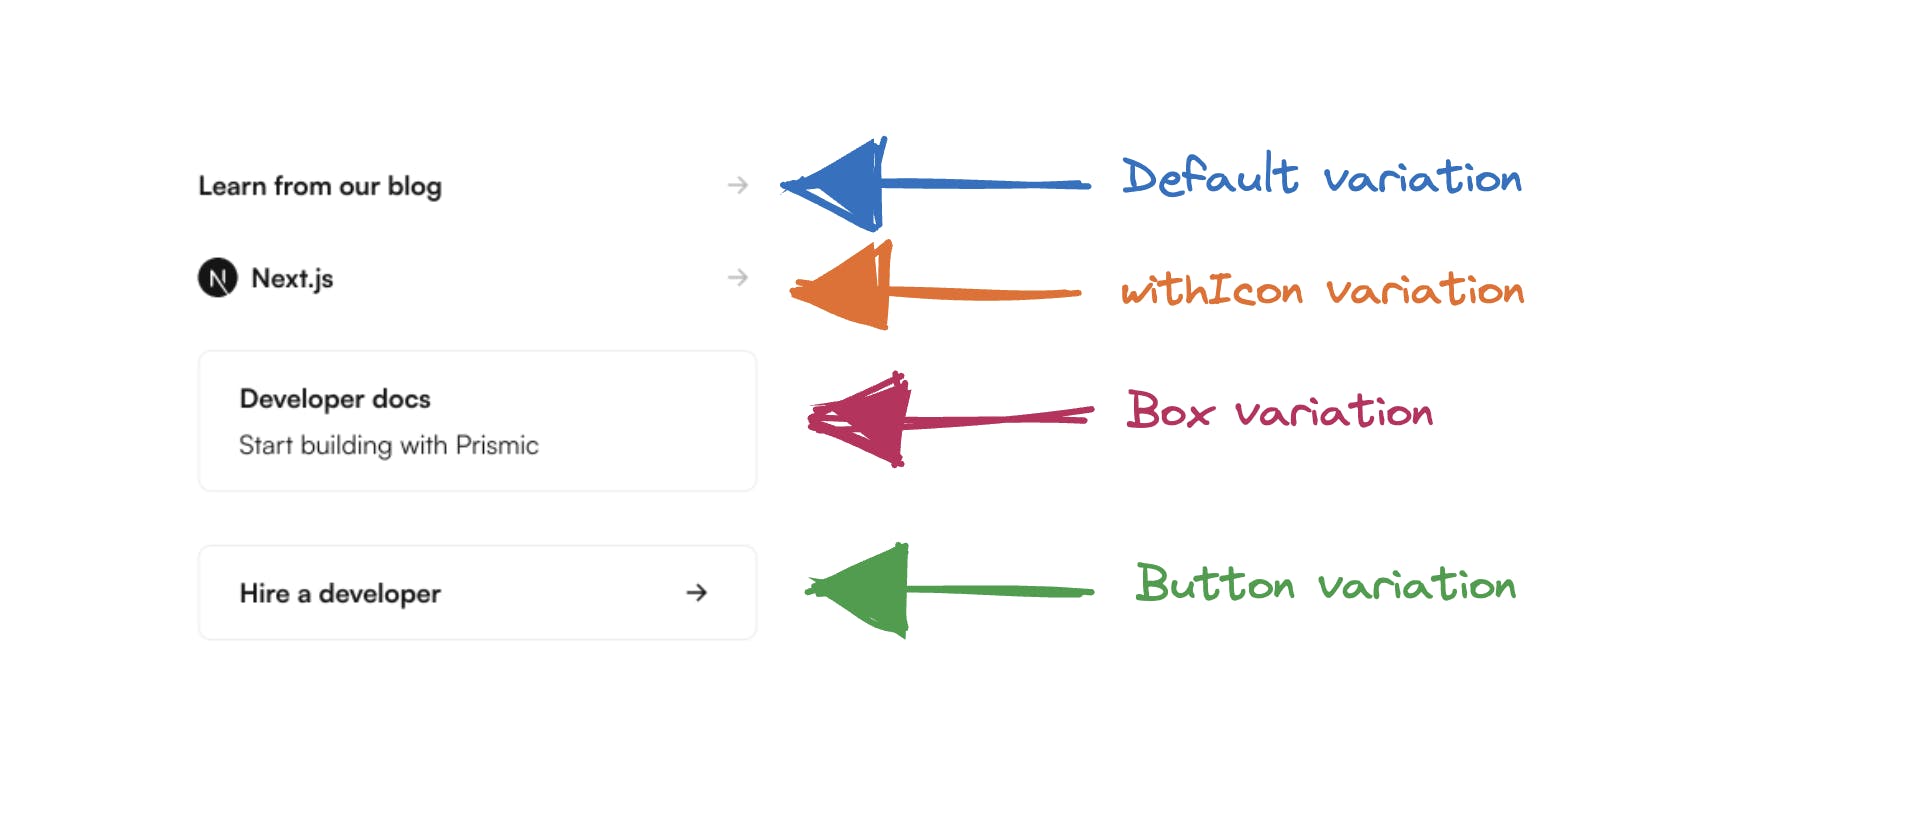
Great! We now have a Slice we can utilize for our submenu items. However, looking at the design of our submenu, not all links appear the exact same way. Let’s visualize all of the styles that our submenu needs to account for.
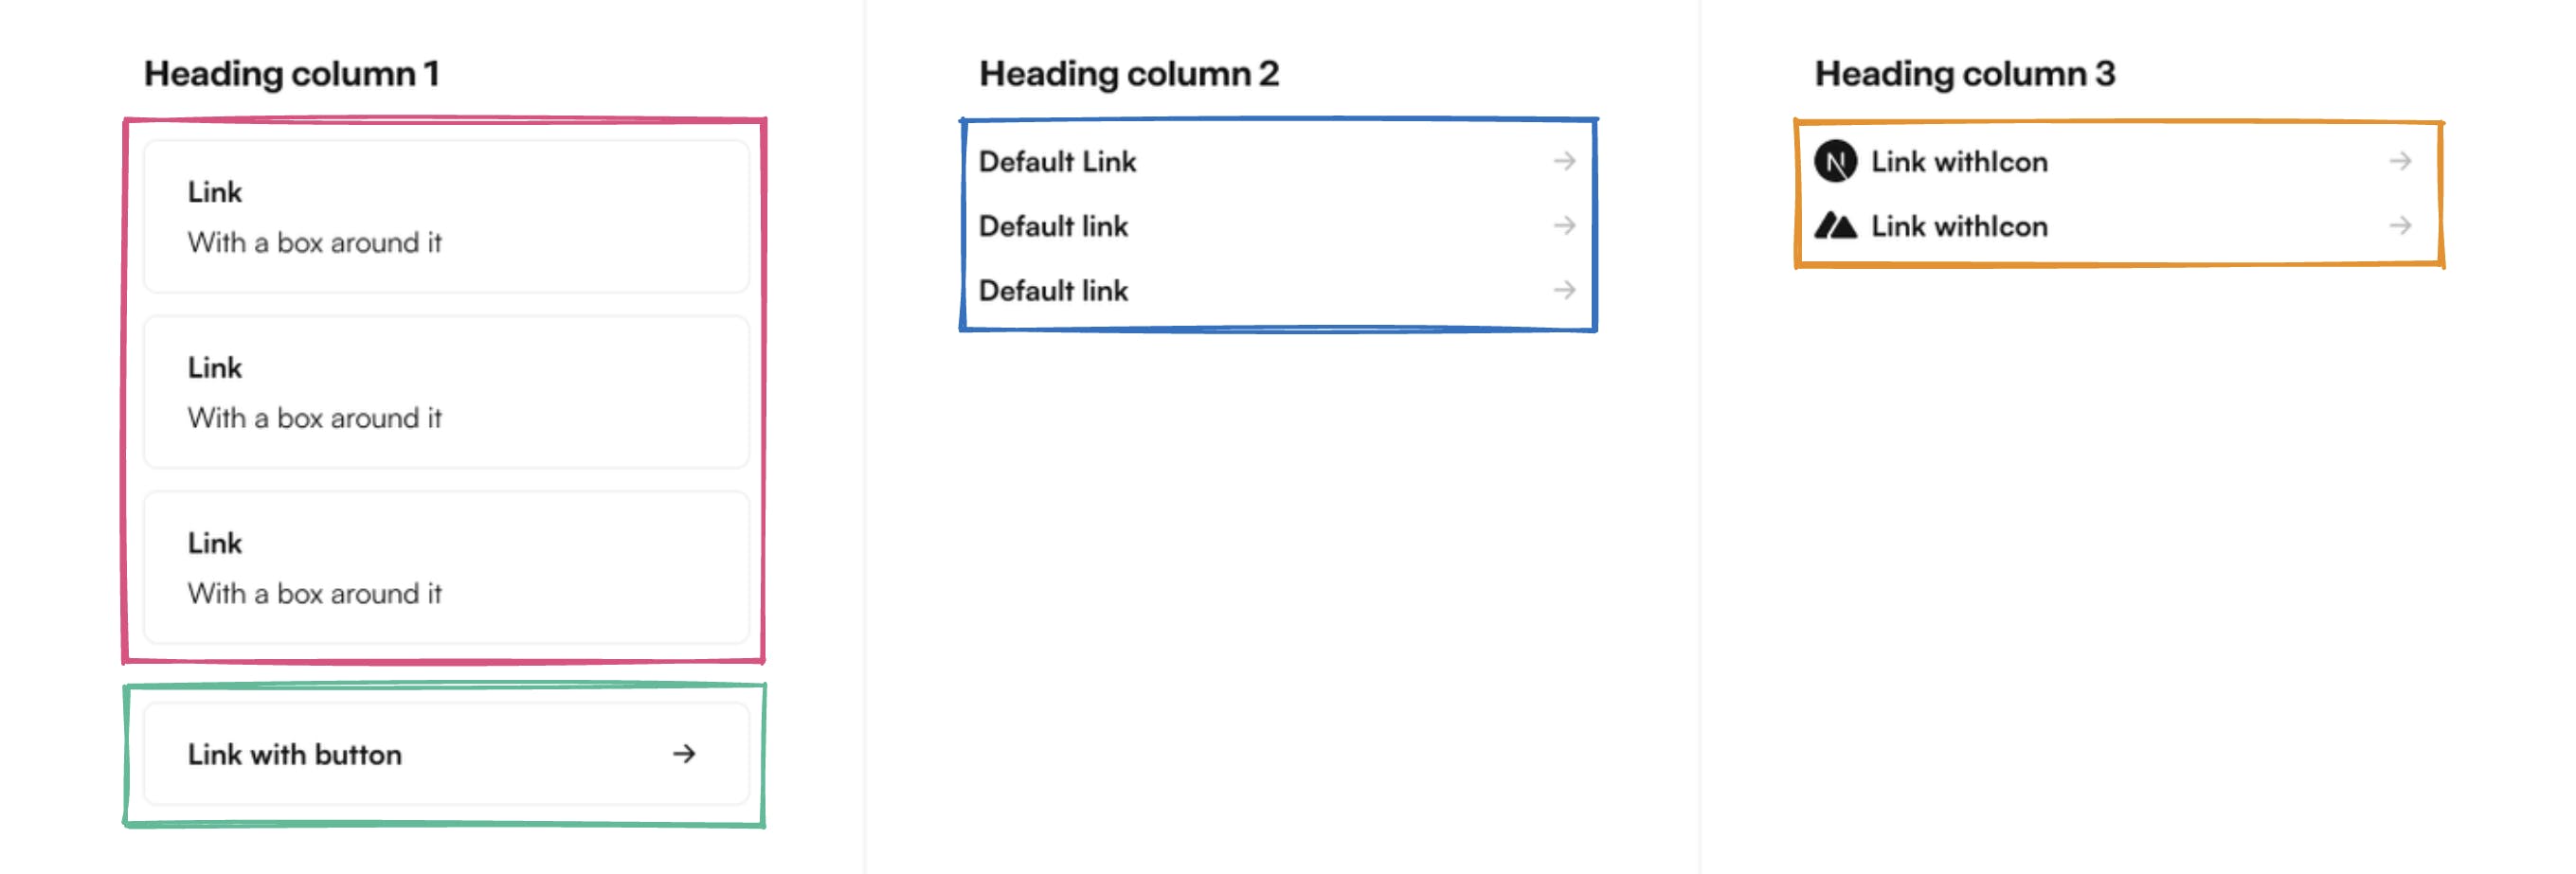
In our submenu, we can see 4 unique styles. To give our content team the ability to add submenu items in a variety of styles, we can simply add them as Slice variations!
Create submenu item Slice variations
Let’s create a Slice variation for each style from the design.
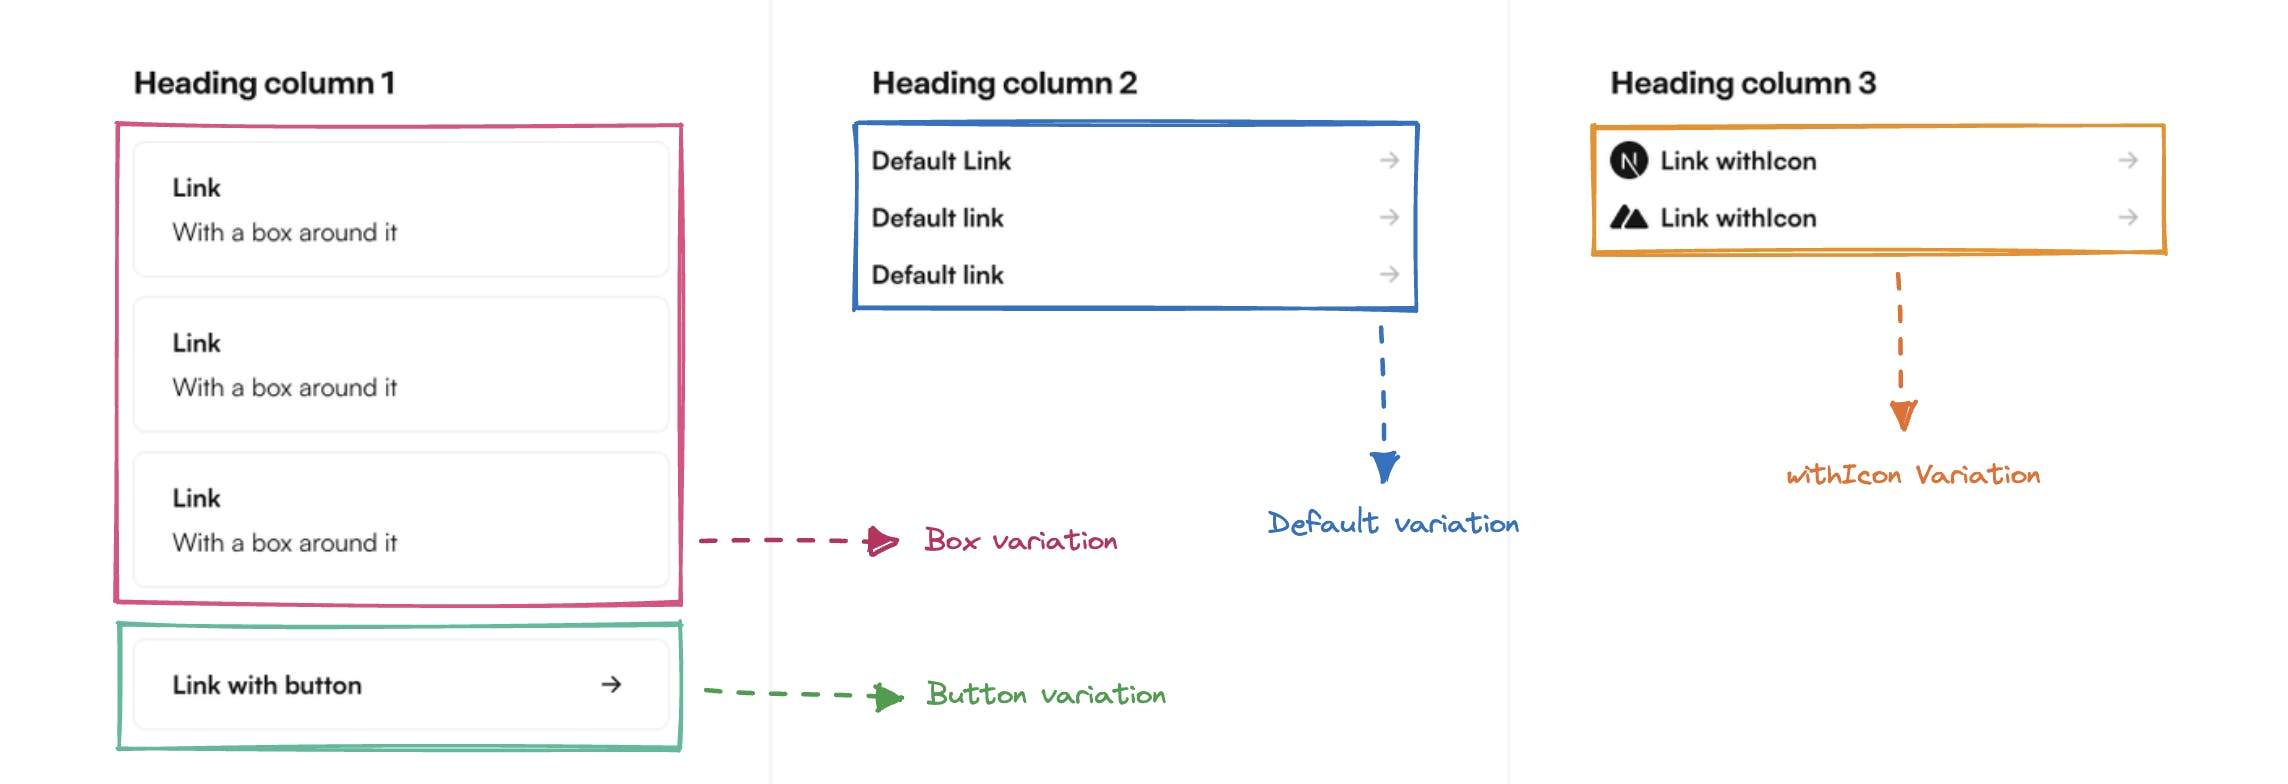
You can see we have the following variations:
- A ‘Default’ variation that we have already created.
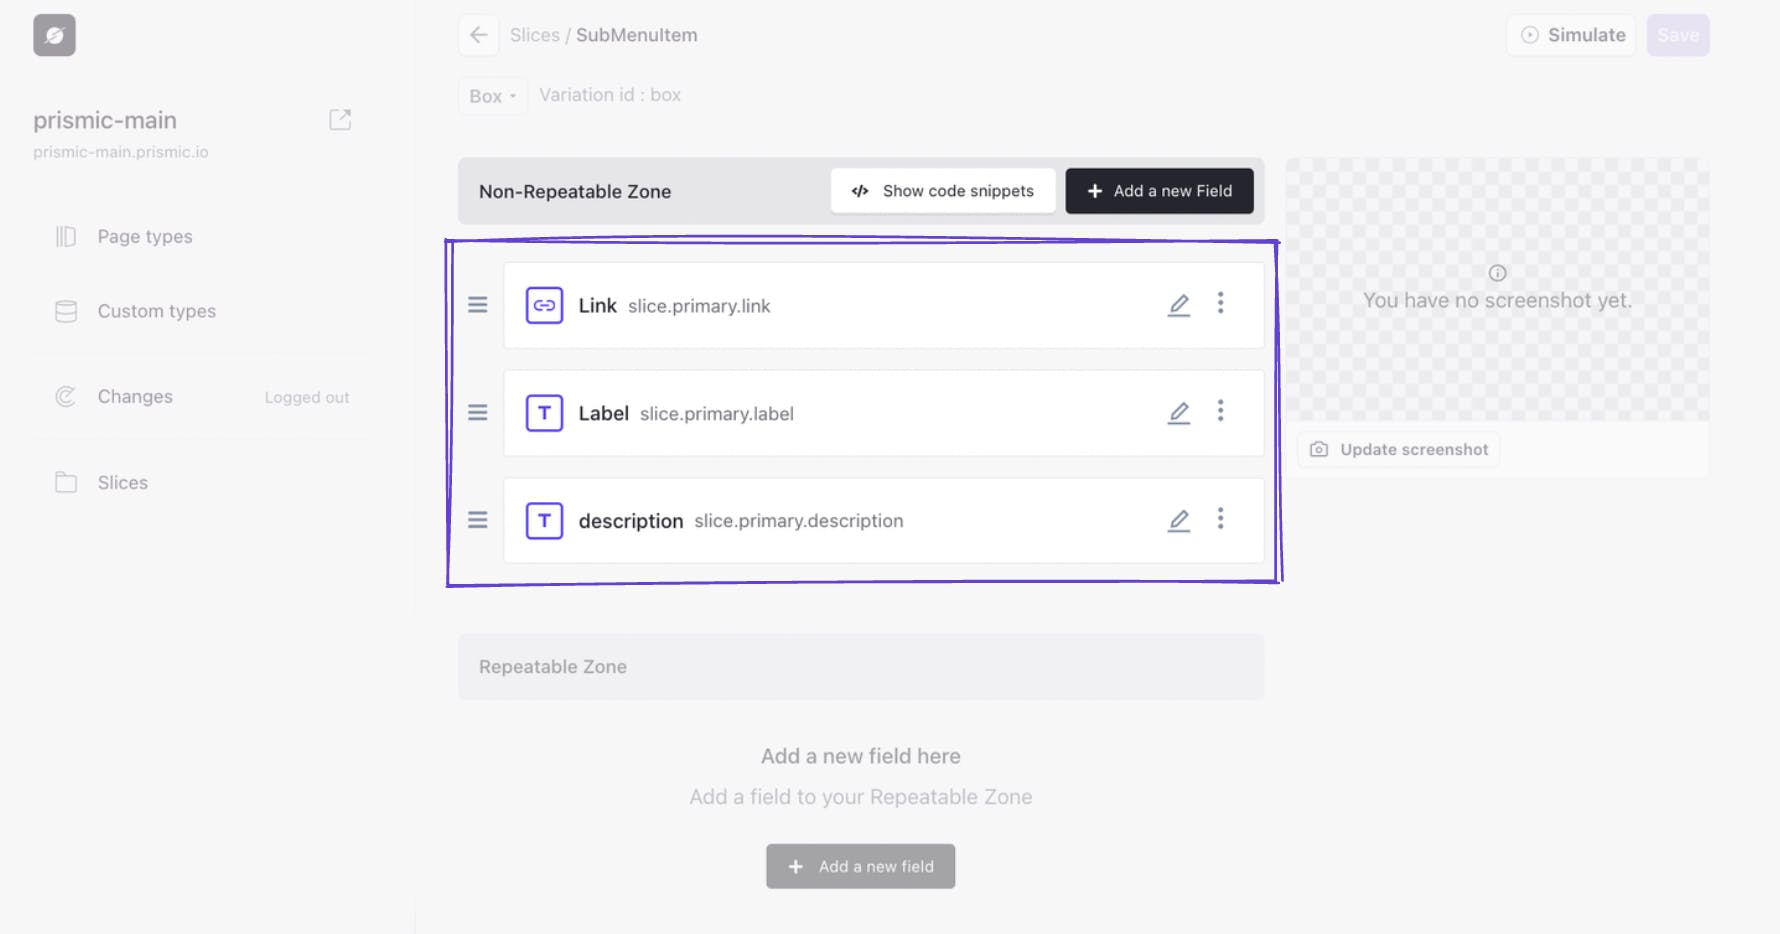
- A ‘Box’ variation that has a box around it as well as a description field.
- A ‘Button’ variation that is shaped like a button.
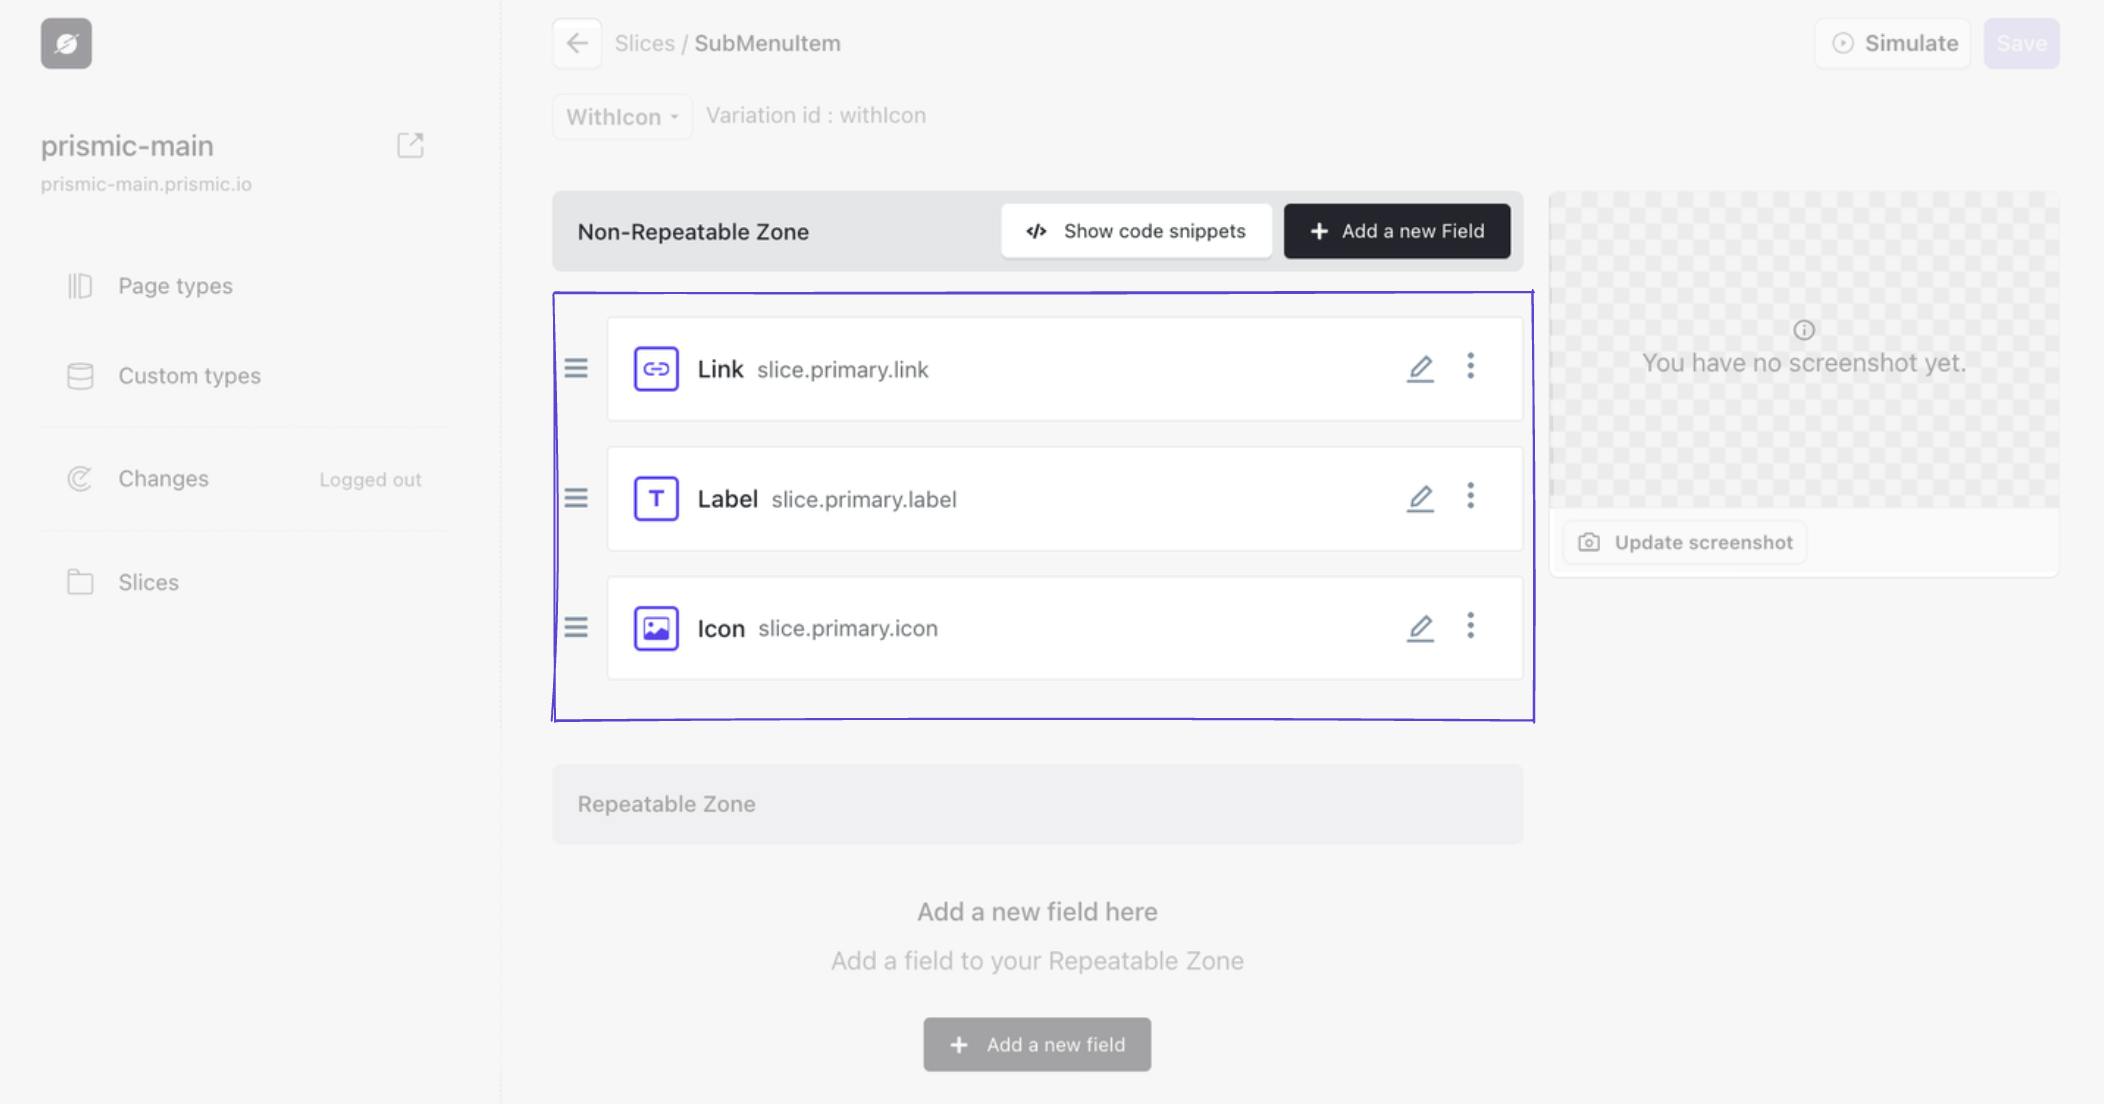
- A ‘withIcon’ variation that includes an icon to the left of the link.
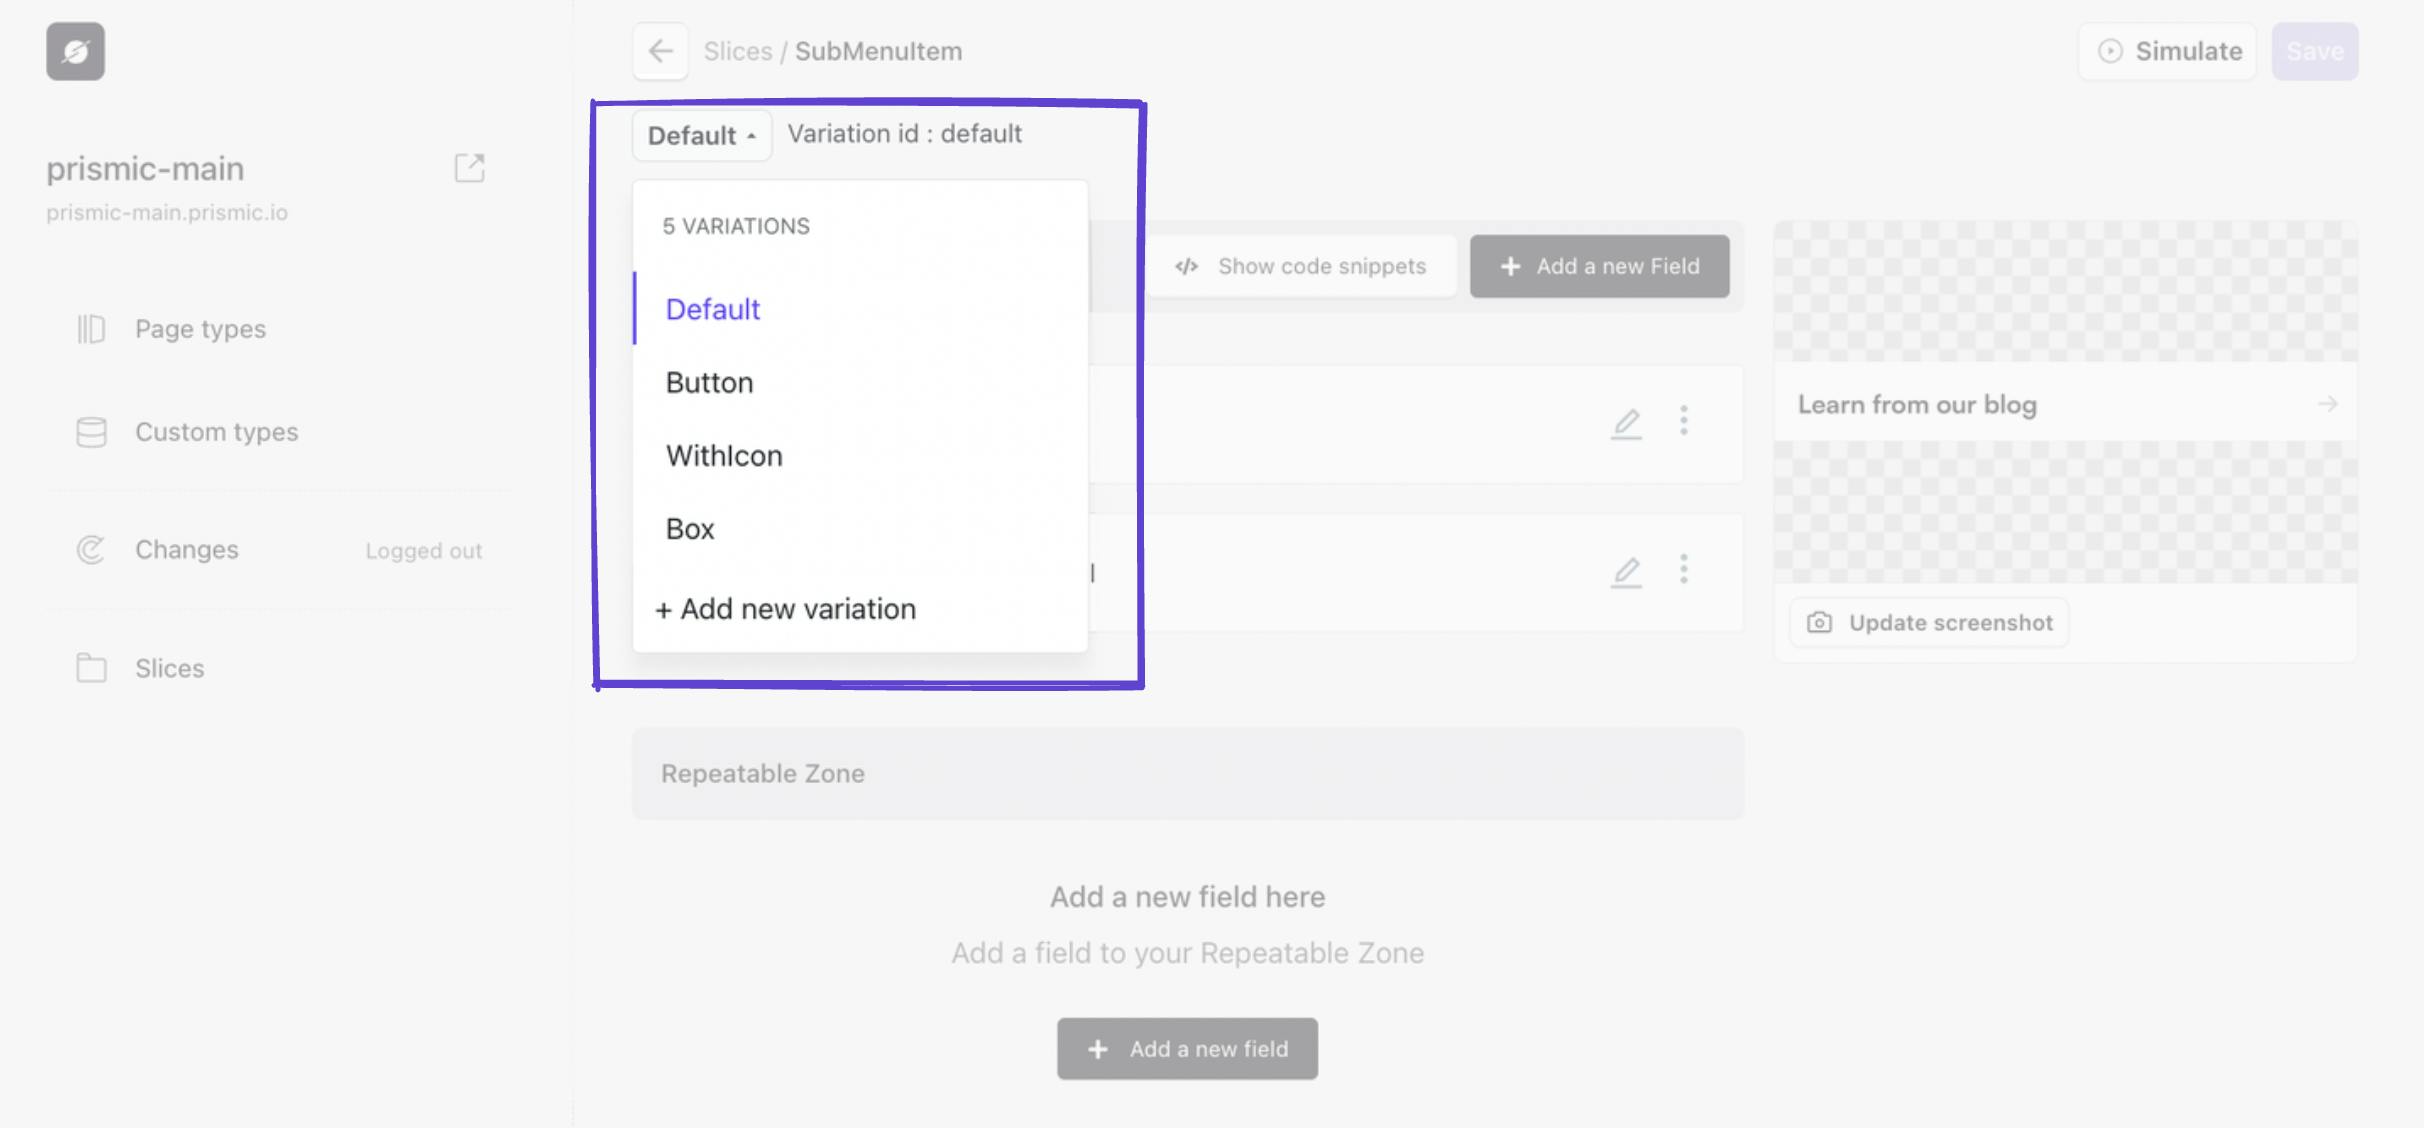
We can add all of these as variations to our ‘SubMenuItem’ Slice in Slice Machine.
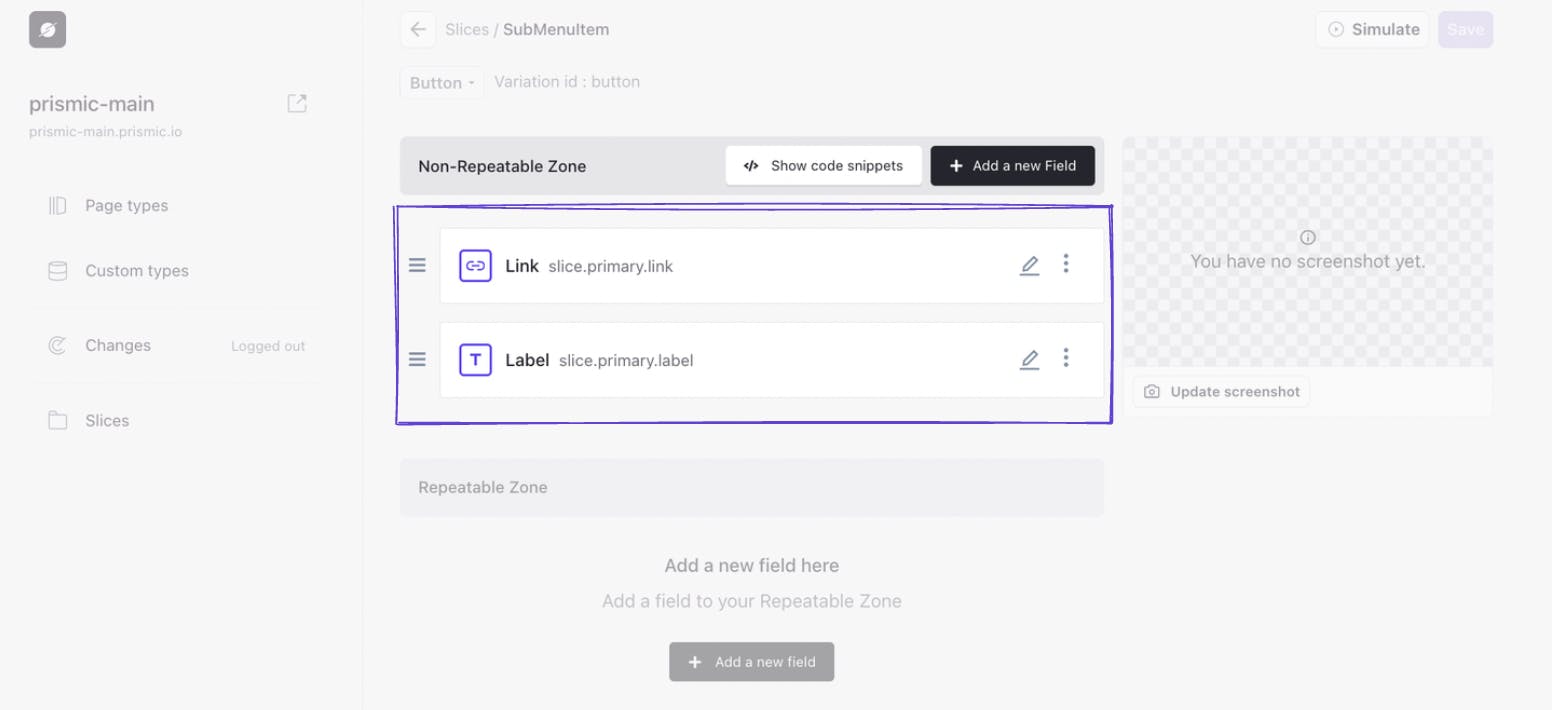
For the ‘Button’ variation, we can create the same fields as the ‘Default’ variation.
- A link field titled ‘Link’.
- A label field titled ‘Label’.
For the ‘Box’ variation, we will need to account for the additional description field. So it will have the following fields:
- A link field titled ‘Link’.
- A label field titled ‘Label’.
- A text field titled ‘Description’.
For the ‘withIcon’ variation, we will need to account for the additional icon field. So it will have the following fields:
- A link field titled ‘Link’.
- A label field titled ‘Label’.
- An image field titled ‘Icon’.
Connect our submenu to the top-level menu items
The last step requires us to go back to our ‘Layout’ custom type that we created in the first step.
Then we can navigate back into our submenu variation of our MenuItem Slice.

Here, if we edit the submenu content relationship field, we can set the ‘Types’ to ‘Sub menu’ and no other custom type.
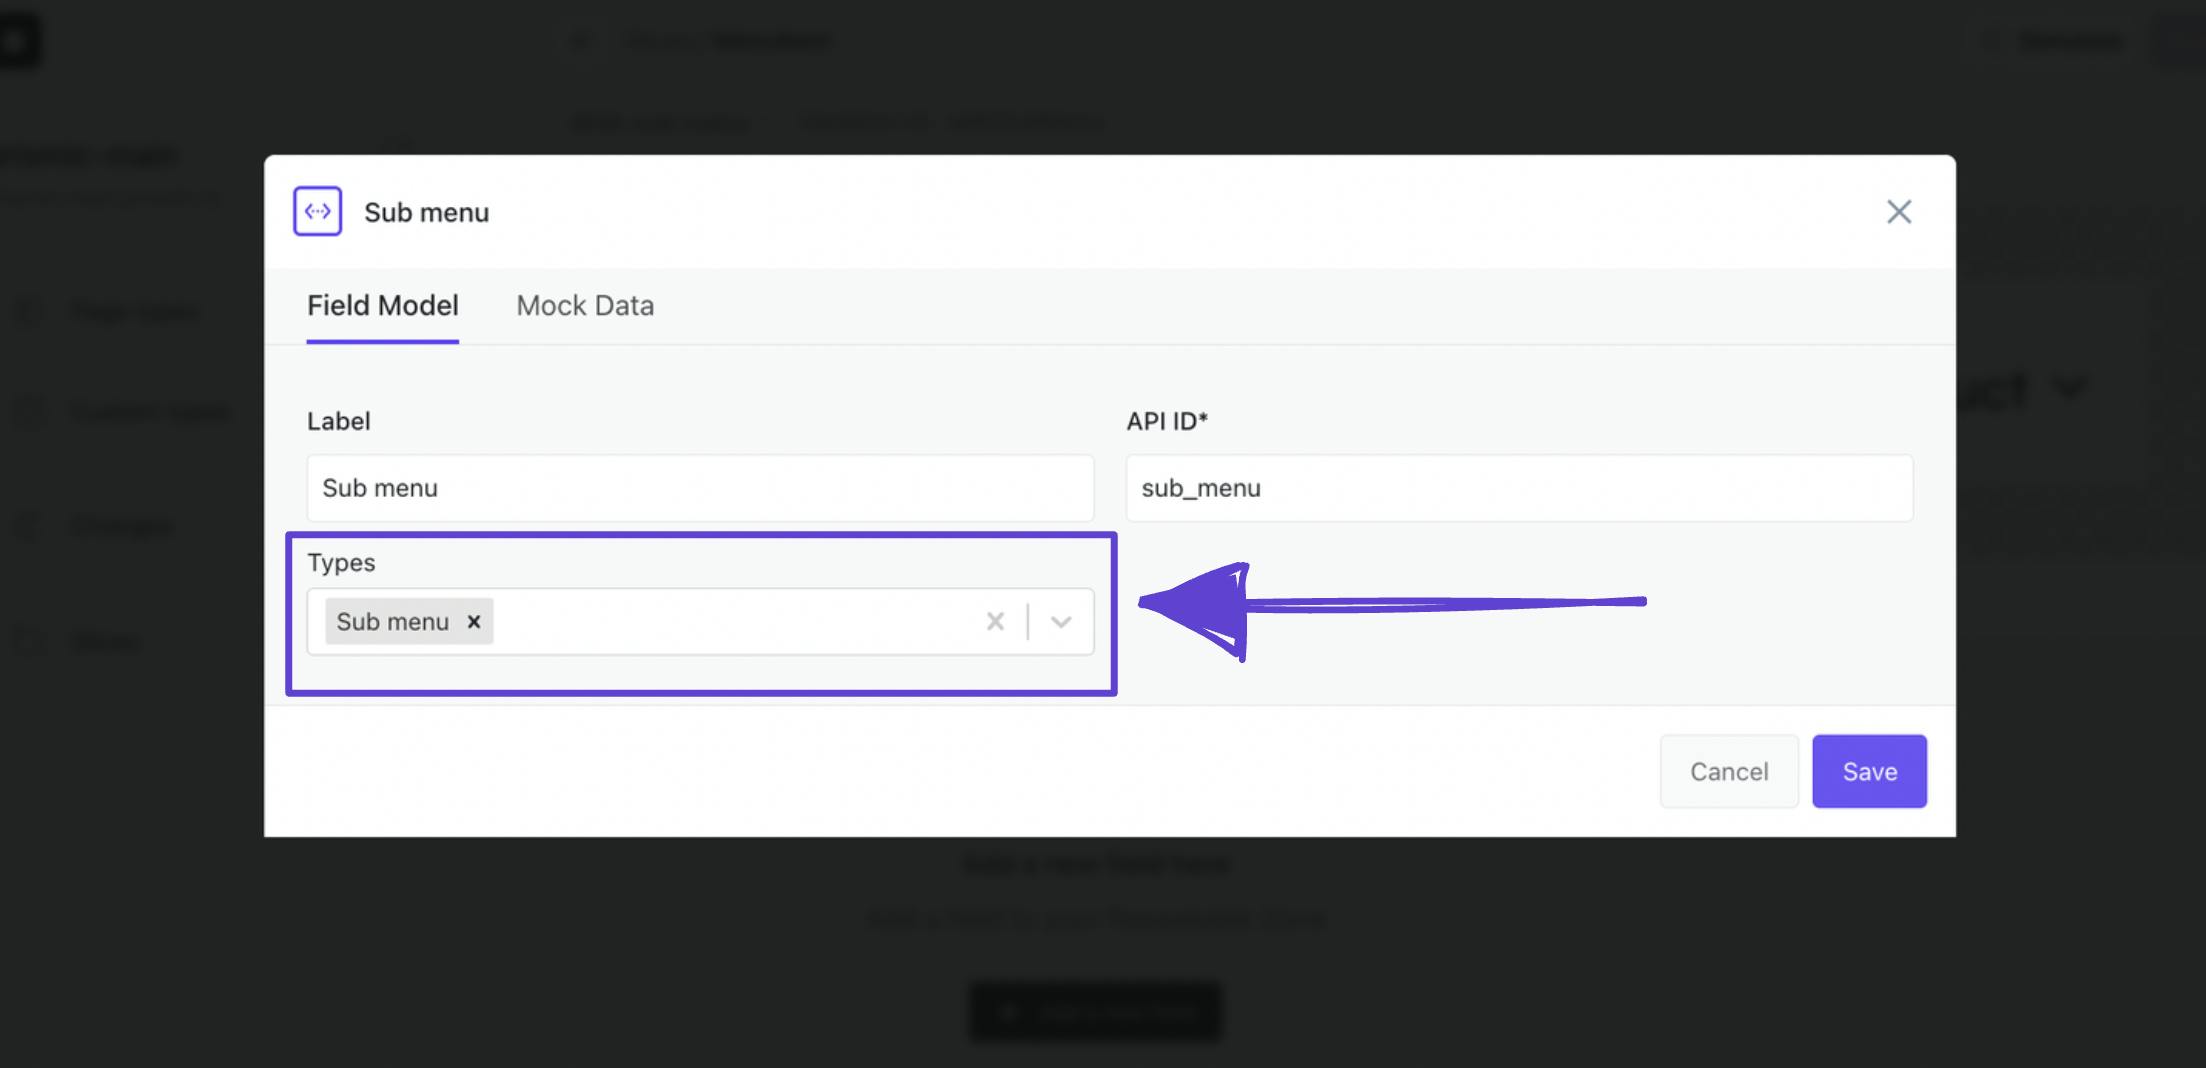
Now our content team can connect a top-level menu item to a submenu, but we have made sure they can only choose a submenu custom type to provide additional quality control in the Page Builder.
How the submenu model translates to the Page Builder
Since our submenu custom type was a repeatable type, we created two documents in the Page Builder, one for each menu item that had a submenu. We called them:
- [Top Navigation] Product
- [Top Navigation] Resources
to correspond with our top-level menu items.

Reusable types for creating ‘workspaces’
Structuring the submenu as a reusable type made it so that we have two separate spaces for these different submenus. This can be particularly beneficial if your team is larger and you have different people working on different parts of the website. You can think of it like your own ‘workspace’ that you go to in order to make updates to the content that is relevant to your team.
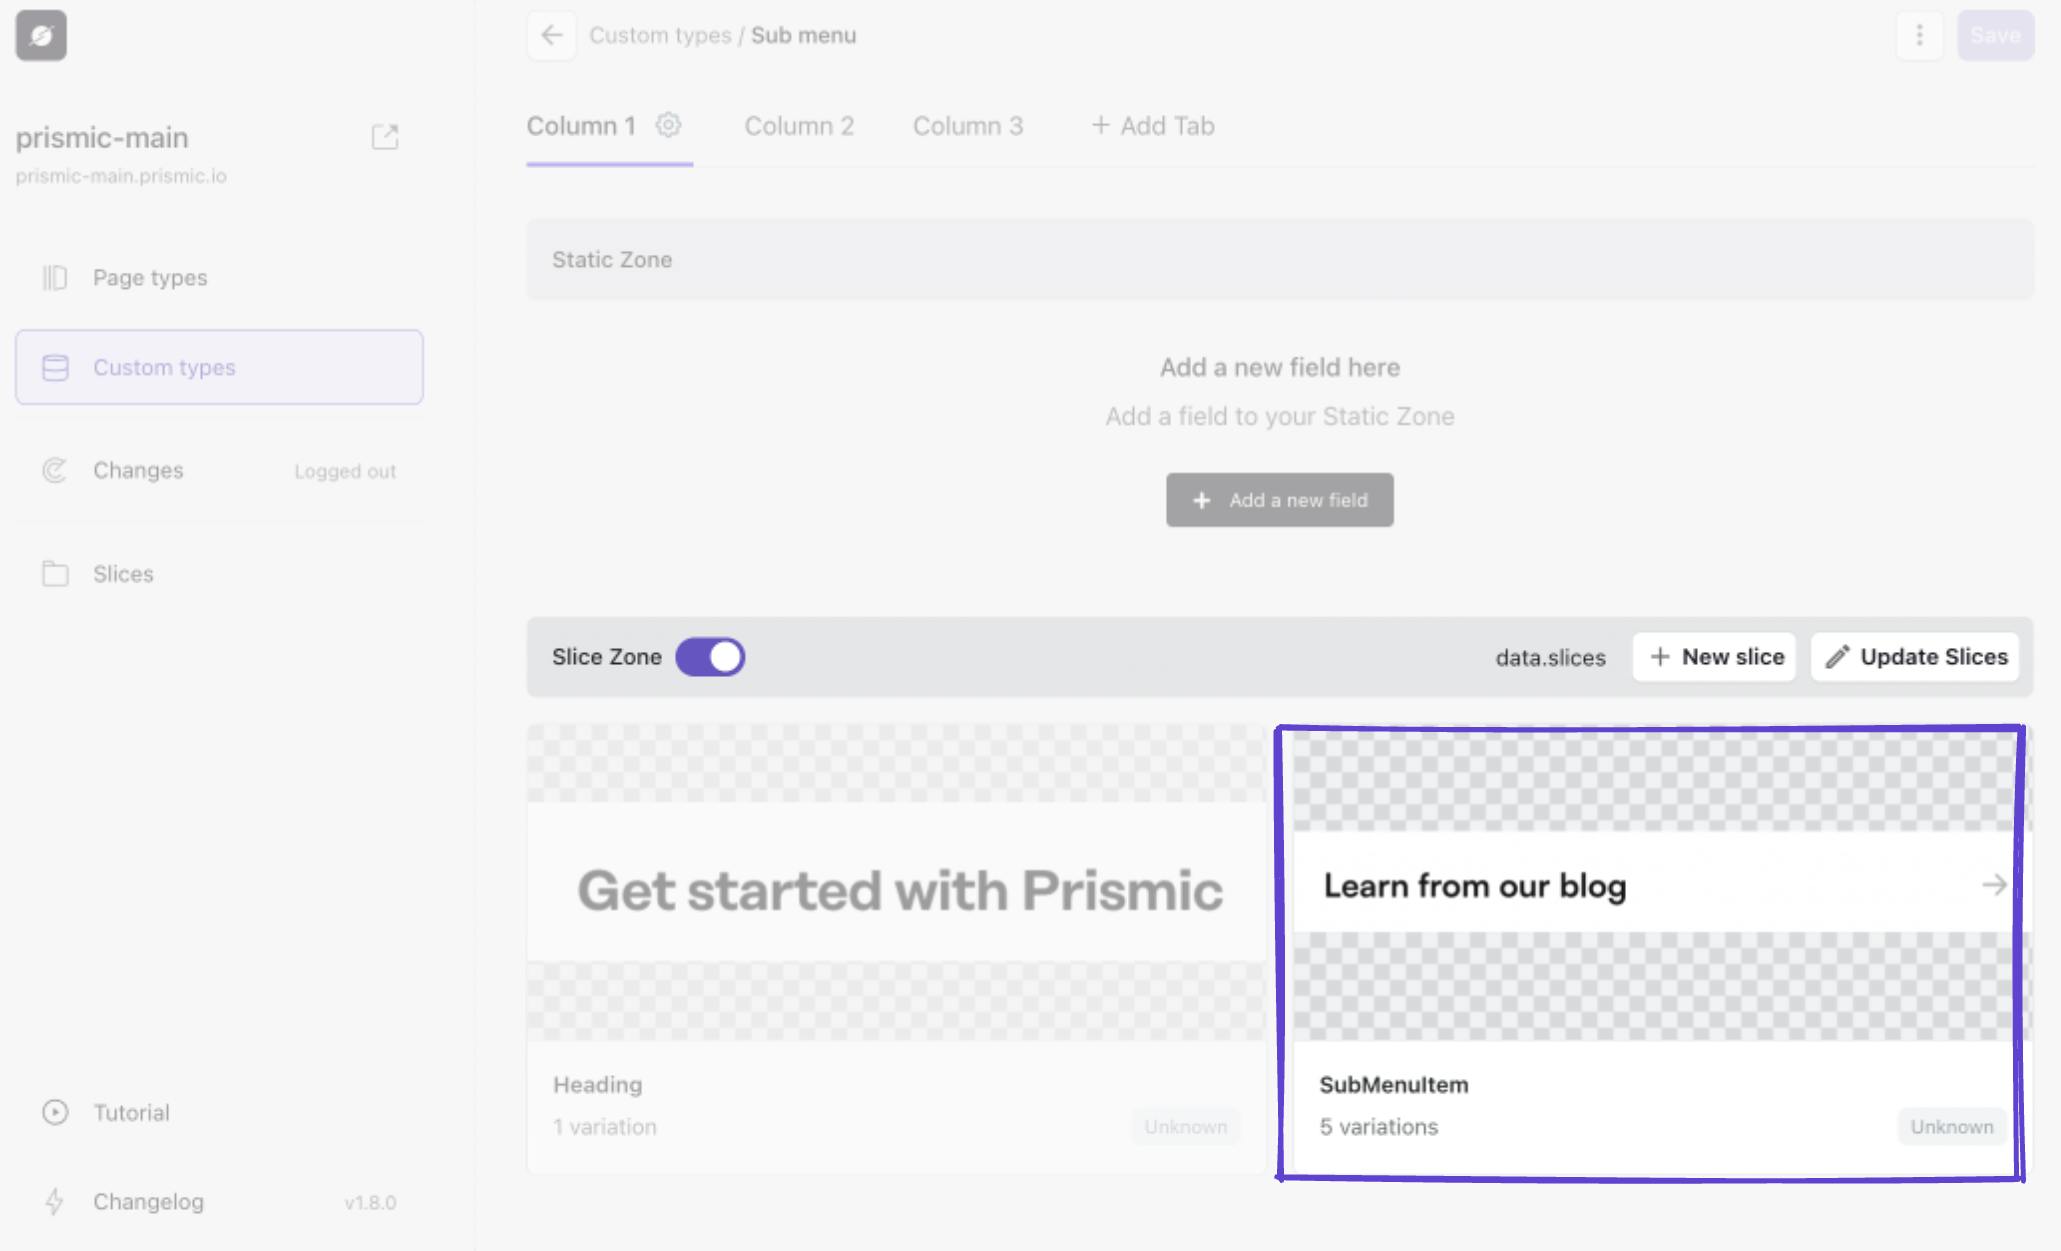
If we take a look at our [Top Navigation] Resources document, we can see our three columns at the top that represent each column in the submenu.
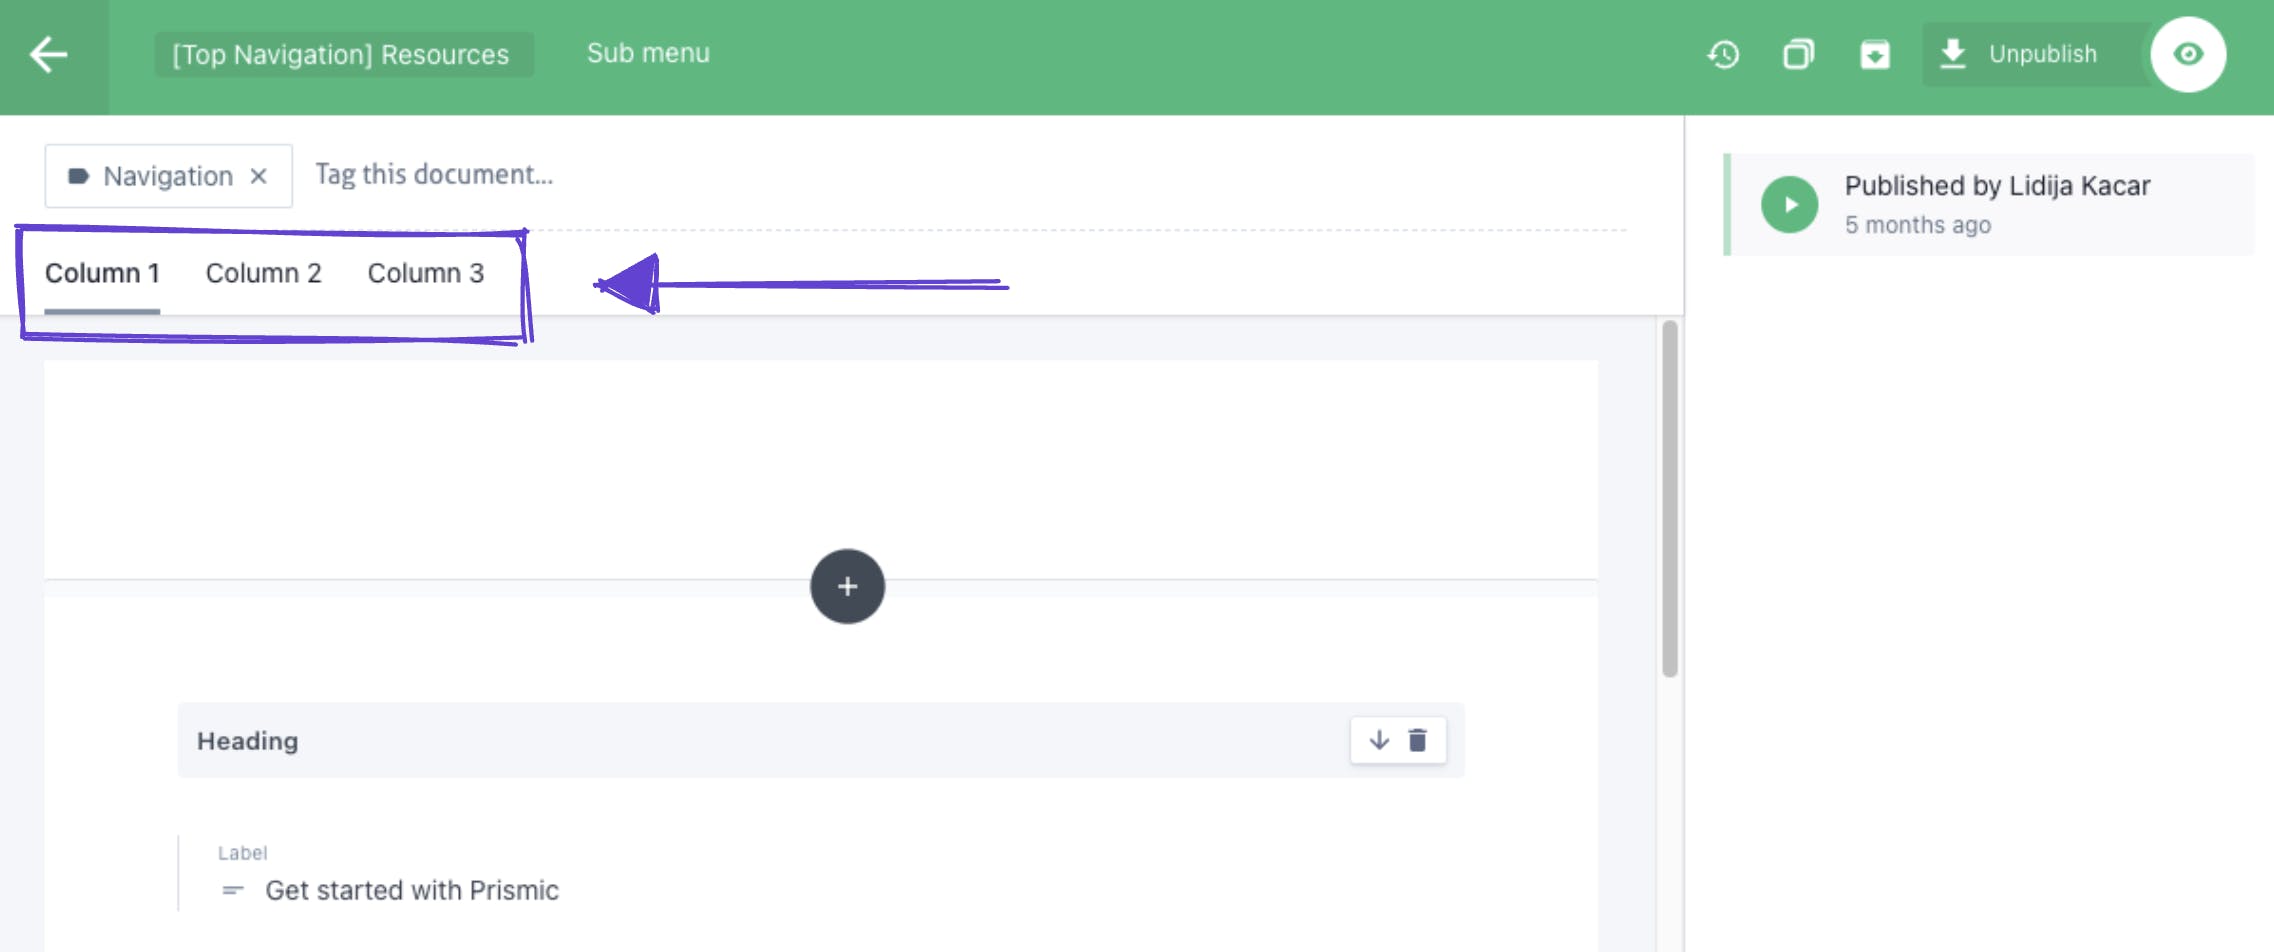
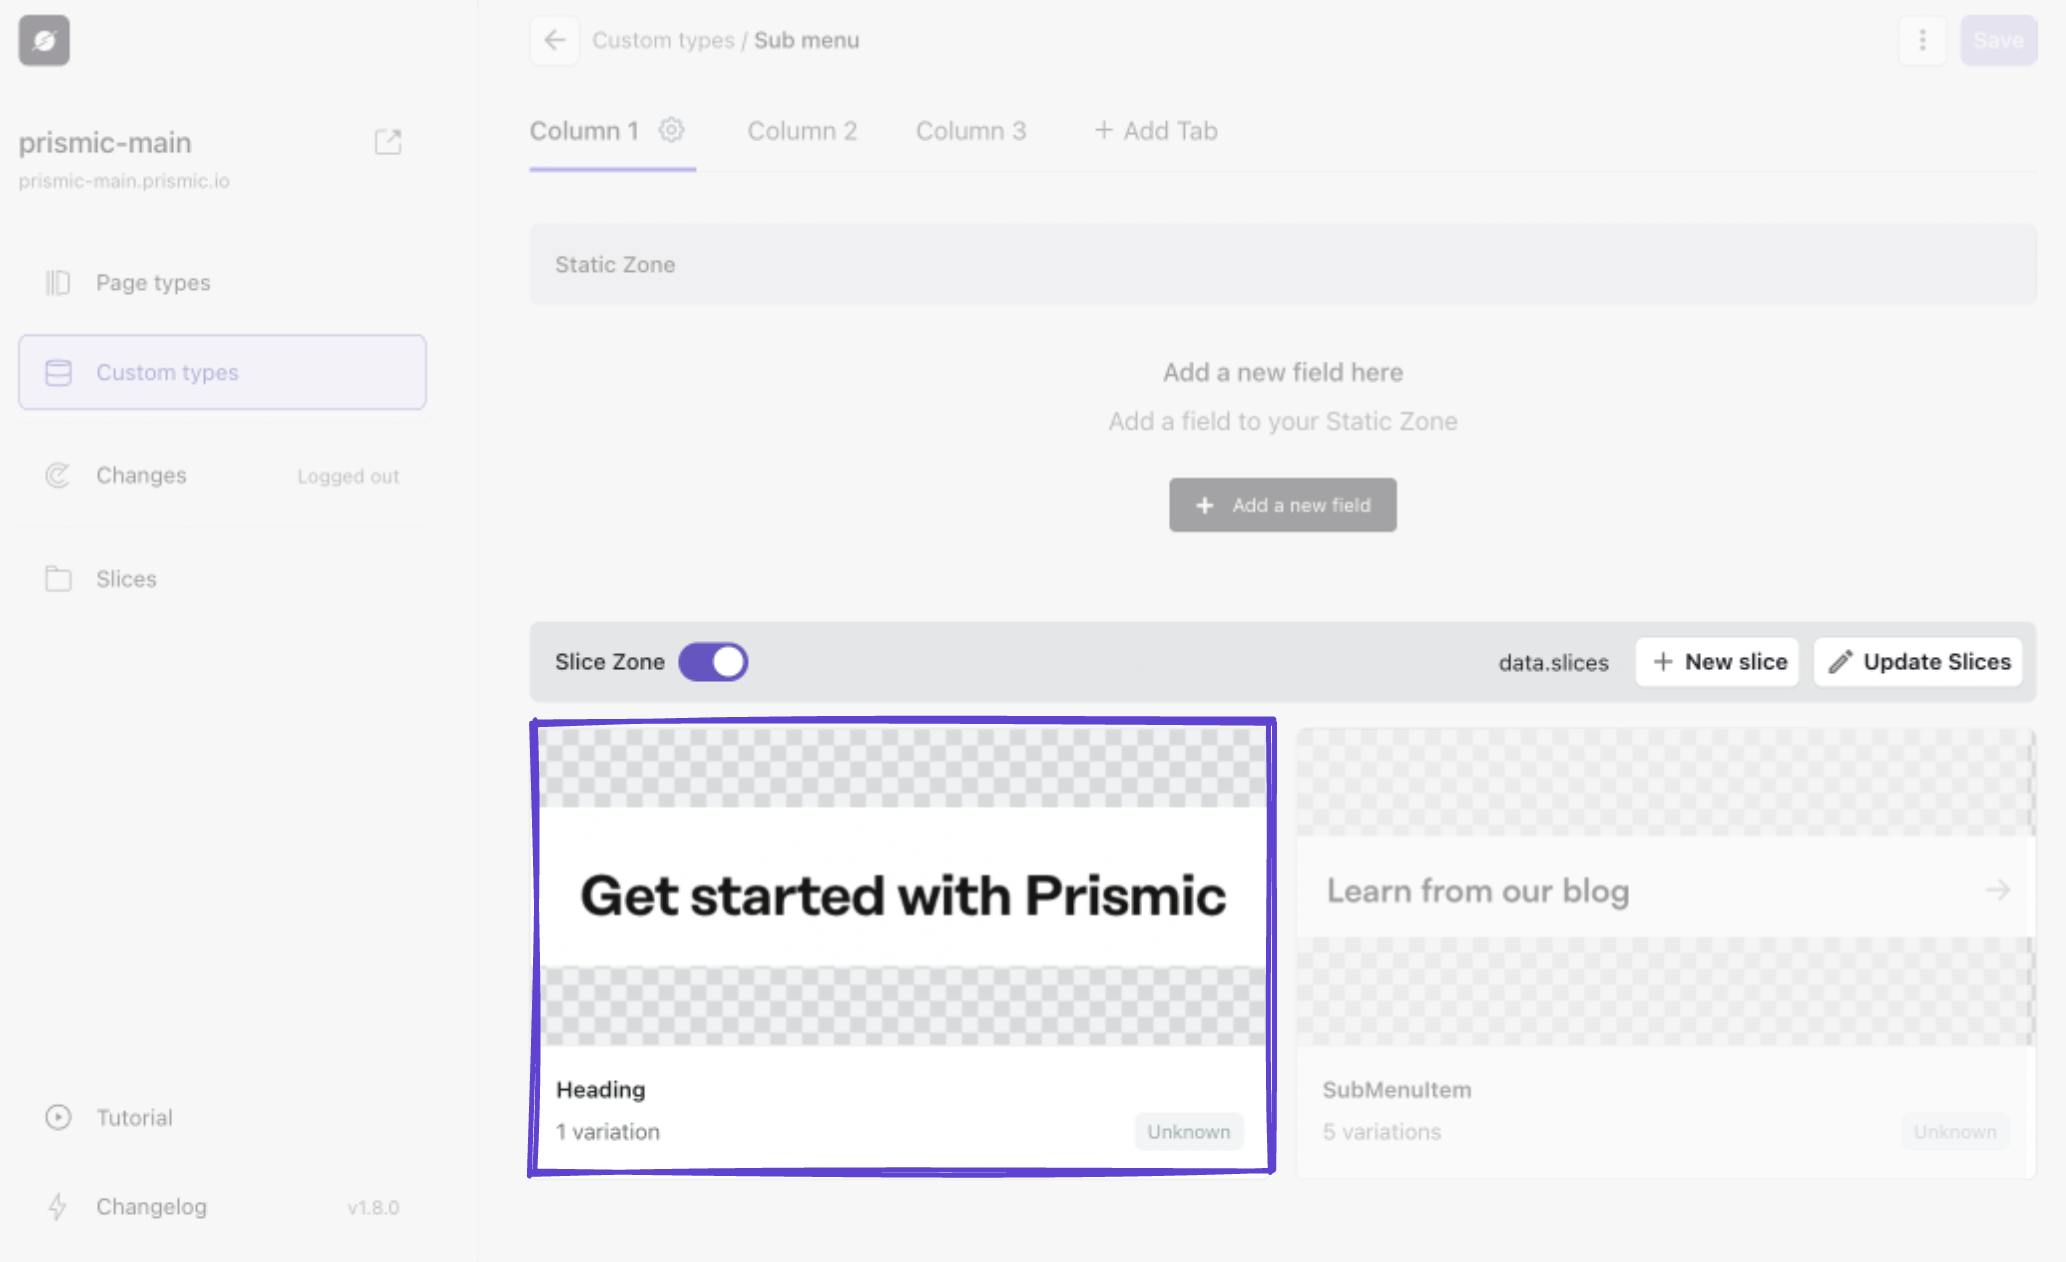
Then if we scroll down in our document, we can see our Slices.
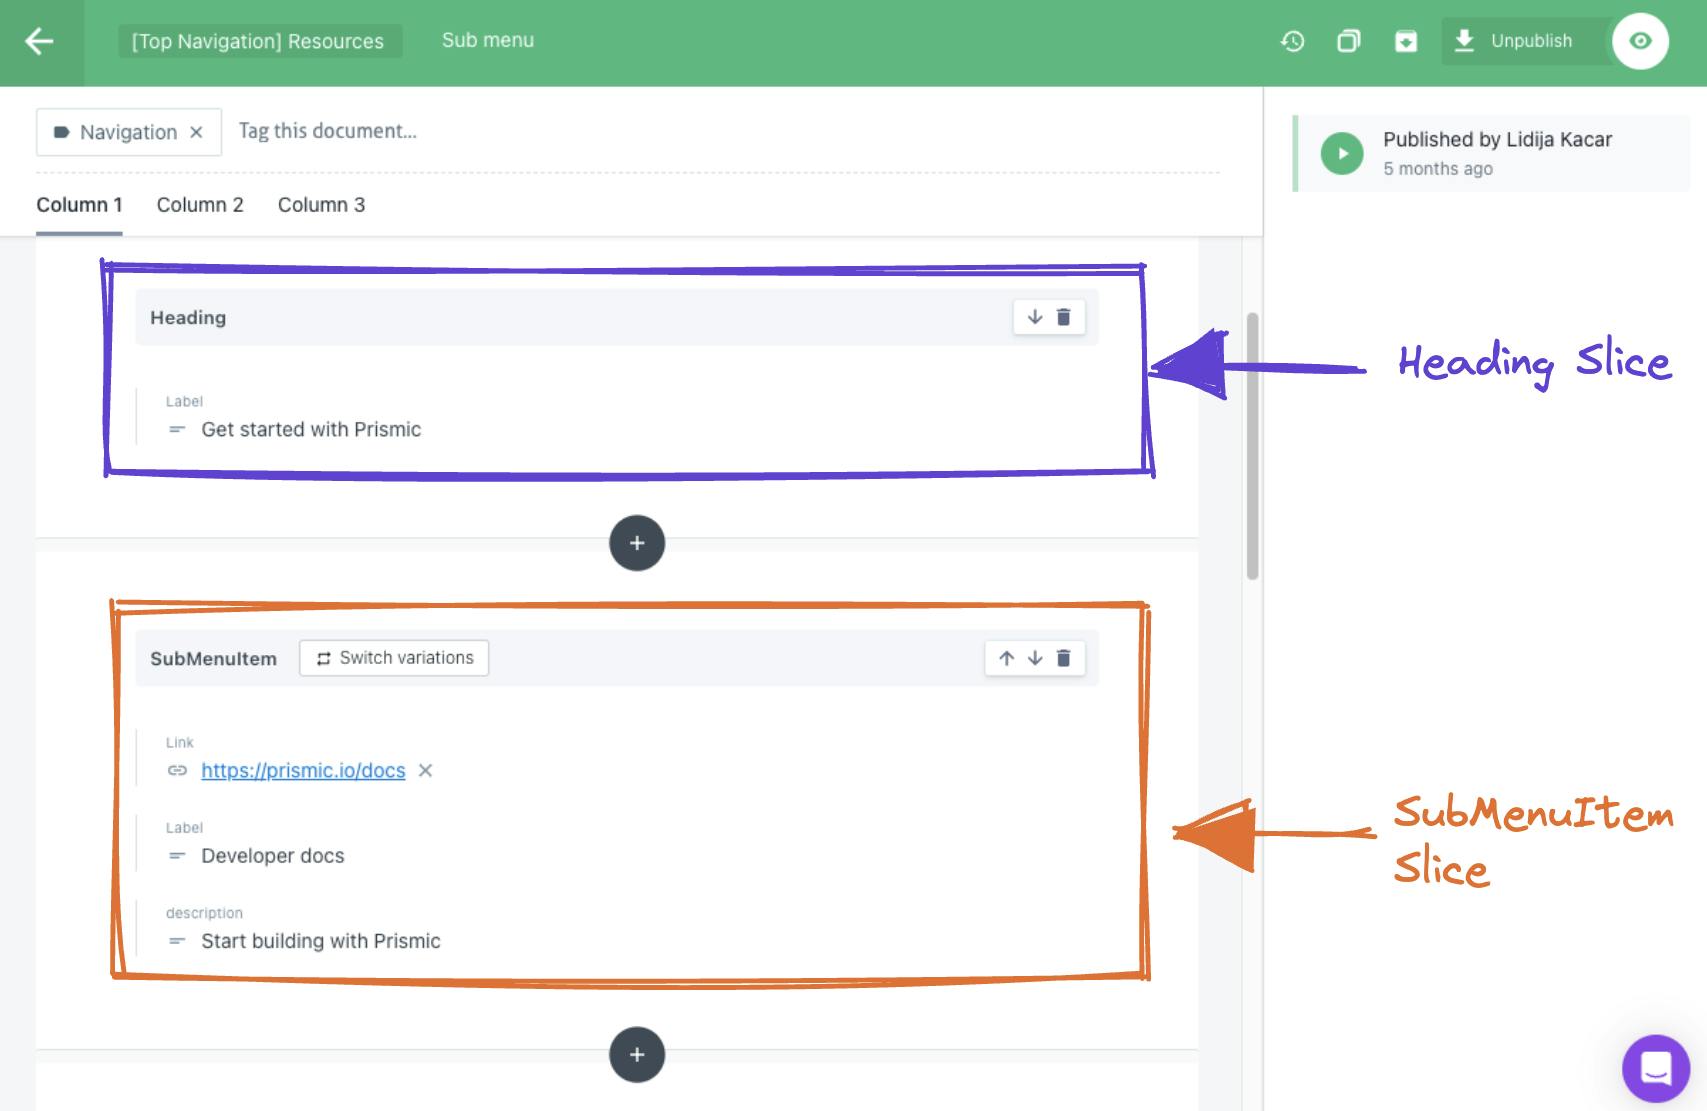
At the top of each column, we have added our ‘Heading’ Slice with a single text field for the heading of each column of our submenu.
We also have our ‘SubMenuItem’ Slice that we can add for our submenu items. For each of these Slices, we can select from our four Slice variations.
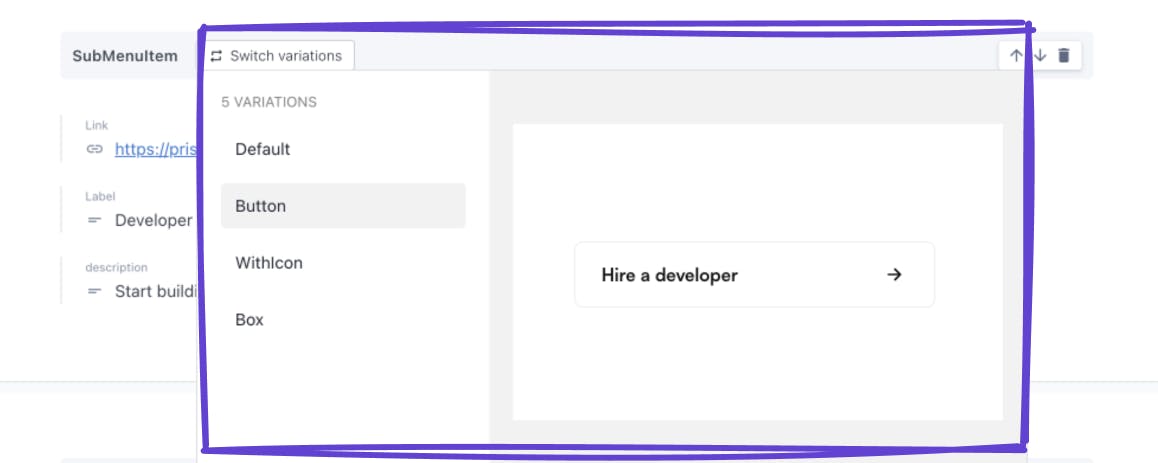
As a developer, adding screenshots of what the variations look like is super helpful for a content team. As you can see above, when I hover over the ‘Button’ variation, I can see what that will look like on the front end. If I were to do the same with the others, I’d be able to visualize each unique style.
And that’s it! We have successfully modeled our mega menu using Prismic.
As you can see, there were quite a few steps to create a nested menu, which is why our team is actively working on plans to further simplify this process! Let’s find out what’s in store! 👇
Future plans for navigations with Prismic
At the end of May, we announced the addition of ‘page types’ as a new and simplified way to build with Prismic. This was step one in our initiative to center our focus on core website elements like pages, navigations, sections, etc., and provide you with a simple and intuitive experience in building and managing websites.
Great news - we have plans to do the same with navigations! Our goal is to take the simplicity of page types and apply similar capabilities to other common website elements, like navigations!
Want to stay in the loop about our latest features?
Don’t miss out on any exciting updates! Check out our progress page to stay informed about the latest shipped features and what’s currently in the works!
Key takeaways
In this post, we covered one approach to modeling a multi-level menu in Prismic. We learned:
- One approach to modeling a simple top-level menu.
- One approach to modeling a nested, second-level submenu.
- Best practices for utilizing features like Slices, tabs, and Slice variations.
- How the Slice Machine features showed up in the Page Builder and on the front end.
- Future plans to further simplify this process.
Our hope is that this helps spark some ideas for how you can tackle modeling your own navigation. Stay tuned for more updates!


