

Over the past ten years since its inception, React has undergone a few updates that dramatically changed how developers work with it. The most notable update that comes to mind is Hooks, introduced in React 16.8.
Hooks changed how we worked with React’s lifecycle methods and state. They allowed Function components to hook into what was previously reserved for Class components. This led to an explosion in popularity for Function components, fundamentally changing how we write them to the point that Class components are seldom seen now.
React Server Components (RSCs) are the latest update to cause this seismic shift in how we work with React.
In this post, we’ll examine RSCs in more depth, their workings, the problems they aim to solve, and how we can use them inside a Next.js App Router application.
What are React Server Components?
At the top level, React Server Components is a new way of working inside React which allows us to create components that run solely on the server.
In turn, this makes available a lot of exciting possibilities that were previously impossible. For example, having async function components or performing database queries directly inside components without needing an intermediary API. This means we can do things like the below that would’ve previously been considered a big no-no in traditional React.
export default async function User() {
  const user = await db.getUser();

  return <p>{user.name}</p>;
}
But now, because of Server Components, these ways of working are very much possible. However, there are some things you need to keep in mind.
First, the underlying rule of Server Components is that they will never re-render or hydrate on the client. The code will run once on the server to generate the UI, and then that immutable output is sent to the client, which won’t change while the user is on that page.
What this singular server rendering approach means is that all Server Components code has to be serializable.
In layman’s terms, these two rules mean a large portion of React’s existing API is now incompatible with Server Components. For example, state won’t work as fundamentally it can change, and Server Components can’t re-render to display updates. The same goes for effects; they only run after the client renders the page, and since only the generated output makes it to the client, that can’t happen either.
Server and Client Components
Now that we know more about Server Components and how they work, let’s consider our well-known and beloved traditional components. And, in this update, they’ve gone through a bit of a rebranding.
As part of the new React Server Components way of working, traditional components are now called “Client Components.”
So, now we have two types of components: “Server” and “Client”. But how do we know when to use a Server Component and when to use a Client Component?
Well, to an extent, the React team has already given a recommendation for this because all components are now considered Server Components by default. And, if you would like to make a Client Component, you need to add the ’use client’; directive at the top of the component file.
'use client'; // This converts the component to a Client Component.

export function ClientComponent() {
  return (
    // ...some UI
  )
}
But, outside the new defaults, how can we determine what type a component should be? The way to think about it is this: if a component can be a Server Component, make it a Server Component. This lets us leverage their benefits, such as simplicity and improved performance.
However, this doesn’t mean we should be setting out to cull all Client Components from our apps; we still need them. If a component needs to use things like state, effects, or offer interactivity, it must be a Client Component, as those features aren’t available to Server Components.
I’ve found a helpful way to picture the relationship between Server Components and Client Components, which is how Dan Abramov describes it in this livestream.
“Server component structure the skeleton, and you kind of add-in meat around the skeleton in the places where you really want client-side specific behavior.”
So, Server Components are like the skeleton of our application, and then the Client Components become the meat of that skeleton to allow the user to interact with our application.
But, as with most things, the more you build with Server Components, the more intuitive this distinction becomes and the decision of what needs to be a Client Component and what can stay as a Server Component.
React Server Components: why are they needed?
Now we can rest easy because our beloved Client Components aren’t going anywhere; let’s ask the real question: Why do we need Server Components?
In short, Server Components help fix a long-standing problem with React apps and how data-fetching works inside them. Specifically, what I’m referring to is the ping-ponging of requests between the client and the server.
This ping-ponging of requests was present regardless of how you decided to render your application, Client-Side Rendering (CSR) or Server-Side Rendering (SSR).
We won’t go into too much detail in this post, but the primary difference between these methods is that the shell of the application is rendered first on the server.
Outside this, these two rendering methods are largely the same: they download the JavaScript for the app, perform any database queries using something like SWR, and then render the returned content (replacing any landing skeletons present before).
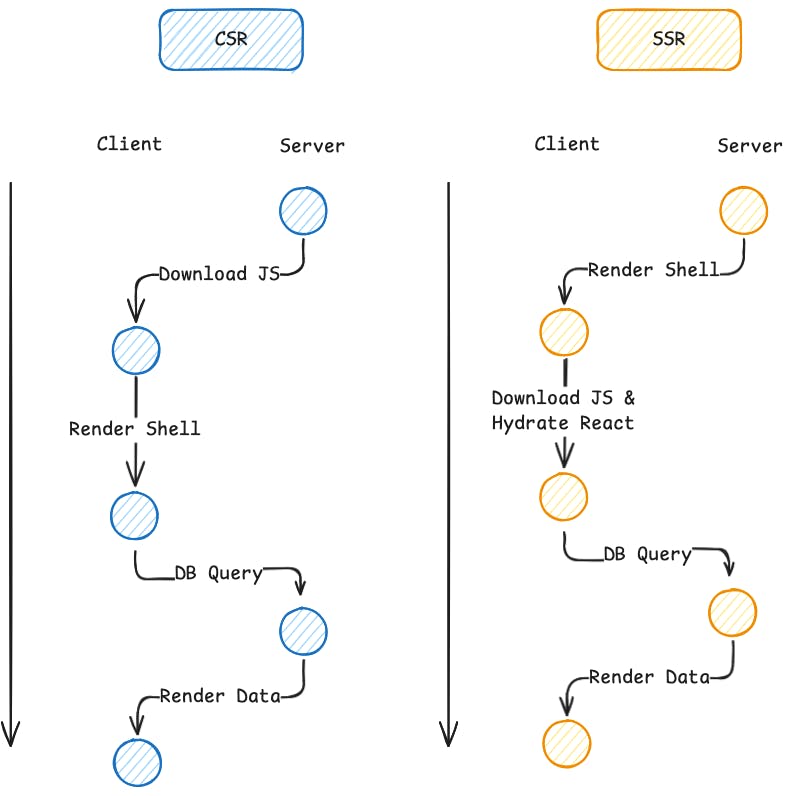
At this point, if you’re anything like me, you might be thinking that this ping-ponging of requests feels a bit unnecessary for SSR apps.
We start the rendering process with a request to the server before sending the result to the client, which then sends more requests back to the server. So, why can’t we just do all the requests at the start? This is where React frameworks enter the conversation!
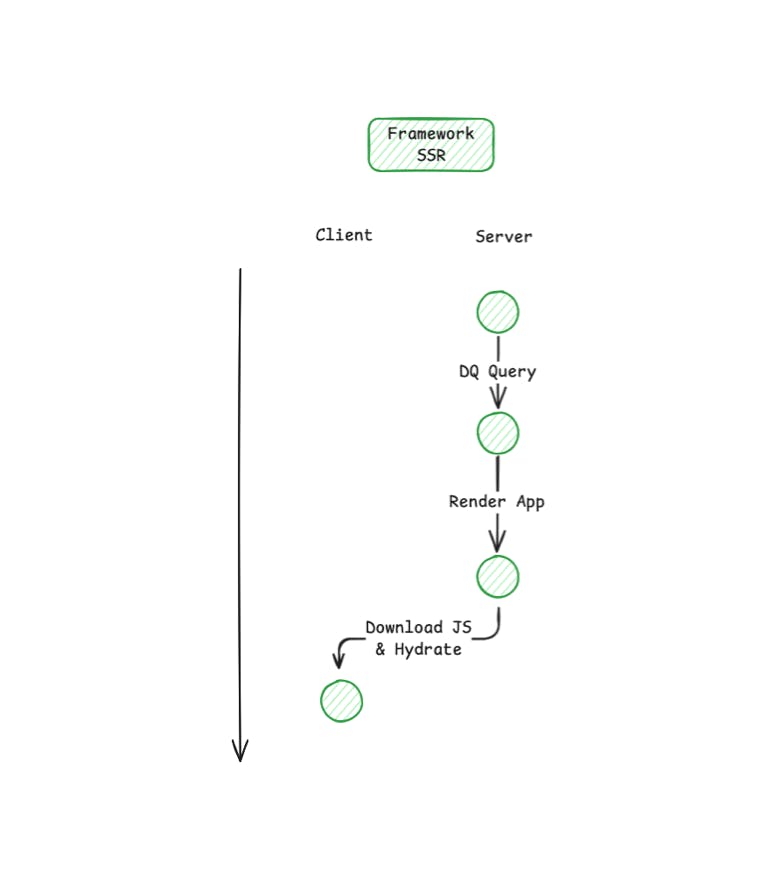
Framework-Specific Solutions
Over time, frameworks like Next.js and Remix came up with their own solutions (getServerSideProps and loaders, respectively) to fix this exact issue. These two methods allow us to fetch the data in the initial server request before then returning the data to the client where it’s all rendered in one go.
This means no more ping-ponging requests between the client and the server as all the content is available from the get-go, meaning our previous flow now looks like this.
These solutions are great, and they largely fix the issues described previously, but they do bring their own issues.
- These solutions all work at the route level. If you have multiple components and they all need certain data, you need to fetch all the data at once. You then need to drill that data with props to the components that need it. Far from elegant.
- It’s not a standardized solution. As each framework came up with its own solution (we only mentioned two of them earlier), it adds to the list of things you need to learn and get accustomed to when switching frameworks or tools. Now, this may or may not be a big issue for you, but it does add friction.
However, with Server Components, both of these issues are resolved, and we still get all the benefits of the framework-specific solutions. For example, with Server Components, we can now fetch data in the component that needs it, meaning no more prop drilling through multiple layers of components.
First time here? Discover what Prismic can do!
👋 Meet Prismic, your solution for creating performant websites! Developers, build with your preferred tech stack and deliver a visual page builder to marketers so they can quickly create on-brand pages independently!

Benefits
Earlier on, we alluded to some of the benefits of Server Components such as the increased simplicity and their performance benefits. So, now, I wanted to take a moment and spend some more time exploring these benefits.
Simplicity
We’ll start with the most obvious benefit of Server Components, their simplicity. With Server Components, you can now perform what were previously backend-only queries directly inside your components. No need to build out separate API endpoints or drill data from a getServerSideProps function. Just query the data you want, where you want it, and render it. You can’t get much simpler than that!
Here’s an example of how much simpler Server Components can make data fetching. In a traditional Next.js Pages Router project, you’d need to do something like this in getServerSideProps.
export async function getServerSideProps() {
  // Fetch data from db
  const data = await db.read()

  // Pass data to the page via props
  return { props: { data } };
}

export default function Page({
  data,
}: InferGetServerSidePropsType<typeof getServerSideProps>) {
  return (
    // ...render out the data
  );
}
But, with Server Components, we can now do something like this.
export default async function Page() {
  // Fetch data from db
  const data = await db.read()

  return (
    // ...render out the data
  );
}
In terms of simplicity that’s a huge improvement!
Improved Performance
Because the Server Component’s code is only run on the server and is not included in the bundle sent to the client, it means there is less overall JavaScript for the client to download and process. By extension, this also means fewer components that need to be hydrated in the client. So, overall, the more we utilize Server Components, the less the client has to manage, leading to increased performance.
Client Boundaries
There is one question that I had when I first started exploring Server Components and building with them, you might also be having that same question right now.
“How do Server Components and Client Components relate to each other? How can I use them together?”
This question tends to stem from the limitations we mentioned previously, notably the fact that pretty much any form of interaction (button clicks, state changes, etc) has to be done with a Client Component.
Furthermore, when these interactions happen, it will trigger the component in question to update and re-render, as well as any child components of that component. But, as we’ve mentioned, Server Components cannot re-render, so how does this work?
Well, the React team thought about this situation and defined a rule for it, “Client Components can only import other Client Components.” This means any components you import into a Client Component will implicitly become a Client Component itself.
This process has a name— client boundaries. And, when you’re working with Client Components, client boundaries are something you need to be comfortable with, so let’s spend some time looking at them.
A client boundary is created whenever the ’use client'; directive is used in a component file. That component and any component imported into it will then exist inside that created boundary.
I realize this can be a bit foreign at first, especially when we’re just talking about it. So, let’s look at an example of a simple React app and its components where we’re using a mixture of Server and Client Components and how they interact with client boundaries.
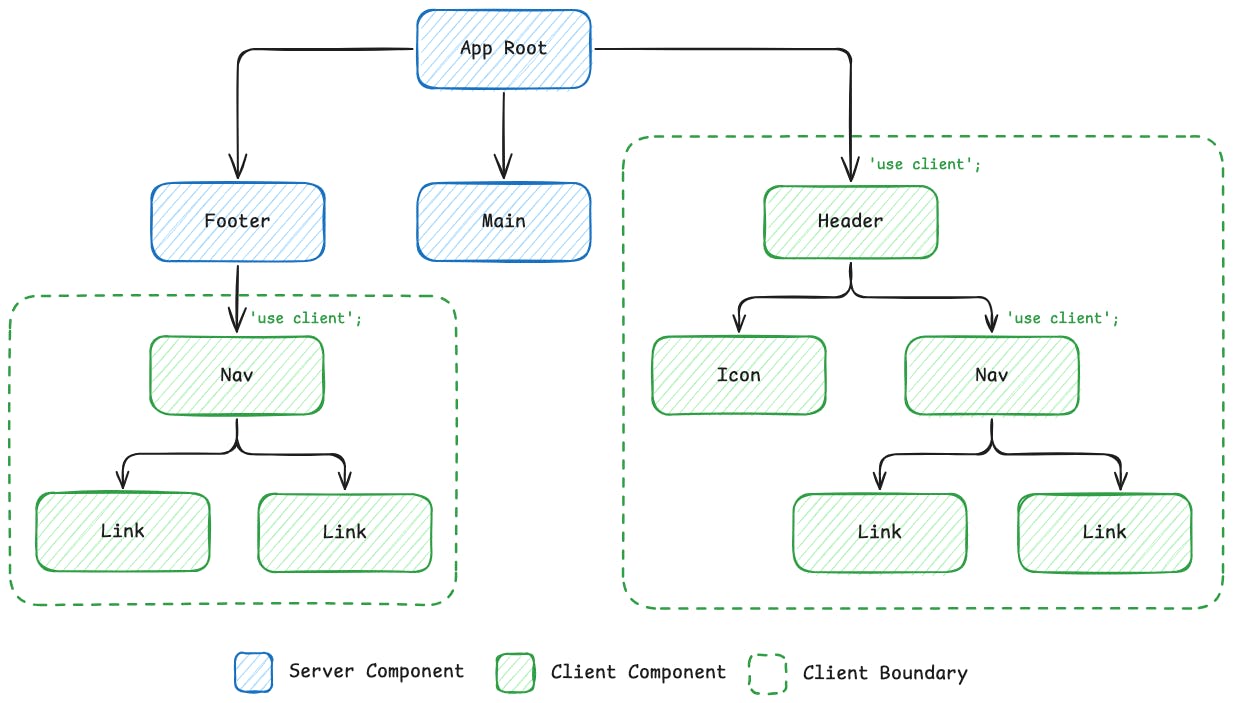
Finally, I wanted to mention that the waterfall impact of the ’use client’; directive is something to always keep in mind. If one of these directives is placed too high in your application, suddenly, you might have accidentally made one giant client boundary and implicitly made most of your app Client Components. 😬
The Solution
When it comes to defining Server/Client Components and their relationships, it’s important to remember one thing: it’s not about the parent/child relationship in the DOM; it’s about the imports between the files.
A Client Component can parent a Server Component in the DOM if they’re both rendered by another Server Component. But, what can never happen is a Client Component importing a Server Component, in this situation it’ll get converted to a Client Component by the client boundary.
At this point, you might be going, “Huh?” so let’s look at another diagram to hopefully illustrate it better.
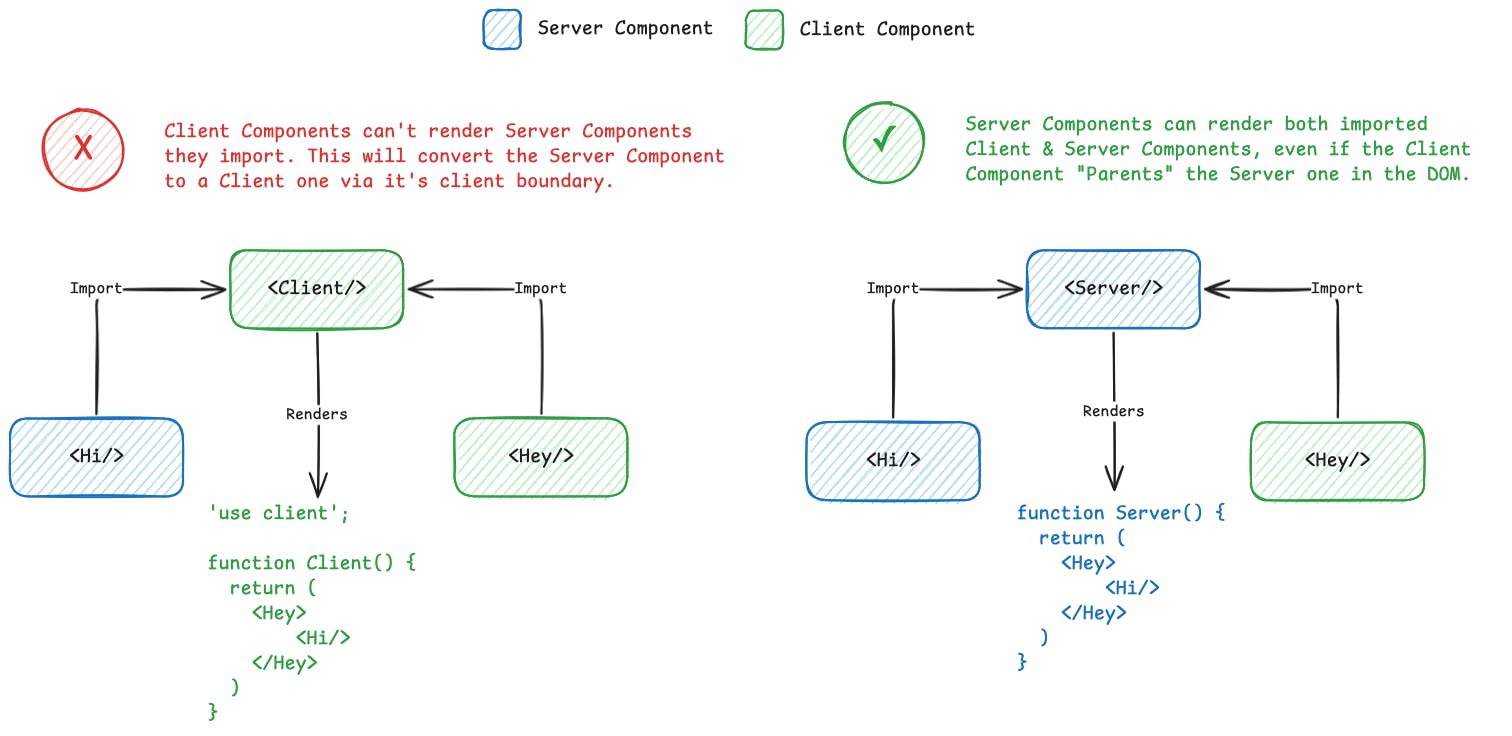
Hopefully, it’s a bit clearer now, but it takes time and practice to get used to. But the key to remember with client boundaries is to look at the imports, not the relationship in the DOM!
Getting Started with RSCs
Currently, at the moment, the most popular and accessible way to access RSCs for building an application is via the Next.js App Router.
However, this is changing as time goes on and as RSCs mature, more frameworks will likely start adopting and supporting them. However, for this post, we will be looking at them in the context of Next.js.
Pages Router - Out With The Old
In the world before RSCs— using the legacy Next.js Pages Router— we had a few options for loading data that we briefly thought about earlier on when looking at SSR and CSR.
- We could fetch data from the client using things like
useSWRand API routes. - We could use
getServerSidePropsto fetch data on the server to generate our page before sending it to the user. - We could also use
getStaticProps, which is similar togetServerSidePropsbut instead of running at runtime per request. It instead runs once at build time, generating a static output.
Compare data-fetching methods!
Ideally, for the best user experience, we would use methods 2 or 3 wherever possible. So, with this in mind, let’s look at a small example of using getServerSideProps to fetch data from an API and then display it on the page.
import type { InferGetServerSidePropsType } from "next";
import Image from "next/image";
import "./globals.css";

type Image = {
  url: string;
  explanation: string;
};

export async function getServerSideProps() {
  // Fetch image from external NASA API
  const res = await fetch(
    "https://api.nasa.gov/planetary/apod?api_key=DEMO_KEY",
  );
  const image: Image = await res.json();

  // Pass data to the page via props
  return { props: { image } };
}

export default function Page({
  image,
}: InferGetServerSidePropsType<typeof getServerSideProps>) {
  return (
    <main className="flex w-screen h-screen items-center justify-center">
      <div className="relative h-96 w-full">
        <Image
          src={image.url}
          fill
          alt={image.explanation}
          className="object-contain"
        />
      </div>
    </main>
  );
}
In this example, we use the getSeverSideProps function to fetch the astronomy picture of the day from NASA’s API. We then return the image in the props to our page before we render it out for the user to see.
If we were to now start our app and visit the route we created that page on, we’d see there is no loading UI and the image loads straight away.

NOTE: The flash you see in the GIF is the page being reloaded.
App Router - In With The New
Now, we’ve seen what we’re building and how it looks in the legacy Pages Router using getServerSideProps. Let’s see how much simpler we can make it using App Router and Server Components.
import Image from "next/image";

type Image = {
  url: string;
  explanation: string;
};

export default async function Page() {
  const res = await fetch(
    "https://api.nasa.gov/planetary/apod?api_key=DEMO_KEY",
  );
  const image: Image = await res.json();

  return (
    <main className="flex w-screen h-screen items-center justify-center">
      <div className="relative h-96 w-full">
        <Image
          src={image.url}
          fill
          alt={image.explanation}
          className="object-contain"
        />
      </div>
    </main>
  );
}
That’s it 🤯! It’s hard to deny the Server Components code is a lot simpler and cleaner. We just fetch the data where we need it and then render it out as we normally would. No more worrying about specific framework functions or dealing with passing props down from the page. Just query and render!
And, as you can see below, the image from NASA still renders with no issues and looks identical to the Pages Router implementation we just looked at.

NOTE: The flash you see in the GIF is the page being reloaded.
App Router Additions
This post isn’t intended to be an App Router tutorial but there a couple of interesting features in App Router that I wanted to call out here as they might be helpful for someone building with it.
Error Boundaries
Error boundaries are similar in concept to the client boundaries we looked at earlier.
However, these boundaries allow you to handle errors from the components you render on a page. This is possible because any unhandled errors thrown in components will bubble up to the nearest parent error boundary and show the defined UI.
Loading UI and Suspense
Another feature of note in App Router is the ability to define instant Loading UIs, which are UI elements that are automatically shown on navigation to a route. These could be a loading indicator or skeleton, for example.
Another option (also available outside of Next.js) is React Suspense, which will automatically show loading UIs by doing things like the following: In this example, while the User component is performing async actions, Suspense will automatically show the UI defined in the fallback prop which in this case is a simple loading message. Then, once the async actions are complete, the component will automatically switch in!
import { Suspense } from 'react'
import { User } from './user'

export default function Header() {
  return (
    <div>
      <Suspense fallback={<p>Loading user...</p>}>
        <User />
      </Suspense>
    </div>
  )
}
The full explanation of why this is helpful is out of the scope of this post. But, at a high level, SSR methods like getServerSideProps suffer from being a sequential series of steps. This means if you’re loading a lot of data on the server, the page rendering to the user will be delayed longer, resulting in a worse UX.
Suspense solves this issue by enabling us to make use of streaming. Streaming allows us to send data from the server to the client as it’s ready at a component level. Meaning if one data request is taking longer, it doesn’t hold up the entire page loading, just the component(s) that request relates to.
Recap
With that, we’ve now reached the end of this post! In this post, we covered all things React Server Components— looking at the new ways of working it brings as well as the differences between Server and Client Components.
We also looked at client boundaries and how they impact the relationship between the two types of components. Finally, we finished off with a brief example of building with Server Components in a Next.js App Router project.
If you’re interested in learning about more Server Components, make sure to check out the React documentation. If you’re interested in learning more about them, specifically in a Next.js context, check out their documentation.
Finally, if you’re interested in learning how Server Components interact with Prismic, check out the Prismic, Next.js App Router tutorial.
Thanks for reading!


