

TL;DR
Svelte is a lightweight JavaScript framework used for building performant websites and applications. It compiles code written in Svelte and converts it into highly optimized vanilla JavaScript code for faster performance. SvelteKit is a Svelte-powered framework that builds on the foundations of Svelte and provides powerful features like SSR, code splitting, file-based routing, and API routes, which make it easier to create complex applications with Svelte. Let's find out the secret behind their increased popularity and adoption.
Introduction
The front-end developer space is similar to a knockout competition, where everyone waits to see which technology will emerge as the next champion. jQuery held the title from its release in 2006 to 2013. However, its dominance waned with the emergence of Angular, React, and Vue, released between 2013 and 2016. Since then, they have been some of the most popular and dominant front-end frameworks and libraries.
Svelte and SvelteKit—its meta-framework—are other solutions that have become increasingly popular. According to Stack Overflow’s 2023 developer survey, Svelte is the 2nd most admired web framework and the 6th most desired framework. Also, data from 2022’s State of JavaScript report reveals that Svelte is the first front-end framework in terms of awareness and interest.
This article will explore Svelte and SvelteKit in detail to understand their features, benefits, and why developers love them. Let’s dive in!
What is Svelte?
Svelte is a JavaScript-based framework that we can use to efficiently create performant websites and applications. Though it is a framework, it is commonly referred to as a compiler because it compiles code written in Svelte to highly optimized JavaScript code.
Svelte was developed by Rich Harris in 2016. It takes a different approach from other web frameworks by compiling components at build time instead of runtime. This means that instead of shipping a bulky JavaScript framework to the client at runtime, Svelte compiles the code into highly optimized JavaScript at build time. This approach allows us to ship as little code as possible to the client, resulting in faster load times.
One of the main reasons why developers are drawn to Svelte is its simplicity and readability. It has a low learning curve, and its syntax sticks closely to the classic web development model of HTML, CSS, and JavaScript. Instead of modifying HTML and JavaScript, like some frameworks do, it adds its own syntax to HTML and offers some JavaScript utilities. This makes it easy for developers familiar with these languages to get started.
Companies that use Svelte internally and externally include Apple, The New York Times, Spotify, Square, Cloudflare, Brave, Decathlon, Tokopedia, 1Password Yahoo, Rakuten, and Bloomberg.

Features of Svelte
Here are some key features that Svelte provides.
Easy DOM manipulation
Svelte has a straightforward syntax for interacting with the Document Object Model (DOM), simplifying DOM manipulation. It provides logic blocks, element directives, and component directives that simplify DOM manipulation operations.
Consider the snippet below to see how straightforward DOM manipulation is in Svelte.
<script>
  let checked = true
</script>

<input type="checkbox" bind:checked />

{#if checked}
 <p>The checkbox is checked!</p>
{:else}
 <p>The checkbox is not checked!</p>
{/if}
All it took was 178 characters and 11 lines of code to create that simple functionality. However, with React, it takes 447 characters and 20 lines of code to achieve the same thing.
import React, { useState } from "react";

export default function App() {
  const [checked, setChecked] = useState(true)
  function checkHandler(event) {
    setChecked(event.target.checked)
  }

  return (
    <div>
      <input type="checkbox" checked={checked} onChange={checkHandler} />
      {checked && <p>
        The checkbox is checked!
      </p>}
      {!checked && <p>
        The checkbox is not checked!
      </p>}
    </div>
  );
}
No virtual DOM
One of the key differentiators of Svelte is its approach to handling the DOM. Unlike other popular frameworks like React or Vue, Svelte does not use a virtual DOM, which is a virtual representation of the real DOM that syncs with the real DOM and keeps it updated as an application’s UI or state changes. It avoids the extra overhead and complexity of a virtual DOM and leverages reactive programming principles instead.
Svelte compiles components at build time and generates highly efficient JavaScript code that directly manipulates the real DOM. This direct DOM manipulation results in faster rendering and improved overall performance.
Built-in animations and transitions
Animations can be tricky to get right. Luckily, Svelte provides several built-in animations and transitions that we can use in our applications. We can access the animations and transitions through the [svelte/animate](<https://learn.svelte.dev/tutorial/animate>) and [svelte/transition](<https://learn.svelte.dev/tutorial/transition>) modules, respectively.
Scoped CSS and dynamic styles
Svelte allows us to write component-specific styles using scoped CSS, which is Svelte’s default behavior. This means that styles defined in one component do not leak into and affect other components. Scoped styling not only reduces the chances of CSS conflicts. It also makes code easier to maintain. If you are familiar with styling in React, Svelte's scoped styling will feel simpler since you can forget about CSS-in-JS, CSS Modules, and PostCSS.
Besides supporting component-scoped styles, Svelte provides shorthand class and style directives for dynamically binding classes and styles to elements. See the snippet below as an example and explore this REPL to test it out.
<script>
	let big = false;
	let color = "blue"
</script>

<label>
	<input type="checkbox" bind:checked={big} />
	big
</label>

<p class:big style:color>
	My dynamic color is {color} and I am a {big ? 'big' : 'small'} text
</p>

<style>
	.big {
		font-size: 2em;
	}
</style>
State management
Svelte provides a basic level method for handling state management. It leverages JavaScript’s let keyword to achieve this. Any variables declared with let inside a Svelte component becomes reactive. This means that any changes to that variable will automatically trigger a re-render of the affected DOM elements.
<script>
  let age = 20
</script>
In scenarios that require more complex state management, Svelte provides Stores and a Context API for managing state. We can use them to create centralized state containers that can be shared across multiple components.
With Svelte, we don't need to worry about actions, reducers, or dispatching events—which you can find in React state management solutions like Redux—because it handles those complexities behind the scenes. Its reactivity system is intuitive and eliminates the need for complex state management libraries.
Benefits of Svelte
Here are some benefits we can enjoy by working with Svelte.
Low learning curve
One major benefit of Svelte is how easy it is to learn and get started with. I found Svelte the easiest to learn as someone who has used several front-end frameworks. It provides a straightforward syntax and offers an interactive learning experience through its online editor. This means we can practice Svelte concepts in the code editor while learning and reading through the detailed explanations provided.
Built-in accessibility checks
Rich Harris tagged Svelte as an “a11y-first framework;” the Svelte team tries to live up to that promise. Svelte’s compiler includes accessibility warnings, and we can see one of them in action in Svelte’s tutorial. The documentation contains a list of accessibility warnings Svelte provides. As of this writing, there are 27 accessibility checks available.
Lightweight package size
Svelte is famously known for being a lightweight package. According to BundlePhobia, it has a bundle size of 2.6kb when gzipped. Svelte’s small bundle size ensures reduced bandwidth, better loading speeds, and improved Core Web Vitals. On the other hand, gzipped React combined with ReactDOM has a total size of 42kb, while Vue.js and Angular are 34.7kb and 62.3kb when gzipped.
Understanding reactivity in Svelte
Reactivity in Svelte allows us to establish dynamic relationships between data and UI components. With data binding, changes in an application’s state automatically synchronize with the user interface. This eliminates the need for manual DOM manipulation and simplifies complex state management.
With Svelte's reactive capabilities, we can write clean and concise code and enjoy enhanced performance. The framework intelligently tracks dependencies between variables and only makes updates when changes occur. This results in faster rendering times and a smoother user experience.
Variables in Svelte are generally reactive, meaning that as they update, the components attached to them also update. Take the code below, for example. As the age increases, the button’s value also increases.
<script>
    let age = 0;
</script>

<button on:click="{() ⇒ age++}">{age}</button>
Note that when it comes to derived or computed states, components do not immediately update as state changes. Let’s explore this.
let age = 0;
let newAge = age * 3

let age = 0;
    function increaseAge() {
        age += 1;
    }
In this scenario, the newAge will not update as the age updates because derived states are not inherently reactive. We have to tell Svelte to make newAge reactive first, and we can achieve that with the $ symbol.
With the change below, Svelte now knows that newAge is reactive, and its value will automatically triple to be thrice the value of age. The $ symbol tells Svelte that newAge is dependent on age and should be updated whenever age updates.
let age = 0;
$: newAge = age * 3
Exploring Svelte’s lifecycle hooks
Every Svelte component goes through a lifecycle that comprises the following stages: creation (or mounting) before updating, after updating, and destruction. Svelte provides lifecycle hooks, which are methods that we can use to plug into these lifecycle stages. They allow us to perform specific actions or tasks at different points in a component's existence.
Let’s explore the four lifecycle hooks that Svelte provides.
onMount
This hook is called when a component is first added to the DOM. It is often used to perform initial setup tasks or fetch data from an API. View the onMount REPL to see the code below in action.
<script>
	import { onMount } from 'svelte';
	let data;

	onMount(async () => {
		data = await fetch('https://api.coindesk.com/v1/bpi/currentprice.json')
			.then((x) => x.json());
	});
</script>

<pre>
  {JSON.stringify(data, null, 2)}
</pre>
beforeUpdate
This hook is called before a component updates. It allows you to perform tasks or update data before the component re-renders. We can also use it to get a snapshot of a component’s current state. View the beforeUpdate REPL to see the code below in action.
<script>
	import { beforeUpdate } from 'svelte';

	let age = 0;
	function addAge(){ age++ }

	beforeUpdate(() => {
	  console.log("The age before the update was", age);
	});
</script>

<button on:click="{addAge}">{age}</button>
afterUpdate
This hook is called after a component updates. It is useful for performing post-update tasks, interacting with the updated DOM, and reacting to changes in a component’s props or state. View the afterUpdate REPL to see the code below in action.
<script>
	import { afterUpdate } from 'svelte';

	let age = 0;
	function addAge(){ age++ }

	afterUpdate(() => {
	  alert(`The age was updated to ${age}`);
	});
</script>

<button on:click="{addAge}">{age}</button>
onDestroy
This hook is called when a component is about to be removed from the DOM. It is used to clean up any resources like event listeners and timers attached to the component. View the onDestroy hook REPL to see the code below in action.
<script>
	import { onDestroy } from "svelte"

	onDestroy(() => {
		console.log("Component was removed from the DOM")
	})
</script>

<h1>Toggle Me</h1>
What is SvelteKit?
SvelteKit is a Svelte-based full-stack framework for developing Svelte applications. It was also developed by Rich Harris and the Svelte team. It is a successor to Sapper, the first Svelte-powered meta-framework.
SvelteKit is to Svelte what Next.js and Nuxt.js are to React and Vue.js, respectively. It extends the foundational functionalities of Svelte and enhances it with more features such as server-side rendering, TypeScript integration, API routes, hot module replacement, file-based routing, and code splitting. This makes it a great choice for building large multi-page applications.
Features of SvelteKit
Let’s explore some of SvelteKit’s features.
Server-side rendering
Instead of serving a bare-bones HTML document, which is an issue that comes with client-side rendering, SvelteKit prerenders applications on the server and sends a fully-rendered HTML file to the client. It provides out-of-the-box SSR support, and this is its default rendering method. SvelteKit’s SSR approach allows us to create SEO-friendly and fast-loading websites.
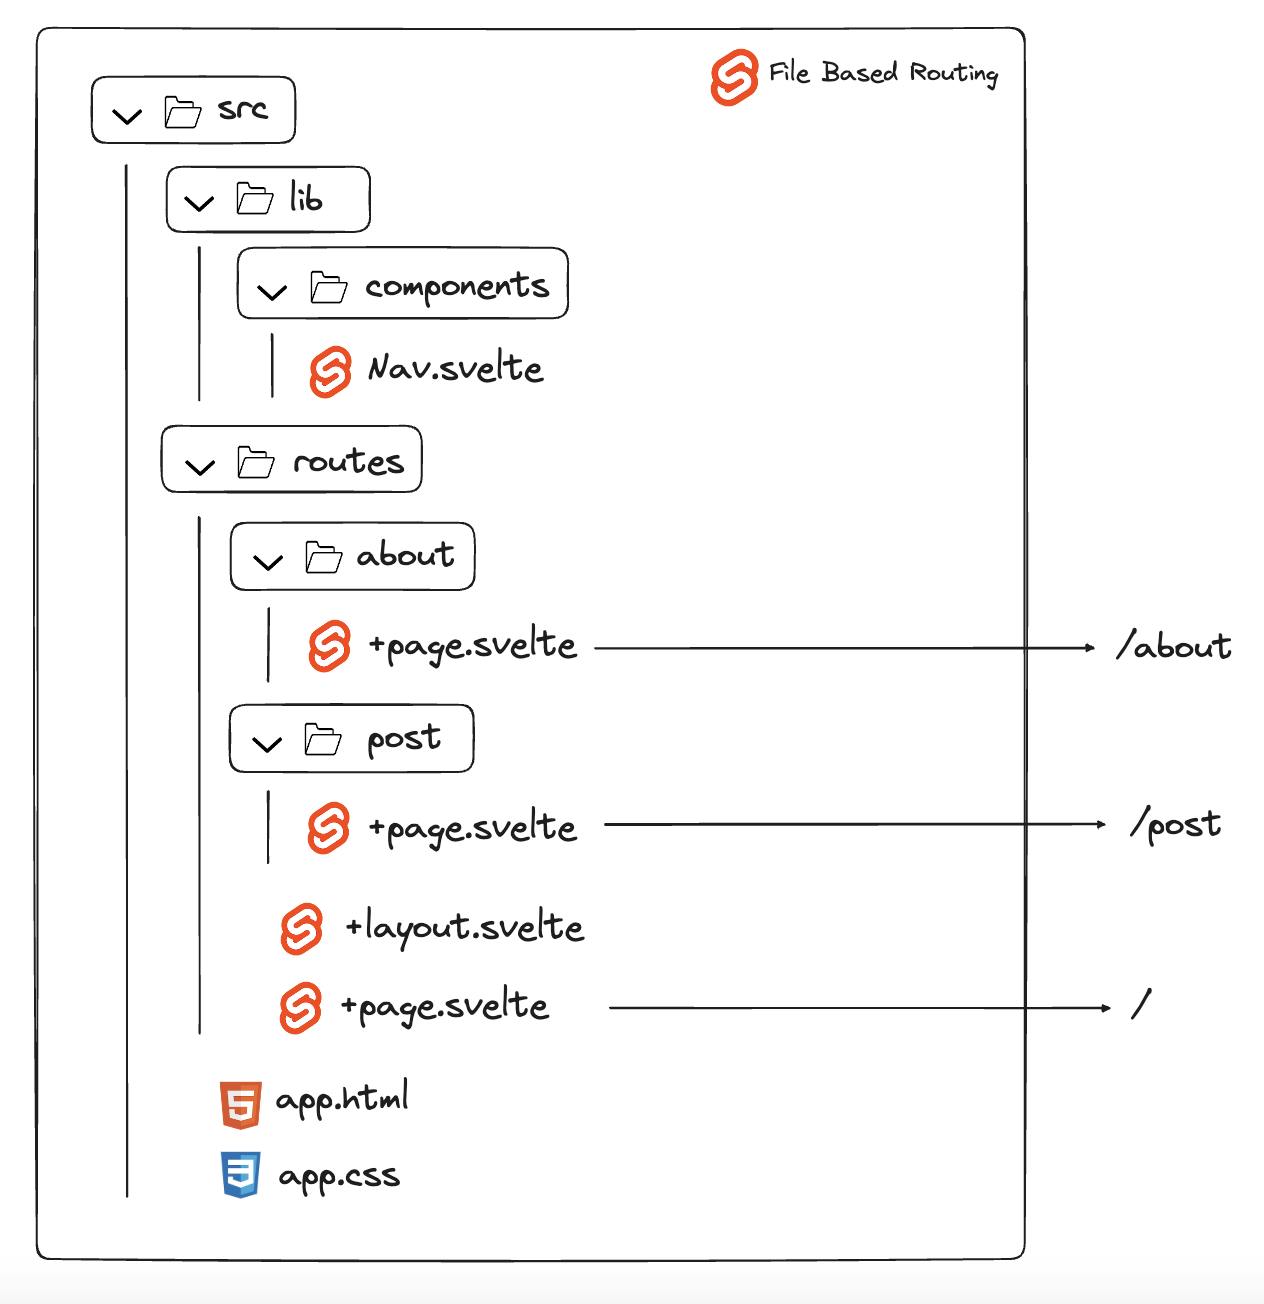
File-based routing
While Svelte requires the use of third-party routing libraries like svelte-routing, SvelteKit does not. Instead, like Next.js, it provides a built-in file-based routing system that simplifies the process of setting up routing between the pages in an application. With this system, an application’s routes are defined based on the directories in its codebase. For example, a src/routes/post/+page.svelte file will correspond to a /posts route, while src/routes/about/+page.svelte will correspond to an /about route.
Automatic code splitting
Instead of serving an entire component at once, SvelteKit splits it into smaller chunks of code, where each chunk represents a route in the application. That means all the code needed for the /posts and /about routes will be loaded when required. If needed, we can also utilize SvelteKit’s prefetching ability to fetch the code for specific routes ahead of time.
API Endpoints
SvelteKit supports server-side API endpoints, or routes, that we can use to create backend functionality for your applications. The API endpoints work similarly to Next.js’ API routes and must be written in a +server.js file. The file export functions that correspond to the different HTTP methods. This means that if we want to perform a GET operation, then we create a function called GET, and so on.
Let’s explore this with an example.
// /greetings/+server.js

export function GET(){
	return new Response( JSON.stringify({message: "Hello" }) )
}

export function POST(){
	return //do something cool here
}
If we navigate to the /greetings endpoint, we will get an object containing the response {"message": "Hello"}.
Benefits of SvelteKit
Here are some benefits we can enjoy by working with SvelteKit.
SEO-friendly
SvelteKit’s default SSR approach provides improved SEO performance for websites and makes it easy for search engines to crawl websites. With SSR, the full website content is rendered on the server and sent to the client as a complete HTML file. This ensures search engines index all the website content.
Great developer experience
SvelteKit provides features like hot module replacement and code splitting that lead to an improved developer experience. In essence, SvelteKit streamlines the development process by handling common tasks. This allows us to focus on building great applications.
Zero-config deployment
SvelteKit provides built-in adapters for deployment platforms like Vercel, Netlify, and Cloudflare pages. Every new SvelteKit project comes with an adapter-auto plugin that detects the platform we are deploying to and automatically downloads its adapter. The adapters simplify the deployment process and reduce the chance of deployment errors. Besides the official adapters from the Svelte team, there are also adapters for Azure and AWS that were created by the Svelte community. We can also create our own adapters if needed. However, note that is creating custom adapters is very advanced.
The Future of Svelte: Svelte 5 and Runes
Svelte 5 has been in development for some time now, and while there’s no release date yet, the Svelte team recently launched a teaser of what to expect with the upcoming and much-anticipated version 5 release.
The teaser contains information on Svelte Runes, which is a new way of handling reactivity in Svelte. According to the Svelte team, this switch to Runes will make Svelte 5 “ridonkulously fast.” Naturally, there have been several opinions and reactions to Runes since the announcement.
We can’t use Svelte 5 in our applications yet. However, the team created a preview site that contains an interactive playground and detailed explanations of the new features. Also, explore this short video that highlights three awesome things you will be able to do with Svelte 5 once it is released.
Explore the speed of SvelteKit + power of Prismic
Prismic recently rolled out support for SvelteKit. This means you can now combine the awesomeness of SvelteKit and Prismic’s Slice Machine features to build highly performant websites.
🚀 Next steps:
➡️ Review Prismic’s Svelte SDK documentation for more info.
➡️ Log in or create an account, and set up a new Prismic repository with the SvelteKit starter template to get started with SvelteKit and Prismic.
Simplifying development with Svelte and SvelteKit
Svelte and SvelteKit provide a fresh approach to building web applications. Svelte's unique compiler model allows it to generate highly optimized code, resulting in faster load times and great performance. Its intuitive syntax and reactivity system make it easy for us to build reactive user interfaces.
SvelteKit takes these advantages further by providing even more features that simplify the development process. Together, they offer a great developer experience and enable us to build fast, SEO-friendly websites and applications. The recent integration of SvelteKit support in Prismic CMS makes the combination even more powerful.
For developers looking for a lightweight yet powerful framework, Svelte and SvelteKit are great options to consider. Their low learning curve, small bundle size and features make them among today's top choices for building websites and applications. As Svelte and SvelteKit become increasingly popular, we can expect to see more people leveraging their speed and capabilities.


