Next.js Authentication: Add Clerk Auth to a Next.js App Router Project
 By Coner Murphy
Authentication is a core component of any application, as it restricts access to certain content. This restricted content could include a user dashboard with personal information, past orders, and payment details. It could also apply to a course site, where only paying users should have access to courses and resources.
Despite its importance in most applications, authentication has a reputation for being challenging to implement in web apps. However, some products and services, such as Clerk, aim to change this.
This tutorial will guide you on how to implement Clerk in a Next.js App Router project, allowing users to sign up for an account and display their username on each page. Let's get started!
Why Clerk?
Before we start building our project, let’s first take a moment to consider why Clerk. There are many authentication providers and services available for Next.js. Clerk has become increasingly popular over the last year and for good reasons:
- As we’ll see in this tutorial, Clerk makes it easy to implement authentication on an application across client and server-rendered pages and components.
- They’ve invested heavily in their Next.js integration, which makes it easy to protect Server Actions and API routes using their pre-built components, hooks, and functions.
Integrating authentication in Next.js App Router
Let's dive in and start building our project. In this case, we'll assume you're creating a blog that's only accessible to paying subscribers. Thus, we'll need to add authentication before accessing the blog.

Step 1: Setting up our project
The first thing, we need to do is to clone the base repository we’re going to be using for this tutorial. Instead of building an application from scratch, we’re going to be adding authentication to the Prismic blog starter template. (Demo: Open live demo)
To clone this repo, run the following commands in your terminal:
npx degit prismicio-community/nextjs-starter-prismic-blog your-project-name
cd your-project-name
npx @slicemachine/init@latest
The commands will do the following:
- Start a new Next.js project using this starter.
- Ask you to log in to Prismic or create an account.
- Create a new Prismic content repository with sample content.
When you're ready to start your project, run the following command: npm run dev.
Once you have the project set up and running, we’re ready to start implementing authentication using Clerk.
Step 2: Configuring Clerk
We first need to configure our application on Clerk. To do this, head over to Clerk’s website and create a new account if you don’t already have one.
Once you’re signed into your Clerk account, you’ll need to create a new application (if you’ve just signed up, you should be automatically taken to this page). When creating your application, you’ll then be asked, “which authentication methods you’d like to use”; select just “Email” and unselect all the other options.
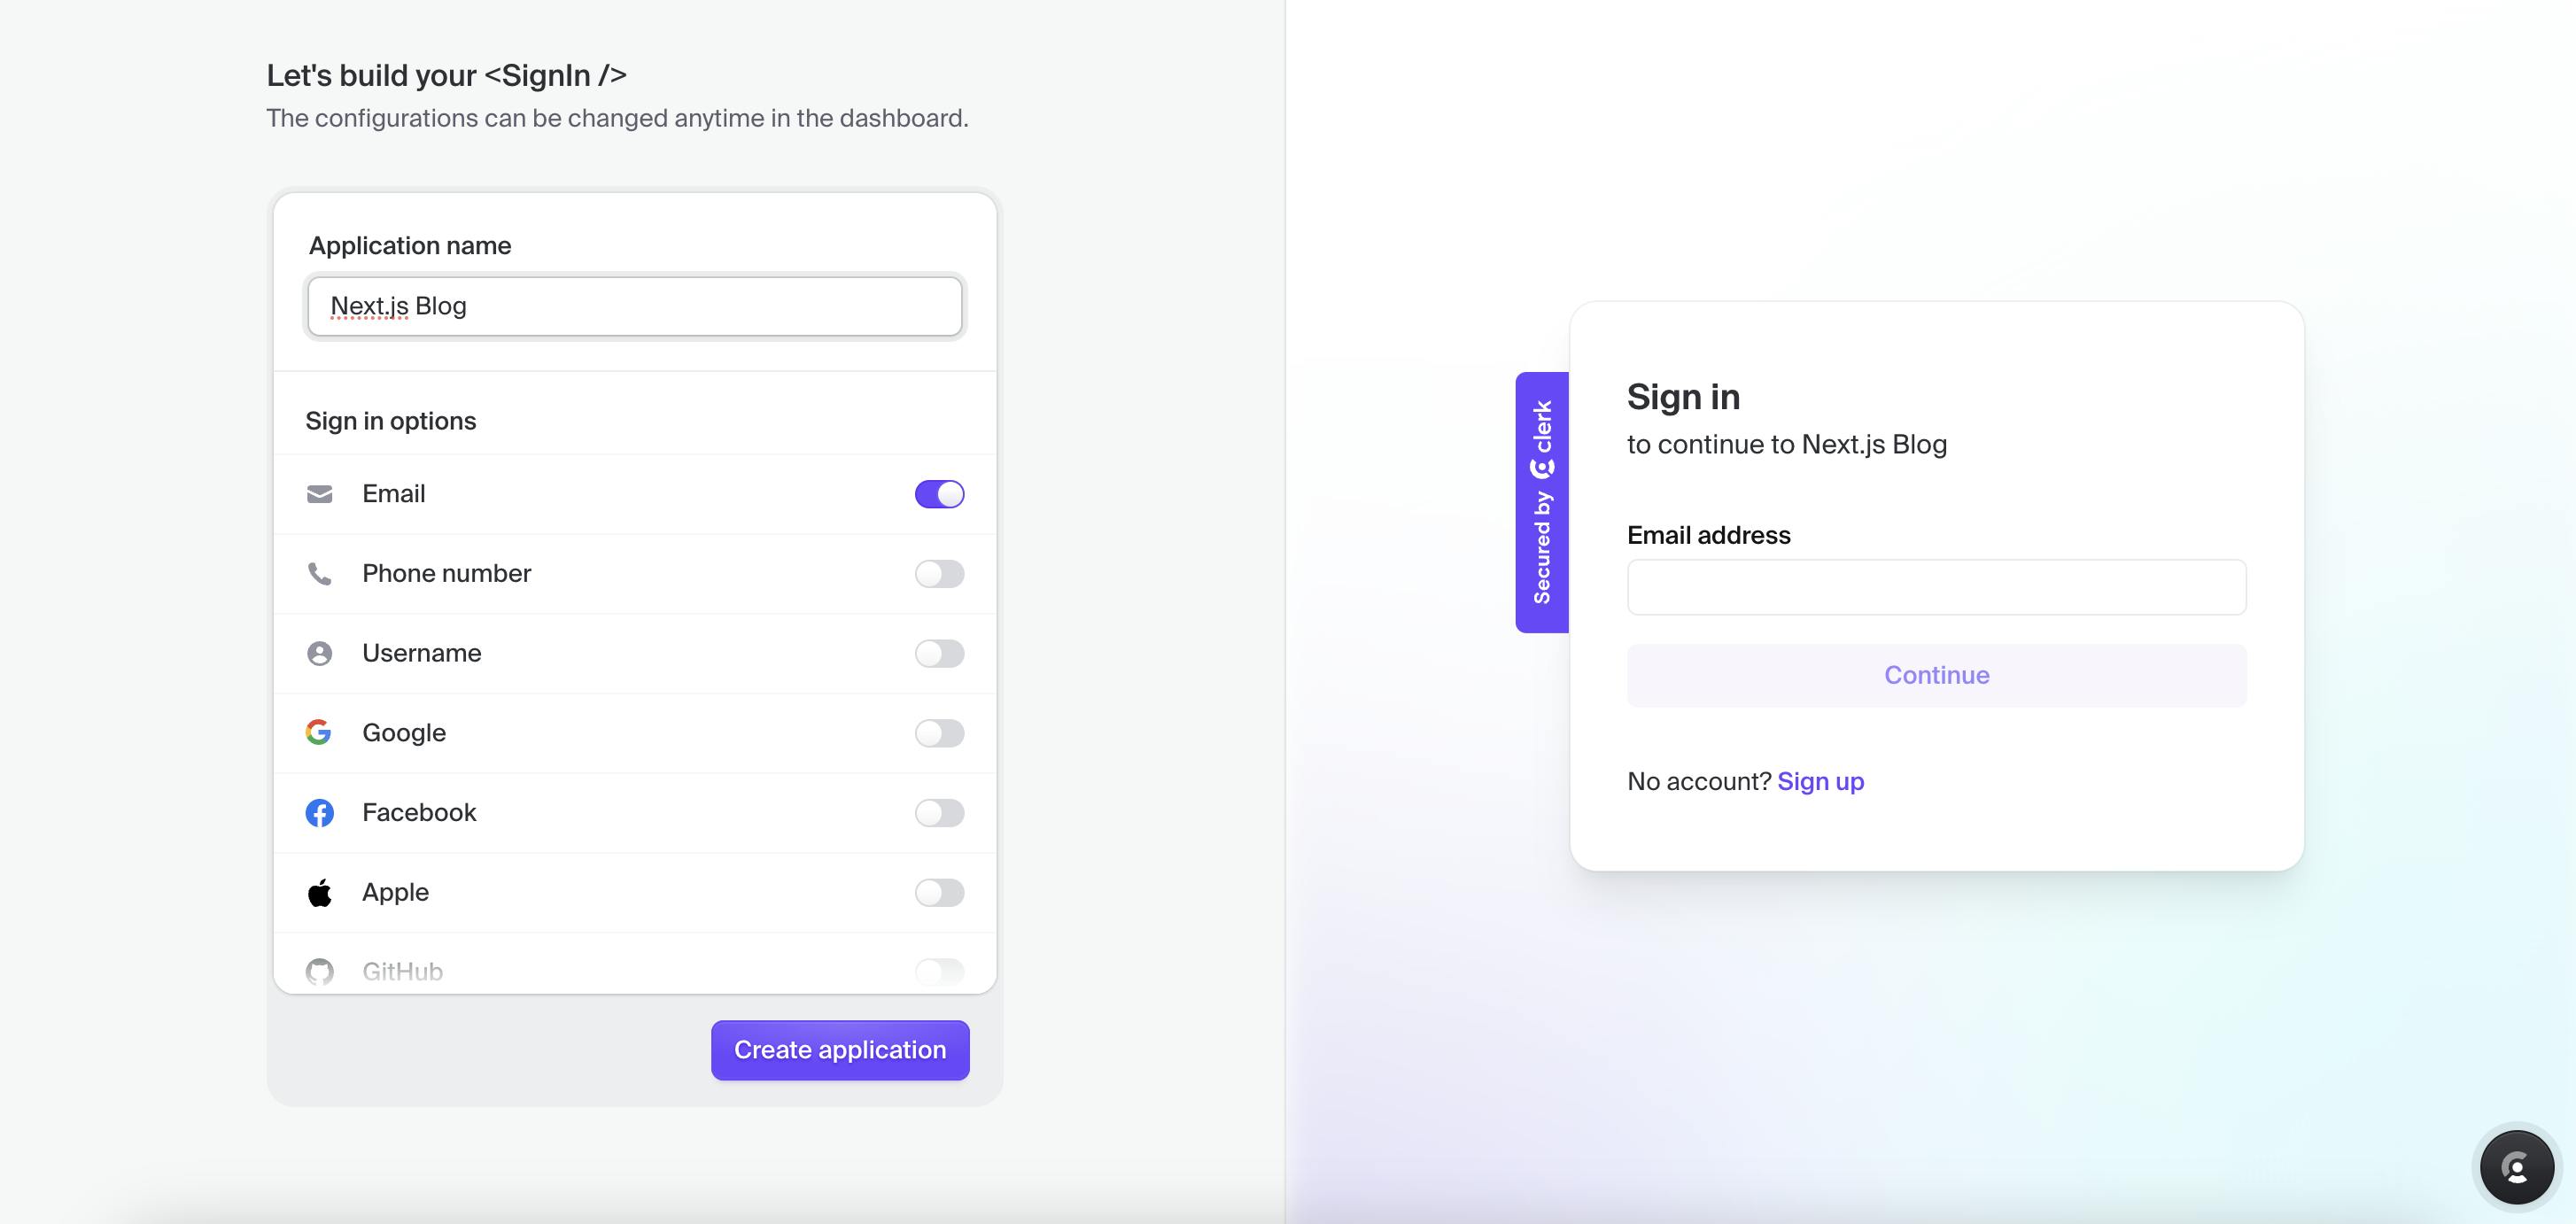
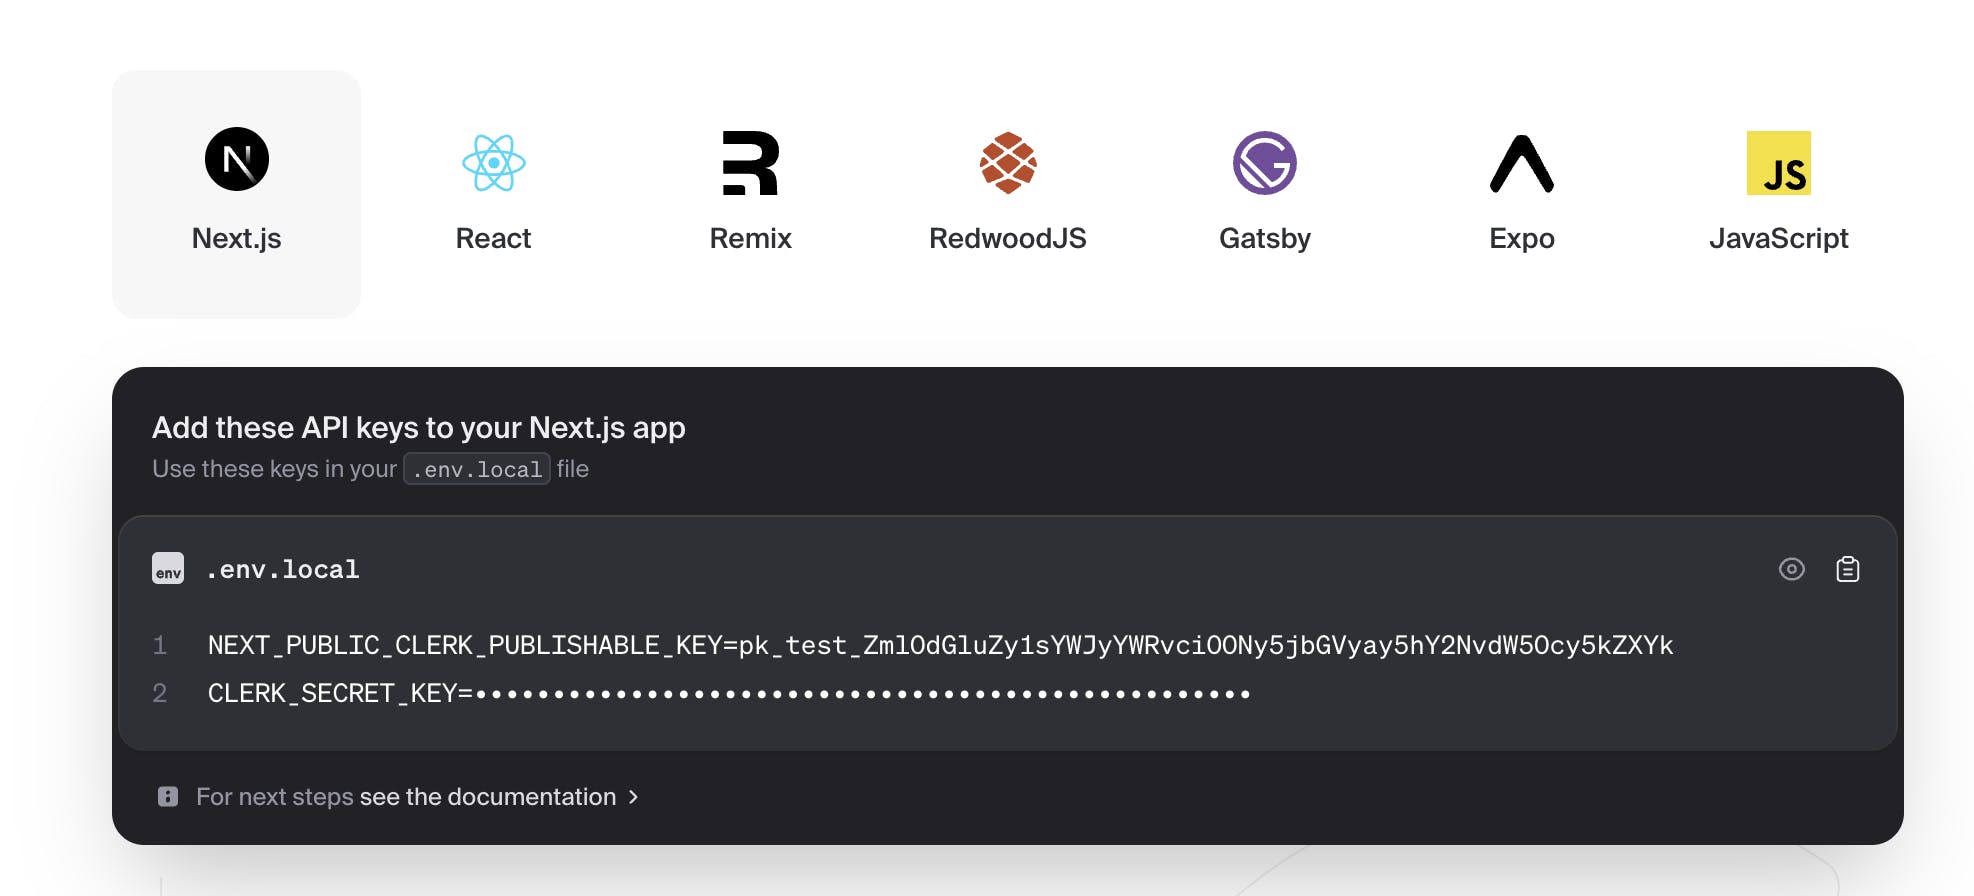
Then, after creating your new application, you’ll want to copy the environment variables displayed (make sure “Next.js” is selected).
Step 3: Configuring our application to add sign-up functionality
With your Clerk application now created and your environment variables copied, we can turn our attention back to the code.
- The first thing we’ll want to do is to add the environment variables we copied earlier into an
.env.localfile at the root of the project. - Then with the environment variables added to the project, the next thing is to install the Next.js Clerk package, which we can do by running the command
npm install @clerk/nextjsin your terminal. - After the install finishes, we can start setting up Clerk in our project. The first step is to wrap our application in the
ClerkProvidercomponent; to do this, update yoursrc/app/layout.jsfile to look like the code below.
import "../styles/globals.css";

import { Inter, Libre_Baskerville } from "next/font/google";

import { PrismicPreview } from "@prismicio/next";
import { repositoryName } from "@/prismicio";
import { ClerkProvider } from "@clerk/nextjs";

const inter = Inter({
  subsets: ["latin"],
  display: "swap",
});

const libre_baskerville = Libre_Baskerville({
  subsets: ["latin"],
  style: ["normal", "italic"],
  weight: ["400", "700"],
  variable: "--libre-baskerville",
  display: "swap",
});

export default function RootLayout({ children }) {
  return (
    <ClerkProvider>
      <html
        lang="en"
        className={`${inter.className} ${libre_baskerville.className}`}
      >
        <body className="overflow-x-hidden antialiased">
          <main>
            {process.env.NODE_ENV === "development" && (
              <div
                style={{
                  background: "#5163ba",
                  padding: "1rem",
                  textAlign: "center",
                  fontSize: "0.85rem",
                  color: "#fff",
                }}
              >
                <p>
                  <strong>👋 Welcome to your new website!</strong> To customize
                  the code and content of this site,{" "}
                  <a
                    href="<https://github.com/prismicio-community/nextjs-starter-prismic-blog/tree/master/docs>"
                    target="_blank"
                    rel="noreferrer"
                    style={{ textDecoration: "underline" }}
                  >
                    see the documentation
                  </a>
                  . Remove this bar in <code>app/layout.js</code>.
                </p>
              </div>
            )}
            {children}
            <PrismicPreview repositoryName={repositoryName} />
          </main>
        </body>
      </html>
    </ClerkProvider>
  );
}
With our application now wrapped in the ClerkProvider component, there is only one thing left for us to do to protect our application with Clerk: add a custom middleware to our project.
Step 4: Creating a custom middleware.js
To create this custom middleware, create a new file in the src directory called middleware.js and add the below code:
import { authMiddleware } from "@clerk/nextjs";

export default authMiddleware({});

export const config = {
  matcher: ["/((?!.+\\\\.[\\\\w]+$|_next).*)", "/", "/(api|trpc)(.*)"],
};
With this file added to our project, our application is officially gated by Clerk authentication! 🙌
At this point, you can test the authentication out by starting the local dev server. Run npm run dev in your terminal and head over to http://localhost:3000.
You should be immediately redirected to the Clerk sign-up page. After successfully signing up, you’ll be automatically redirected to our application where you should see the blog home page.

Step 5: Adding sign-out functionality
Now, the keen-eyed among you might have noticed that there is no mechanism for a user to sign out of our application. Let’s now add this functionality!
To add the sign out functionality we’re going to use the custom UserButton component that is included in the @clerk/nextjs package we installed earlier.
To configure this component in our project, head over to the Header.js file and update the Header component to be the code below.
import { UserButton } from "@clerk/nextjs";

// ...rest of the imports and component definitions

export const Header = ({
 withDivider = true,
 withProfile = true,
 navigation,
 settings,
}) => {
 return (
	 // Adding the UserButton component in the nav
   <Bounded as="header">
     <div className="grid grid-cols-1 justify-items-center gap-20">
       <nav className="flex flex-row gap-4 items-center">
         <UserButton />
         <ul className="flex flex-wrap justify-center gap-10">
           <NavItem>
             <Link href="/">
               <PrismicText field={navigation.data.homepageLabel} />
             </Link>
           </NavItem>
           {navigation.data?.links.map((item) => (
             <NavItem key={prismic.asText(item.label)}>
               <PrismicNextLink field={item.link}>
                 <PrismicText field={item.label} />
               </PrismicNextLink>
             </NavItem>
           ))}
         </ul>
       </nav>
       {withProfile && (
         <Profile
           name={settings.data.name}
           description={settings.data.description}
           profilePicture={settings.data.profilePicture}
         />
       )}
       {withDivider && <HorizontalDivider />}
     </div>
   </Bounded>
 );
};
In this code, we import the UserButton from @clerk/nextjs then we add it to our Header component. We also update some of the styles of the Header component to make it display the UserButton component a bit nicer next to the pre-existing navigation bar.
Now, with the UserButton component added, we can go to our application in our browser and test it out. We should now be able to click on the UserButton component next to the navigation bar and then press the “Sign Out” button and after a few seconds be redirected to the Clerk sign-in page.
This application allows users to sign up and sign in using the Clerk authentication pages, before redirecting them to our blog. Once authenticated, users can navigate and view the blog's content. They can also sign out using the UserButton component.
While the full authentication flow is functional as is, we can enhance the user experience by hosting our own branded sign-up and sign-in pages. This eliminates the need to redirect to a Clerk URL. Let's do that next!
Stay on Top of New Tools, Frameworks, and More
Research shows that we learn better by doing. Dive into a monthly tutorial with the Optimized Dev Newsletter that helps you decide which new web dev tools are worth adding to your stack.

Step 6: Creating a custom sign-in and sign-up with Clerk
To get our custom sign-in and signup pages, we'll first need to add additional environment variables to our project. This is to tell Clerk where our signing and signup pages will be hosted in our application. Clerk will use these environment variables in their custom components SignIn and SignUp components.
To configure these environment variables, add the below variables at the bottom of your .env.local file at the root of your project.
NEXT_PUBLIC_CLERK_SIGN_IN_URL=/sign-in
NEXT_PUBLIC_CLERK_SIGN_UP_URL=/sign-up
NEXT_PUBLIC_CLERK_AFTER_SIGN_IN_URL=/
NEXT_PUBLIC_CLERK_AFTER_SIGN_UP_URL=/
With these environment variables added, we’re ready to get started with creating our custom pages.
Let’s start by creating the custom sign-in page.
Create a new file at /src/app/sign-in/[...sign-in]/page.js and then add the below code to it.
import { SignIn } from "@clerk/nextjs";
import Link from "next/link";

export default function Page() {
  return (
    <div className="h-screen flex flex-col items-center justify-center gap-6 min-w-full">
      <h2 className="text-2xl font-semibold text-gray-800">
        Sign in to your account
      </h2>
      <SignIn
        appearance={{
          elements: { footer: "hidden", formButtonPrimary: "bg-blue-700" },
        }}
      />
      <div className="flex flex-row gap-1 text-sm">
        <p>Not a user?</p>
        <Link href="/sign-up" className="text-blue-700 underline font-semibold">
          Sign up here.
        </Link>
      </div>
    </div>
  );
}
Let’s go through this code and see what’s happening.
- We start by defining some base layouts and styles for the page as well as creating a header for it.
- We then add the
SignIncomponent from the@clerk/nextjspackage. This component will handle the rendering of the sign-in form as well as the logic required to authenticate the user. At this point, we also make some customizations to the element using theappearanceprop to remove the built-in footer and change the color of the submit button. - Finally, under the
SignIncomponent, we add a custom footer to the page that displays a link to our sign-up page.
Let’s do it again for our sign-up page!
Create a new file at src/app/sign-up/[...sign-up]/page.js and add the below code to it.
import { SignUp } from "@clerk/nextjs";
import Link from "next/link";

export default function Page() {
  return (
    <div className="h-screen flex flex-col items-center justify-center gap-6 min-w-full">
      <h2 className="text-2xl font-semibold text-gray-800">
        Sign up for a new account
      </h2>
      <SignUp
        appearance={{
          elements: { footer: "hidden", formButtonPrimary: "bg-blue-700" },
        }}
      />
      <div className="flex flex-row gap-1 text-sm">
        <p>Already a user?</p>
        <Link href="/sign-in" className="text-blue-700 underline font-semibold">
          Sign in here.
        </Link>
      </div>
    </div>
  );
}
The code we’ve added here is very similar to the custom sign-in page we just went through, with the only difference being the use of the SignUp component from @clerk/nextjs instead of SignIn. We also include a link to the sign-in page in the footer of the component instead of a link to the sign-up page, as we did earlier.
Last step: updating the middleware.js
We’re almost ready to test our new custom authentication pages, but before we can do that, we need to update our middleware.js file. In our middleware.js file, we need to allow the /sign-in and /sign-up pages to be public routes, which means they can be accessed by users who aren’t authenticated.
To configure this, update your middleware.js file to use the code below.
import { authMiddleware } from "@clerk/nextjs";

export default authMiddleware({
  publicRoutes: ["/sign-in", "/sign-up"],
});

export const config = {
  matcher: ["/((?!.+\\\\.[\\\\w]+$|_next).*)", "/", "/(api|trpc)(.*)"],
};
This file is identical to the one we added earlier, with the only difference being the addition of the publicRoutes property inside the authMiddleware function.
The second thing we need to do is to update our UserButton component in the Header.js file to redirect to our custom sign-in page after the user presses “Sign Out.” We can do this by updating the UserButton code from earlier to look like this <UserButton afterSignOutUrl="/sign-in" />.
import { UserButton } from "@clerk/nextjs";

// ...rest of the imports and component definitions

export const Header = ({
 withDivider = true,
 withProfile = true,
 navigation,
 settings,
}) => {
 return (
	 // Notice the change in the <UserButton/> component
   <Bounded as="header">
     <div className="grid grid-cols-1 justify-items-center gap-20">
       <nav className="flex flex-row gap-4 items-center">
         <UserButton afterSignOutUrl="/sign-in" />
         <ul className="flex flex-wrap justify-center gap-10">
           <NavItem>
             <Link href="/">
               <PrismicText field={navigation.data.homepageLabel} />
             </Link>
           </NavItem>
           {navigation.data?.links.map((item) => (
             <NavItem key={prismic.asText(item.label)}>
               <PrismicNextLink field={item.link}>
                 <PrismicText field={item.label} />
               </PrismicNextLink>
             </NavItem>
           ))}
         </ul>
       </nav>
       {withProfile && (
         <Profile
           name={settings.data.name}
           description={settings.data.description}
           profilePicture={settings.data.profilePicture}
         />
       )}
       {withDivider && <HorizontalDivider />}
     </div>
   </Bounded>
 );
};
Testing our new authentication
With our custom authentication pages now added and configured, we’re ready to test our finished example application.
To do this, start up your local dev server again (if you stopped it) using npm run dev and then head over to http://localhost:3000. Then, if you’re not already authenticated, you should be automatically redirected to our custom sign-in page at http://localhost:3000/sign-in where you can sign in or navigate to the custom sign-up page at http://localhost:3000/sign-up using the link we added.
Then, once authenticated, you should be able to access the blog home page.
Once you’re finished, you should be able to sign out of the application using the UserButton component we added and be redirected back to the sign-in page.
In summary, your completed application should look something like the one below.

Closing Thoughts
If your application looks and functions like the one shown in the video and you can perform all the actions described, then congratulations, you’ve made an application gated with Clerk authentication! 🎉
At this point, you may be wondering what your next steps would be. One option would be to look at making completely custom authentication pages where you use no pre-built components from Clerk. Another option would be to implement a social auth provider like Google or GitHub. Or, maybe you’ll want to learn more about using Prismic and Next.js and enrich your new blog with the Prismic Academy.
If you’re interested in checking out the complete code of this project, you can see it on GitHub.
Thank you for reading.
Further learning
Build a full Next.js website with Next.js, Tailwind CSS, Prismic, and TypeScript!
If you're looking to take your skills to the next level, try this Next.js full website tutorial course! See the power of Prismic as a Headless website builder alongside Next.js, the popular React framework. In this tutorial, you'll create a trendy, dark, and modern website and use GSAP to add wonderful animations, both on page load and on scroll. You'll also use Tailwind CSS to style the super-polished website.


