How to Add Fonts in Next.js 13 (Google Fonts, Local Fonts, Tailwind CSS)
 By Alison Brunk
With the rise of variable and web fonts, designers and developers today have endless options for creative typography on the web. But with great power comes great responsibility. Choosing the right fonts is critical for an exceptional user experience that optimizes readability across devices.
Next.js 13 unlocks new levels of font control to help developers implement beautiful, functional typography using variable fonts, Google fonts, local fonts, and more. In this tutorial, we will walk through:
- The benefits of using the
next/fontpackage. - How to implement
next/font. - How to apply a Google font globally.
- How to use
next/fontwith Tailwind CSS and a CSS variable - Applying a font to a specific component.
- How to use a custom local font.
So let’s dive in!
Font optimization benefits of using next/font
The next/font package optimizes font loading and usage in several key ways:
- Automatic font optimization: By default, Next.js will optimize web fonts (including custom fonts), eliminating the need to manually set up font delivery. This allows you to spend more time focusing on your app’s logic rather than tweaking font settings.
- No external requests -
next/fontcompletely removes external network requests, which improves privacy and performance. - Built-in automatic self-hosting - CSS and font files are downloaded at build time and automatically self-hosted with the rest of your static assets.
- Automatic matching fallback -
next/fontprovides a custom fallback that closely matches your font and calculates things like thesize-adjustproperty. This allows you to optimally load your fonts with zero layout shift. - Preloading strategy:
next/fontemploys a preloading strategy for critical fonts. This means that vital fonts, such as those used in your website's main content, load quicker, allowing your website's text to render more promptly for users. - Automatic font subsetting: with
next/font, Google fonts are automatically subset, which reduces the size of font files, ensuring quicker font loading times.
Now that we know how next/font helps with font optimization, let’s see how it works. 👇
Setting up your Next.js fonts project
To get started, we first need a project. To follow this tutorial step-by-step, you can clone this repo on GitHub by running:
git clone https://github.com/prismicio-community/nextjs-fonts-app.git nextjs-fonts-app
cd nextjs-fonts-app
Then we can install our dependencies by running npm install.
Finally, you can run your build process with npm run dev.
When loading http://localhost:3000/ on the front end, you will see we have a basic page with a single <p> element.

Deliver a fast website with a visual Page Builder
Prismic is a headless solution, with a visual Page Builder for your marketing team to release pages independently.

Using next/font to apply a Google font globally
For this example, we will apply the Google Open Sans font, which is a variable font. To start using the next/font package, we need to complete 3 steps:
- Import the font
- Configure the font object
- Attach the font to the JSX code
We can do all 3 of these things in our layout.js file.
// src/app/layout.js

import './globals.css'

//👇 Import Open Sans font
import { Open_Sans } from 'next/font/google'

//👇 Configure our font object
const openSans = Open_Sans({
  subsets: ['latin'],
  display: 'swap',
})

export default function RootLayout({ children }) {
  return (
    // 👇 Attach font to global JSX node
    <html lang="en" className={openSans.className}>
      <body>{children}</body>
    </html>
  )
}
In the above code block, you can see we have imported our Google Open Sans font and configured our object with two properties.
Then, we attached our font to the <html> element so all of the children elements can inherit this font. We used the className prop to attach the font by adding className={openSans.className} to our <html> element.
Not using a variable font?
If you aren’t using a variable font when configuring your font object, you will also need to specify a font-weight when configuring your object, like weight: '400'.
Now that we’ve implemented these 3 steps, we can see that the font has changed on the front end.

If we want to verify that we are using the correct font, we can right-click and select inspect mode.
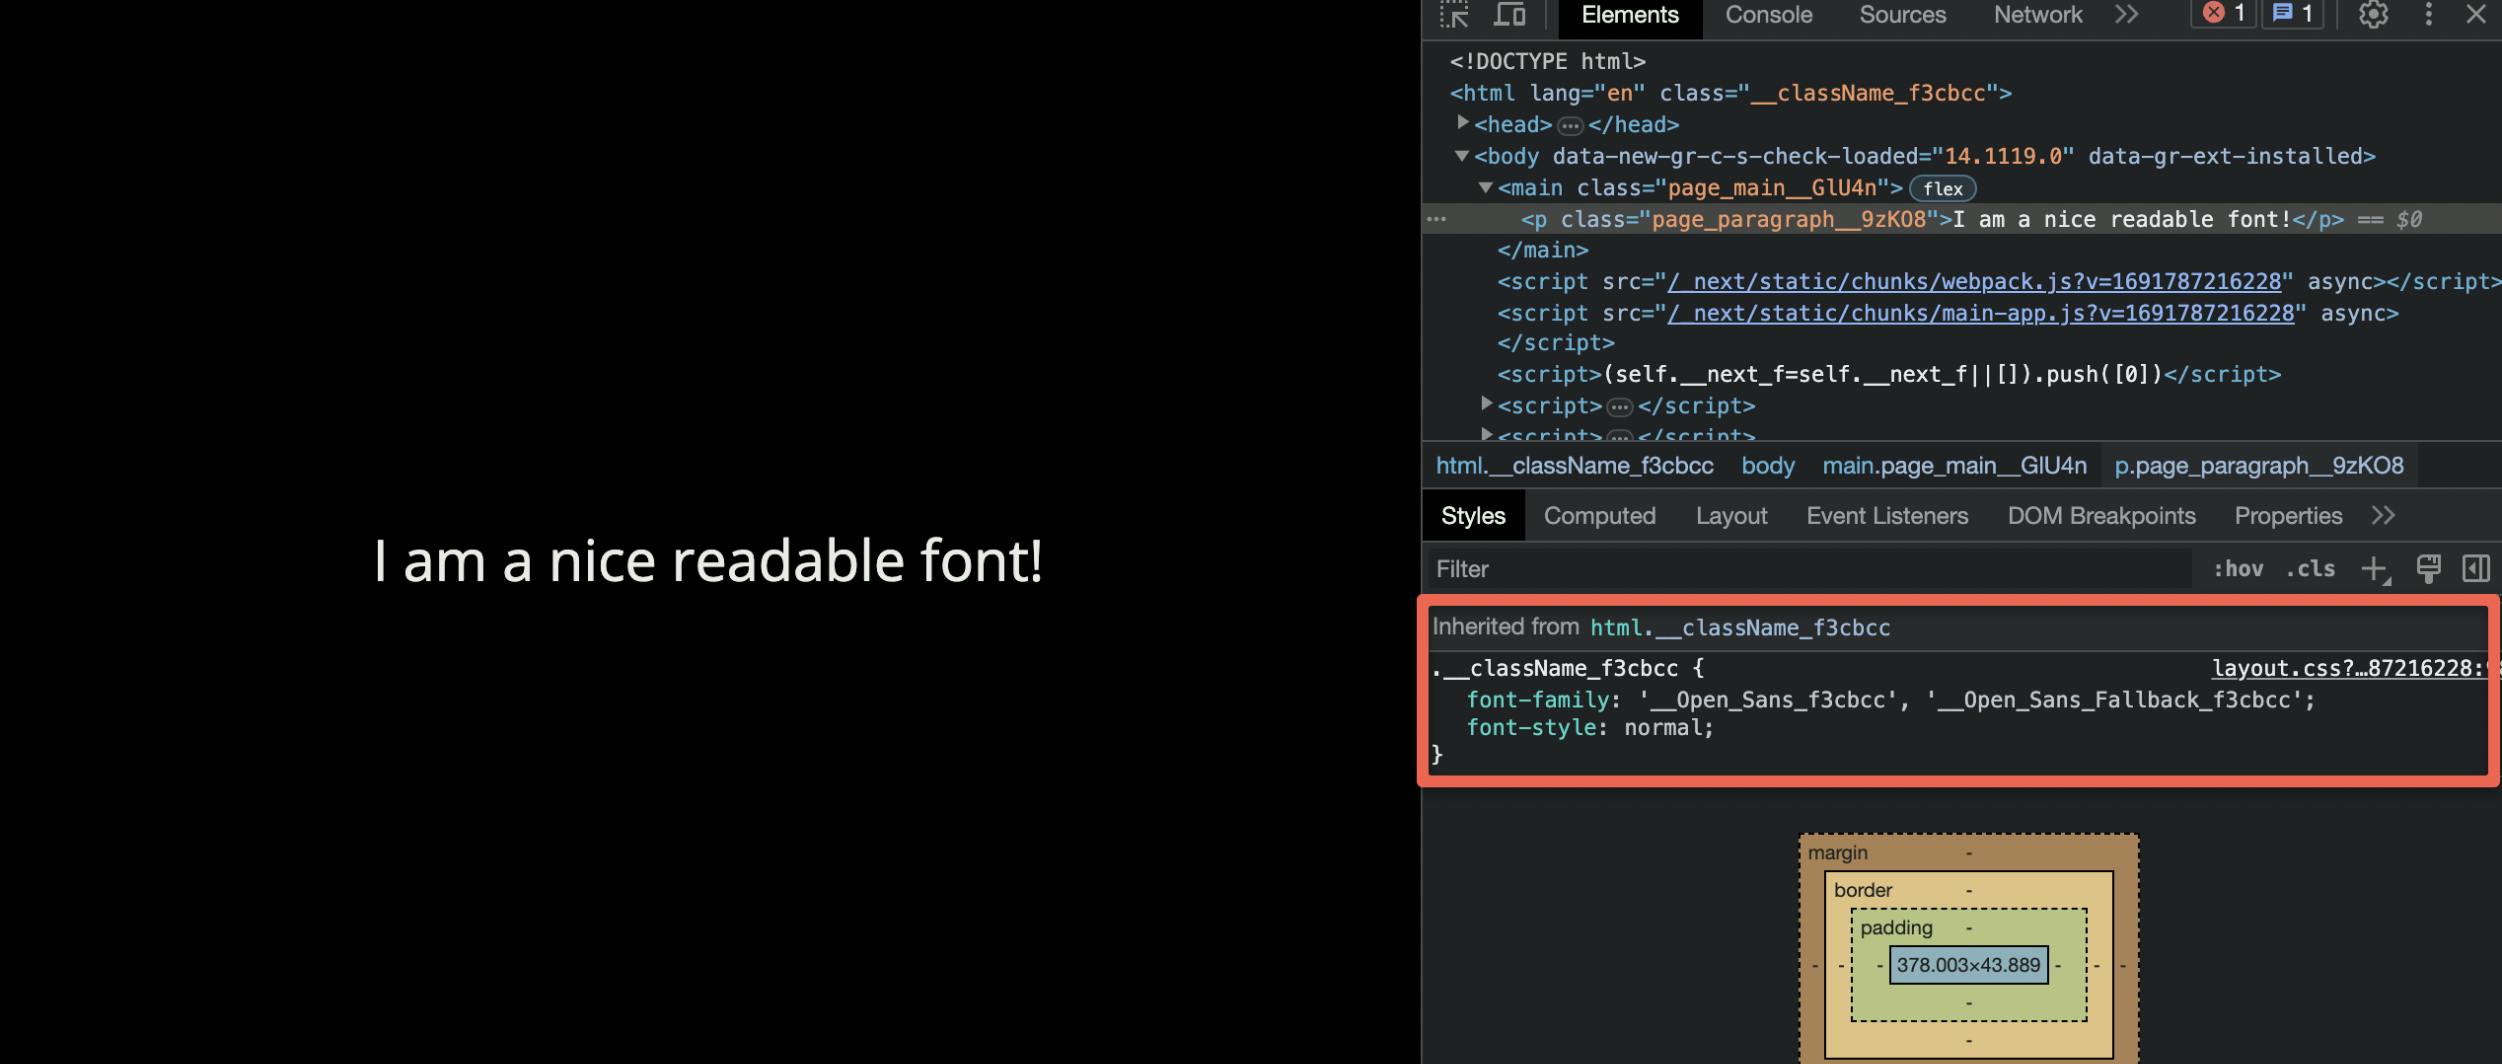
We can see that we are indeed using Open Sans font, which is what we imported from the next/font package and configured as our global font! 🌟 Great!
Are you an agency evaluating solutions for your clients?
Create high-quality sites faster with Prismic. Check out our agency page to learn more about how you can launch faster and make your clients happier with Prismic.

Using next/font with Tailwind CSS and a CSS variable
Tailwind CSS provides a large set of CSS classes to style elements, often as a replacement to writing vanilla CSS. It is used by many developers to quickly style websites. Let’s see how we can use next/font with Tailwind CSS.
Configure our code to be used with Tailwind CSS
We can extend our example from above by configuring Open Sans to output a CSS variable (also known as a CSS custom property). Using a variable allows us to reference it easily through Tailwind CSS classes. We’ve also added the Google Roboto Mono font to exemplify one approach to handling multiple fonts:
// src/app/layout.js

import './globals.css'

//👇 Import our second font
import { Open_Sans, Roboto_Mono } from 'next/font/google'

const openSans = Open_Sans({
  subsets: ['latin'],
  display: 'swap',
  //👇 Add variable to our object
  variable: '--font-opensans',
})

//👇 Configure the object for our second font
const robotoMono = Roboto_Mono({
  subsets: ['latin'],
  display: 'swap',
  variable: '--font-roboto-mono',
})

export default function RootLayout({ children }) {
  return (
    // 👇 Attach CSS variables to HTML
    <html
      lang="en"
      className={`${openSans.variable} ${robotoMono.variable} font-sans`}
    >
      <body>{children}</body>
    </html>
  )
}
In the example above we:
- Import our
Open_SansandRoboto_Monofonts fromnext/font/google. - Load our fonts with the
variableoption to define the CSS variable name and assign it toopenSansandrobotoMonovariables. - Attach both CSS variables to our HTML document by doing
{${openSans.variable} ${robotoMono.variable}}rather than{openSans.className}like we did above when we were only using a single font.
Install Tailwind CSS in our project
Now that we’ve updated our code to be usable with Tailwind CSS, we need to follow a few steps to install and configure it.
- Install Tailwind CSS by opening a new tab and running:
npm install -D tailwindcss postcss autoprefixer
npx tailwindcss init -p
2. Configure your template paths with the CSS variables:
// tailwind.config.js

/** @type {import('tailwindcss').Config} */
module.exports = {
  content: [
    "./app/**/*.{js,ts,jsx,tsx,mdx}",
    "./pages/**/*.{js,ts,jsx,tsx,mdx}",
    "./components/**/*.{js,ts,jsx,tsx,mdx}",

    // Or if using `src` directory:
    "./src/**/*.{js,ts,jsx,tsx,mdx}",
  ],
  theme: {
    extend: {
      fontFamily: {
        // 👇 Add CSS variables
        sans: ["var(--font-opensans)"],
        mono: ["var(--font-roboto-mono)"],
      },
    },
  },
  plugins: [],
};
3. Add the Tailwind CSS directives to the top of globals.css:
/* src/app/globals.css */

@tailwind base;
@tailwind components;
@tailwind utilities;
4. Restart the dev server after installing Tailwind CSS by pressing CTRL+C and re-running npm run dev, and refreshing your page.
And that’s it! Now we can use the font-sans and font-mono utility classes to apply the font to our elements. 👍
Handling multiple fonts without Tailwind CSS
If you want to use Tailwind CSS, you need to use the CSS variable approach shown above. However, if you are not using Tailwind CSS, an alternative (and recommended) method is to create a utility function that exports a font, imports it, and applies its className where needed. This ensures that the font is preloaded only when it is rendered. To learn more about this approach, check out the docs.
Using next/font to apply a font to a specific component
We’ll assume you added the font as a variable, as shown in the Tailwind CSS section. Now let’s take a look at how we can implement our new Roboto Mono font with a custom component. Let’s start by creating our new component.
Create a header component
For this demo, we will add a <Header> component. First, we need to create a components folder in the src directory and then add a Header.js file inside of it.

We can add the following code to Header.js.
// src/components/Header.js

import styles from './Header.module.css'

export default function Header({ children }) {
  return <h1 className={styles.header}>{children}</h1>
}
Add some styling
Now let’s spruce this component up a bit by adding some styles. To do so, we can create a new stylesheet called Header.module.css in our newly created components directory.

Now we can add these styles to our newly created Header.module.css file.
/* src/components/Header.module.css */

.header {
	text-transform: uppercase;
	text-align: center;
	background: linear-gradient(to right, #3f5EFB, #FC466B);
	-webkit-background-clip: text;
	-webkit-text-fill-color: transparent;
  font-size: 2rem;
}
Display the component
Next, we can add our component to the page so we can actually see two different fonts at the same time. To do so, we can update page.js to import and display our new component.
// src/app/page.js

import Head from 'next/head'
import styles from './page.module.css'

//👇 Import Header
import Header from '@/components/Header'

export default function Home() {
  return (
    <>
      <Head>
        <title>Next.js fonts demo!</title>
        <meta name="description" content="Generated by create next app" />
        <meta name="viewport" content="width=device-width, initial-scale=1" />
        <link rel="icon" href="/favicon.ico" />
      </Head>
      <main className={styles.main}>
        {/*👇 Display our Header component*/}
        <Header>I am a gorgeous header font</Header>
        <p className={styles.paragraph}>I am a nice readable font!</p>
      </main>
    </>
  )
}
We can now see our new <Header> component, but if we inspect, we can see it is still using the global Open Sans font.
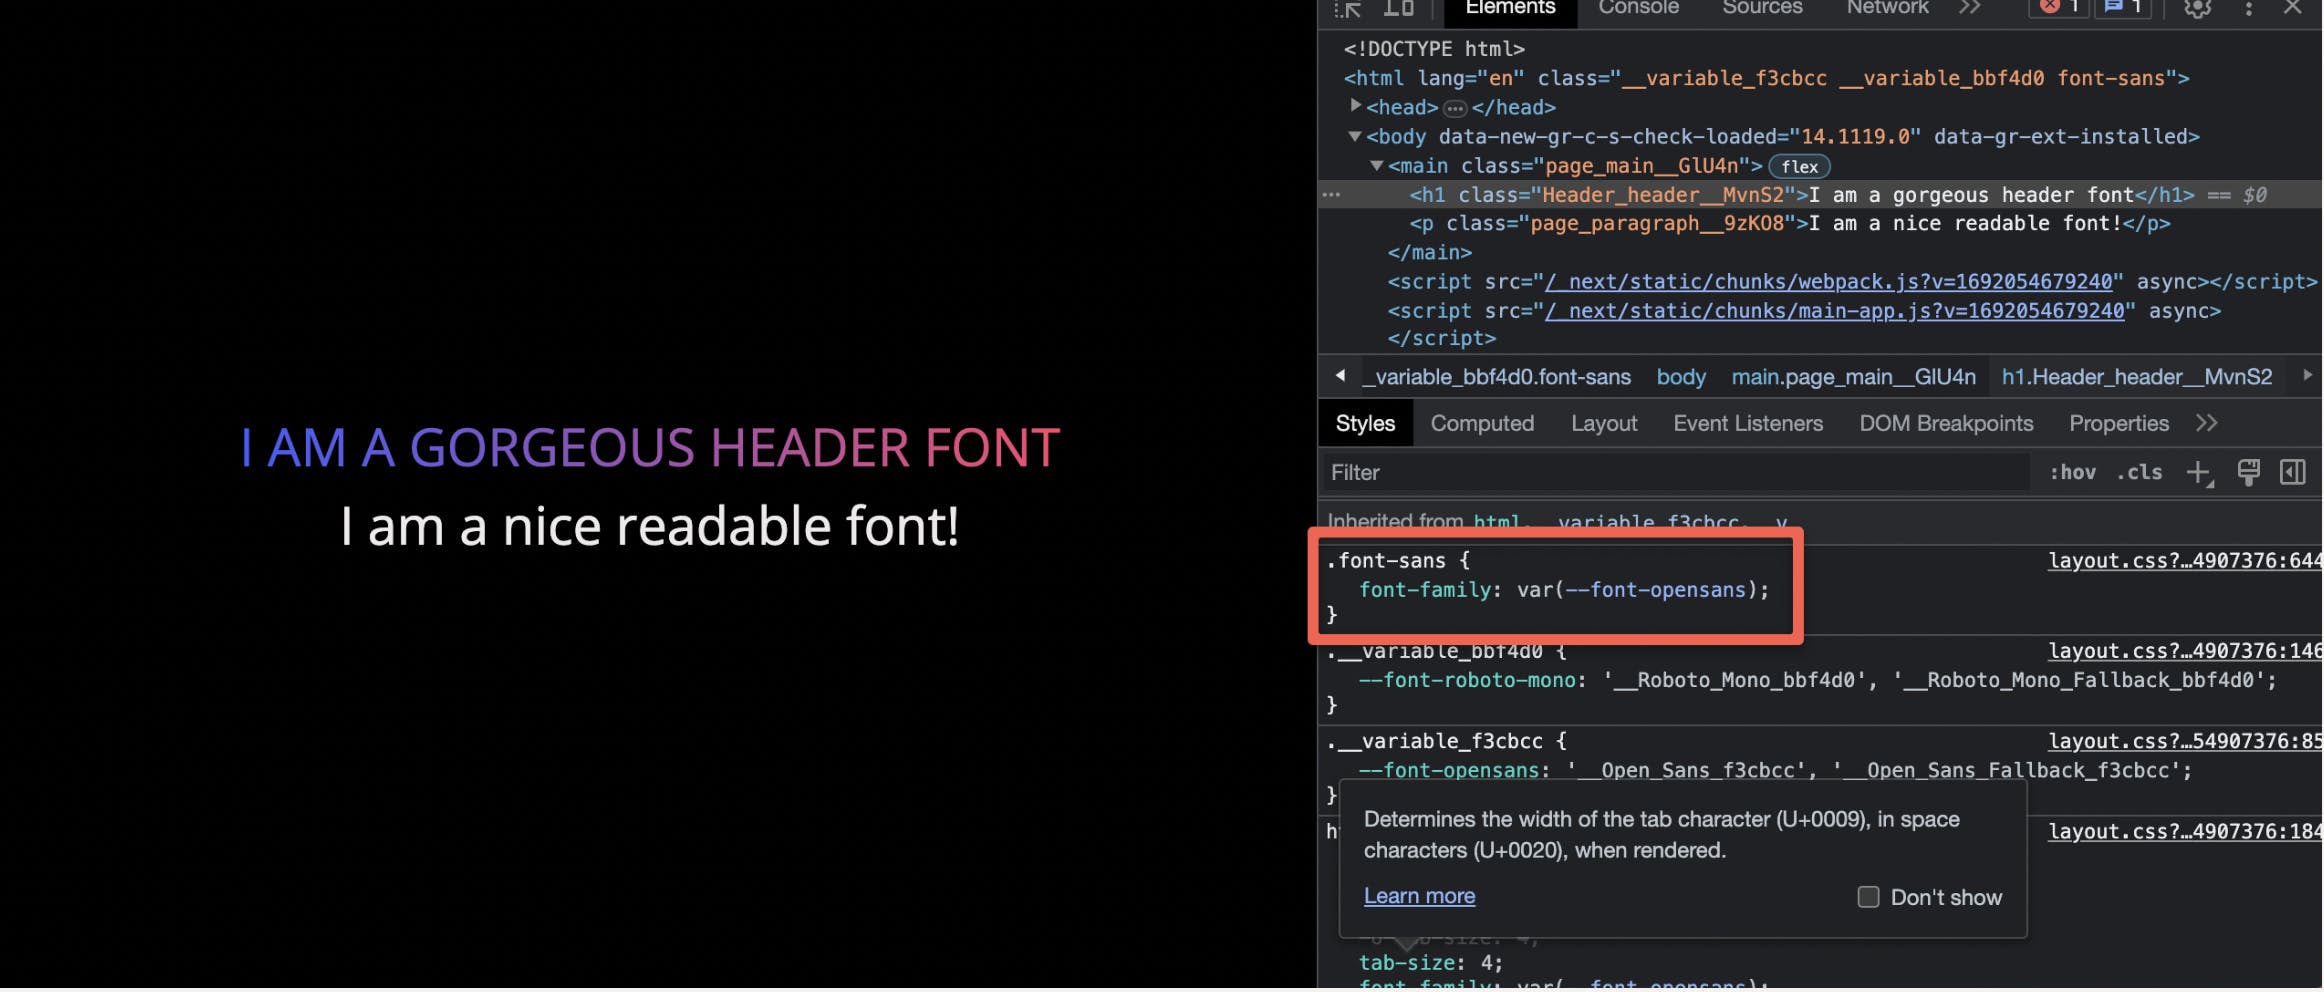
Now, since we are using Tailwind CSS, we just have to add our font-mono class to Header.js.
// src/components/Header.js
import styles from './Header.module.css'
export default function Header({ children }) {
return <h1 className={`${styles.header} font-mono`}>{children}</h1>
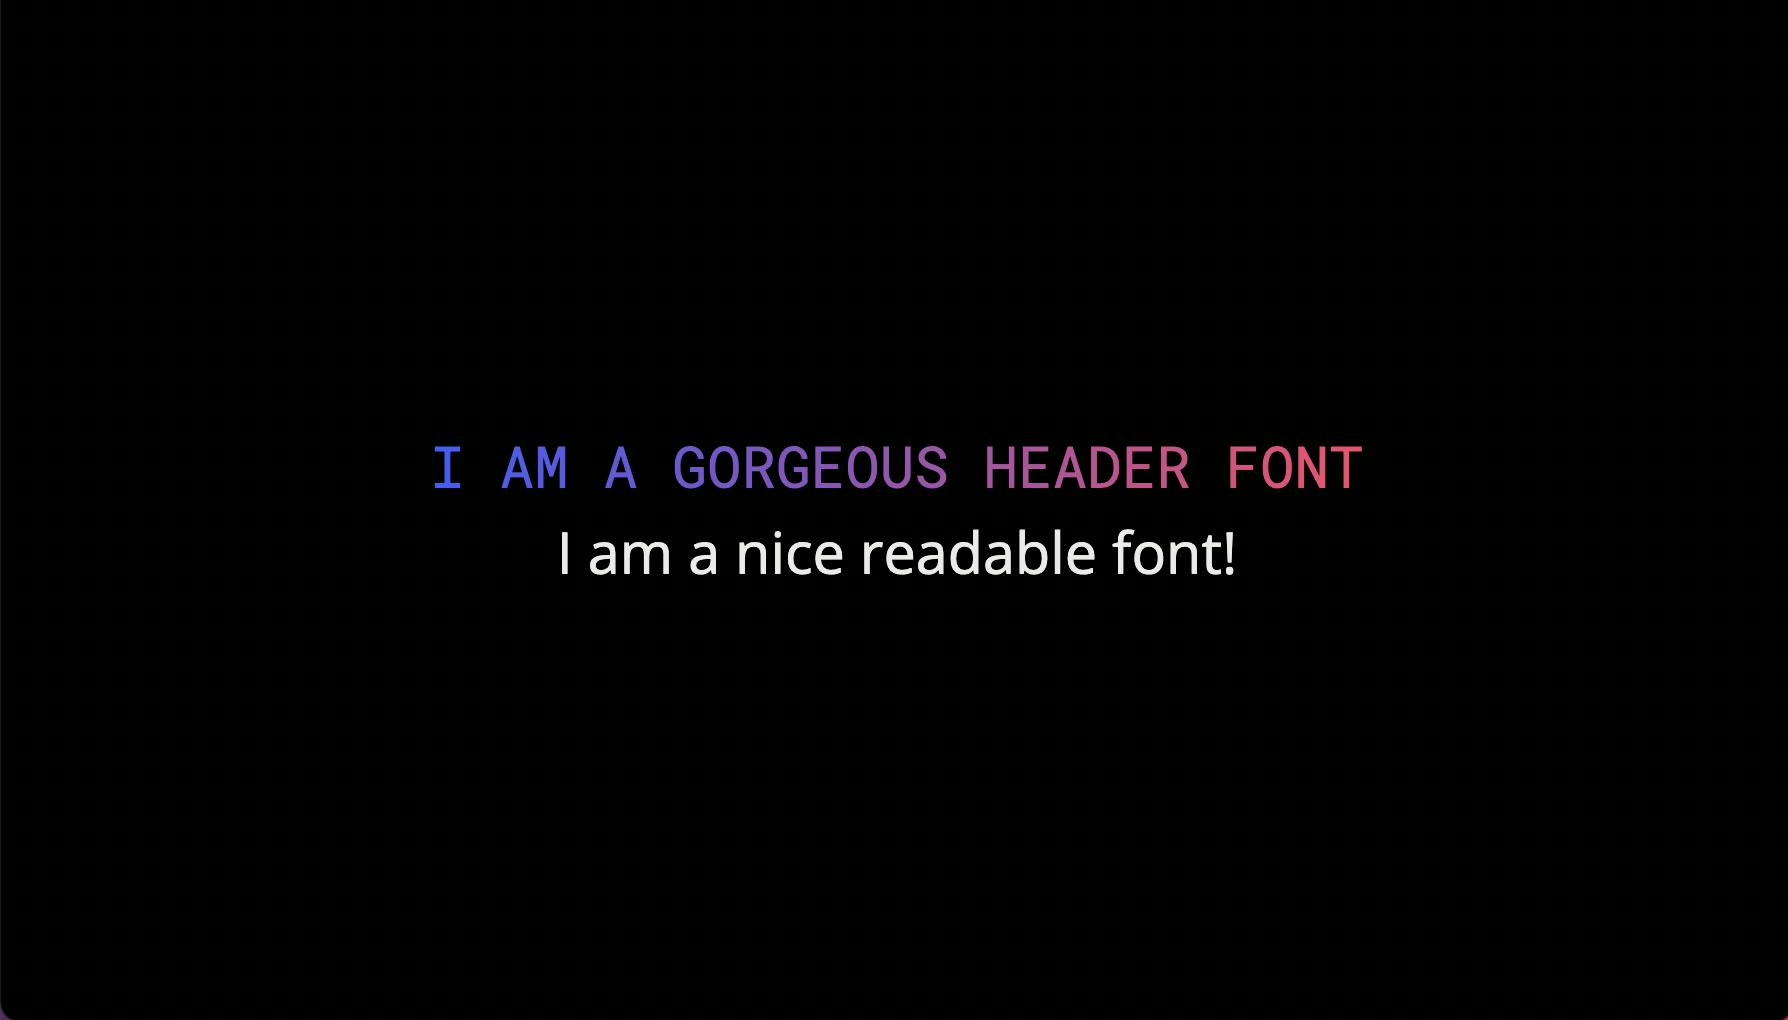
}You can now see that our page displays both fonts. The header is Roboto Mono, and the <p> element is Open Sans.
Using next/font to apply a custom local font
But what if I wanted to store a custom font locally and use that instead? next/font makes doing so very simple! Let’s see how we could update our header component to use a locally stored font.
If you are using the starter from above, you will notice there is already a fonts directory that exists with a single my-font.ttf file. So let’s configure our Header.js file to use this.
// src/components/Header.js

// 👇 import local font
import localFont from 'next/font/local'

//👇 Configure our local font object
const myFont = localFont({ src: '../fonts/my-font.ttf' })

import styles from './Header.module.css'

export default function Header({ children }) {
  //👇 Add our local font as a className
  return <h1 className={`${myFont.className} ${styles.header}`}>{children}</h1>
}
As we can see in the above code block, we have imported our local font and configured our object to pass the local file using the src prop. Then we attached our font to the <h1> using className={${myFont.className} ${styles.header}} so we could use our local font along with the styles we previously added.
And voila! Now on the front end, you can see our local font is being applied to the <Header> component!

Now if we inspect, we can see our preloaded fonts in the header and that we are now using our custom local font for the <h1>.

Additionally, if we inspect the CSS for the element, we can see our size-adjust property being added so we can be sure our fonts load with zero layout shift. 👍

Using next/font with the Pages Router?
If your project is using the Pages Router as opposed to the App Router, we’ve got you covered! This step-by-step tutorial walks you through several approaches to working with the next/font package using the Pages Router. Check it out! 👇
Recapping Next.js fonts
So let’s recap!
In this tutorial, we explored several approaches to optimizing fonts using the Next.js font package. We've successfully utilized next/font to manage Google fonts, multiple fonts, and local fonts. We've also implemented the CSS variable approach for added flexibility and integration with Tailwind CSS.
So, which approach do you prefer? Let us know, and stay tuned for more content like this. 🚀
Try editing a page with Prismic
A visual page builder, configured to marketing team's needs. They can easily create on-brand website pages, release more, attract more visitors and convert quality leads.


