

When building a blog with Next.js, you may be tempted to handle the management of the content yourself in the code using methods like Markdown. However, this approach often becomes cumbersome and can quickly pose issues as the team grows and fewer technical people are onboarded to the project.
This is why using a headless CMS like Prismic is ideal for a Next.js blog because it allows for easy management of content for both technical and non-technical people. Prismic enables you to build and iterate pages quickly, which is essential for managing a blog and consistently delivering quality, unique content. This is precisely what we’ll explore further in this tutorial as we build the example blog below.

Project Setup
To get started, we’ll need to create a new Prismic project, which we can do with a few easy steps:
- Log in to Prismic or create a new account.
- Create a new Prismic repository using the Next.js option.
- Select the ”Minimal starter”
- Give your repository a name, select the free plan, and click Create Repository.
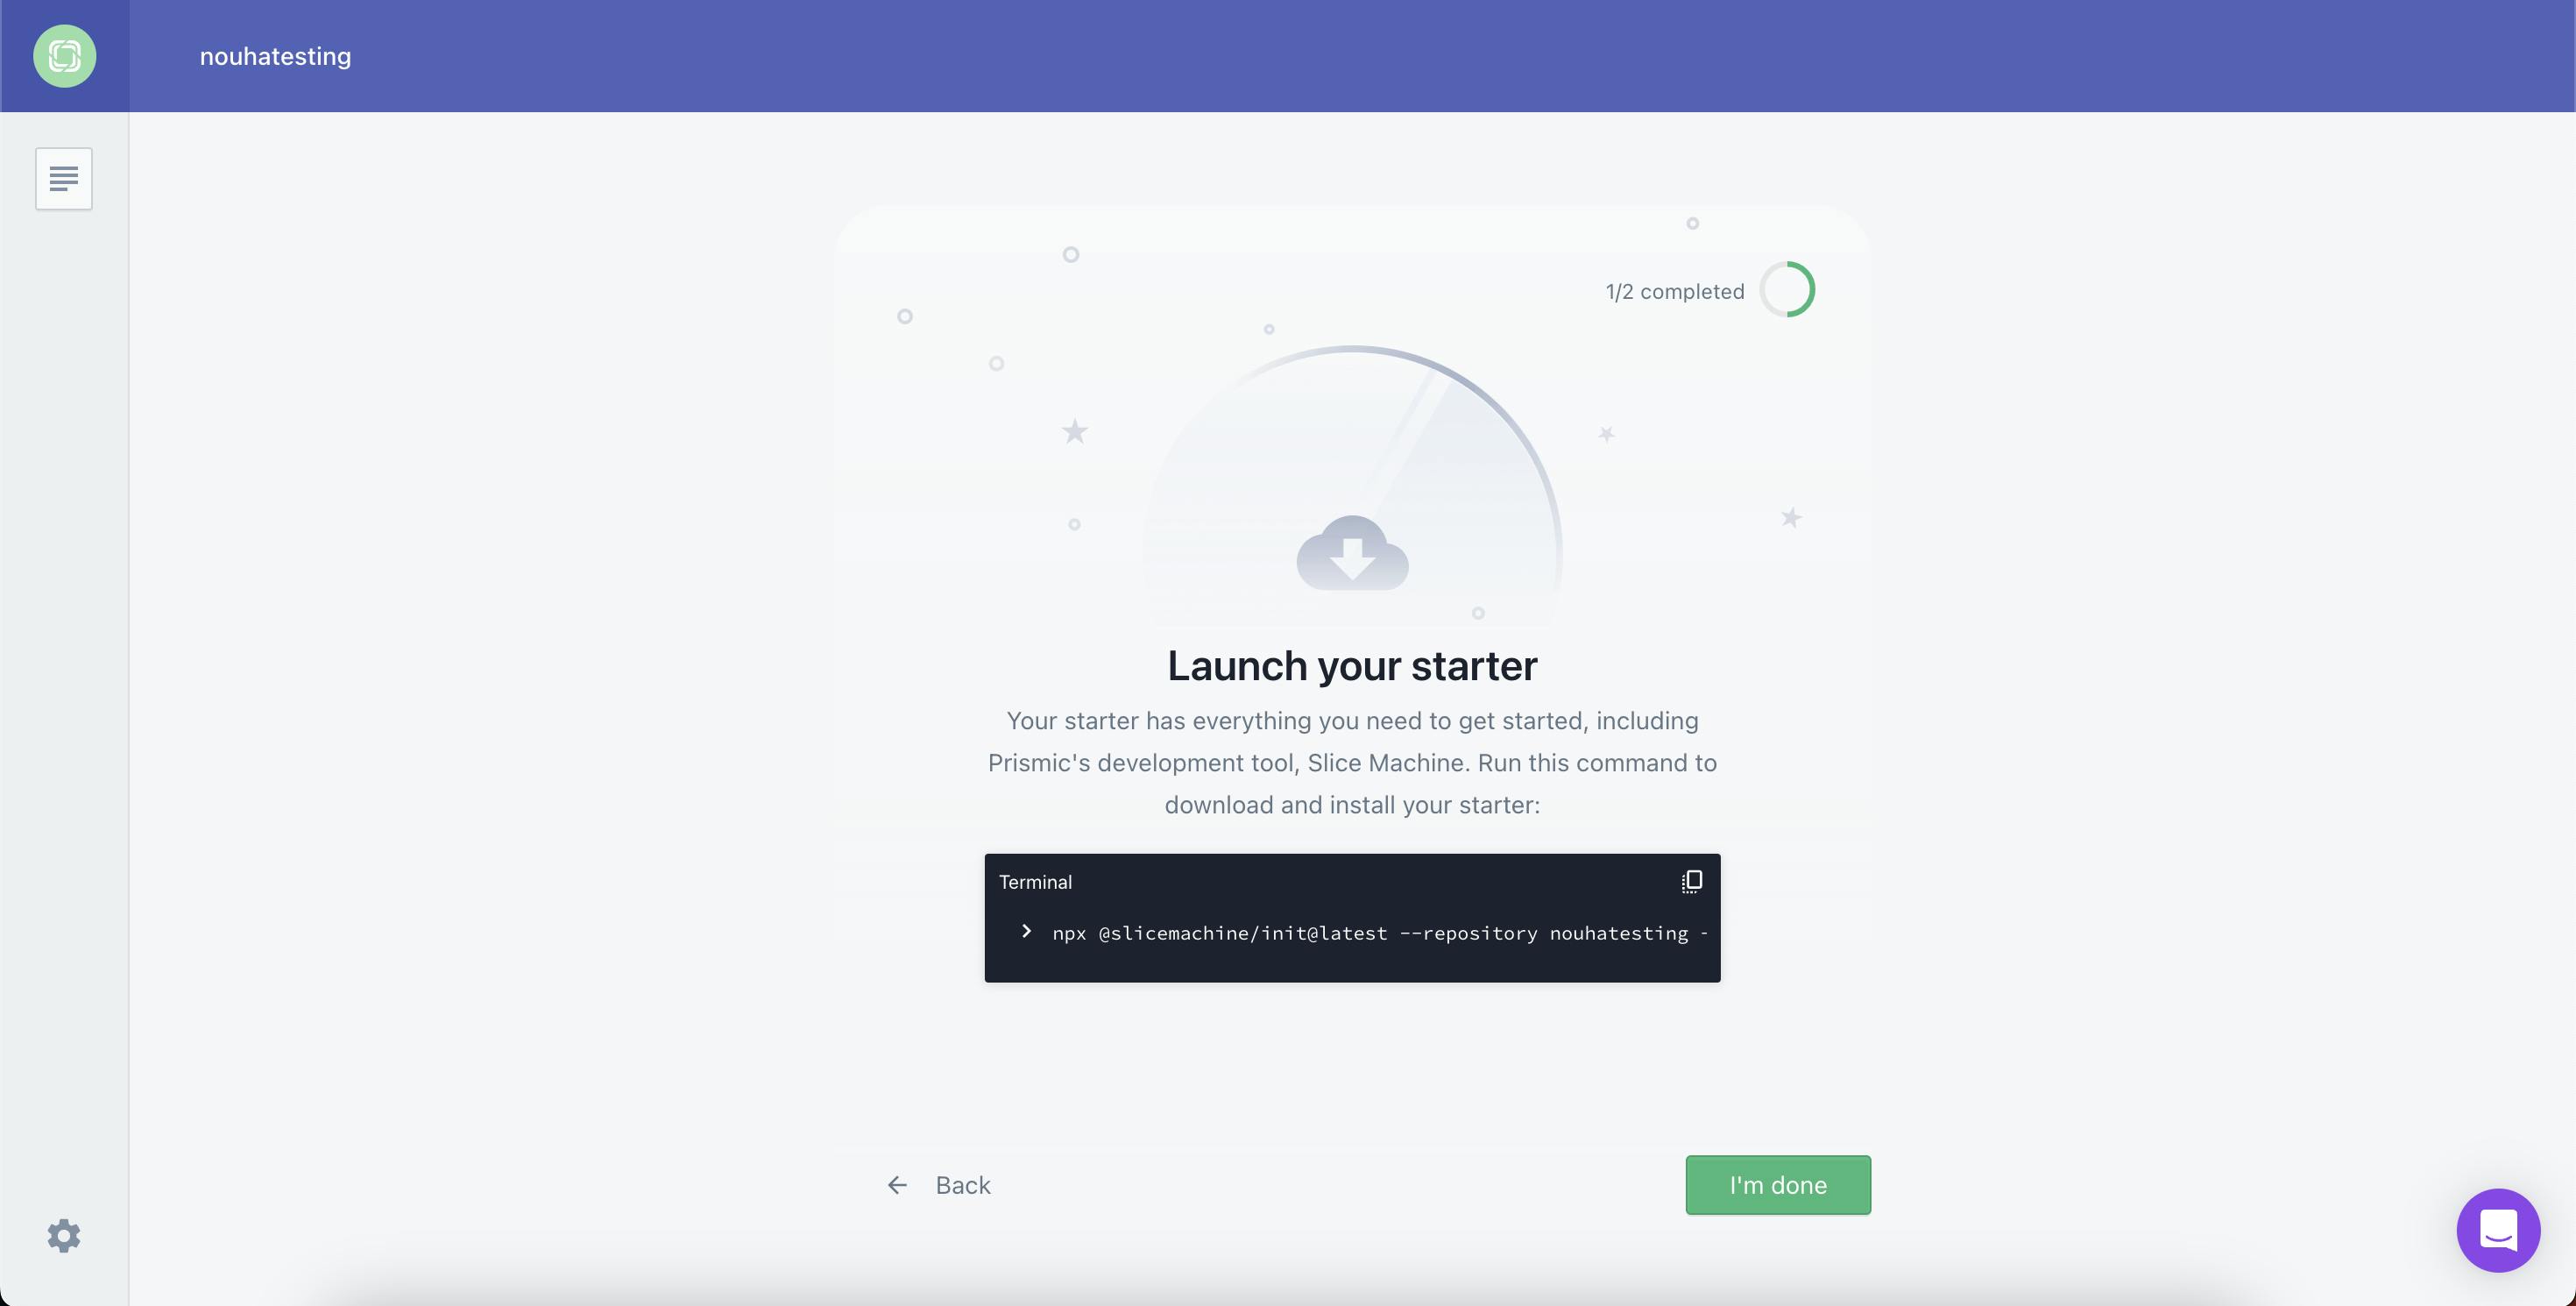
Launch your starter
Then, once the project has been created in Prismic, click Get Started with Slice Machine and run the command in the dashboard to launch your starter. You will be asked if you want to run Slice Machine in the terminal. We will run this in the next step, so for now, you can type n and click I’m done.
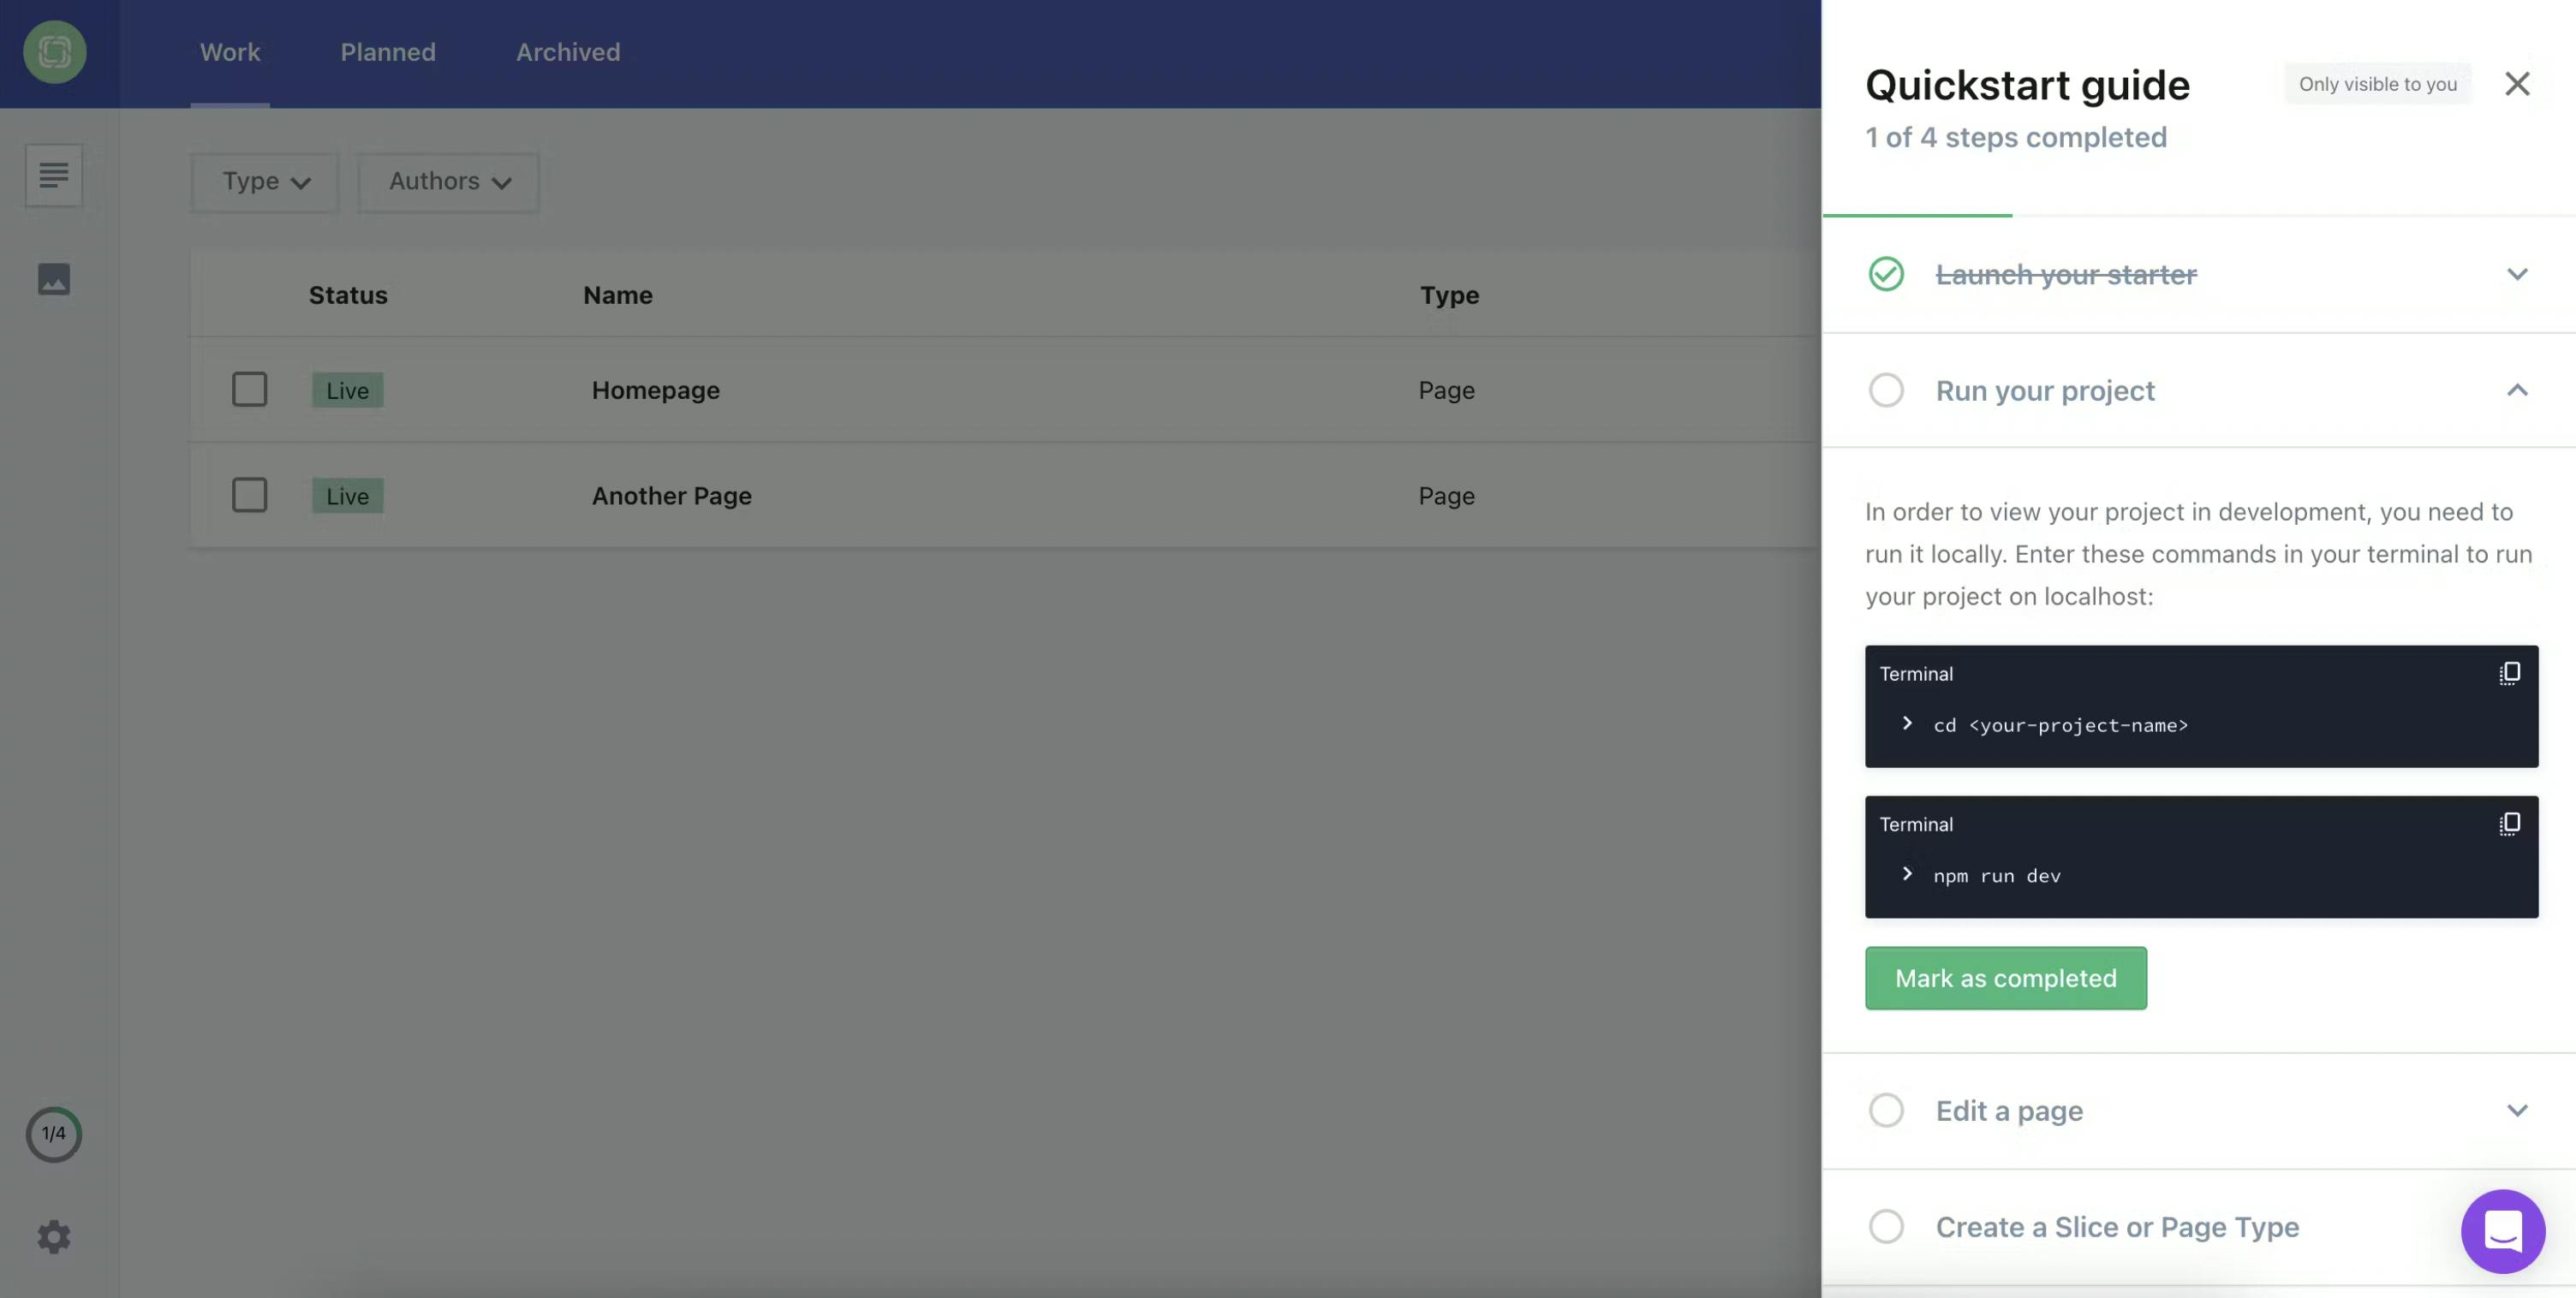
Next, in order to view your project in development, run the commands under ‘Run your project’ in the Prismic dashboard (making sure to swap in your repository name for <your-project-name>). When you’re done, you can mark this step as completed by clicking the button.
We’ll go through editing a page and creating slices and page types later in the tutorial, so don’t worry about those steps yet. For now, open the project in your code editor.
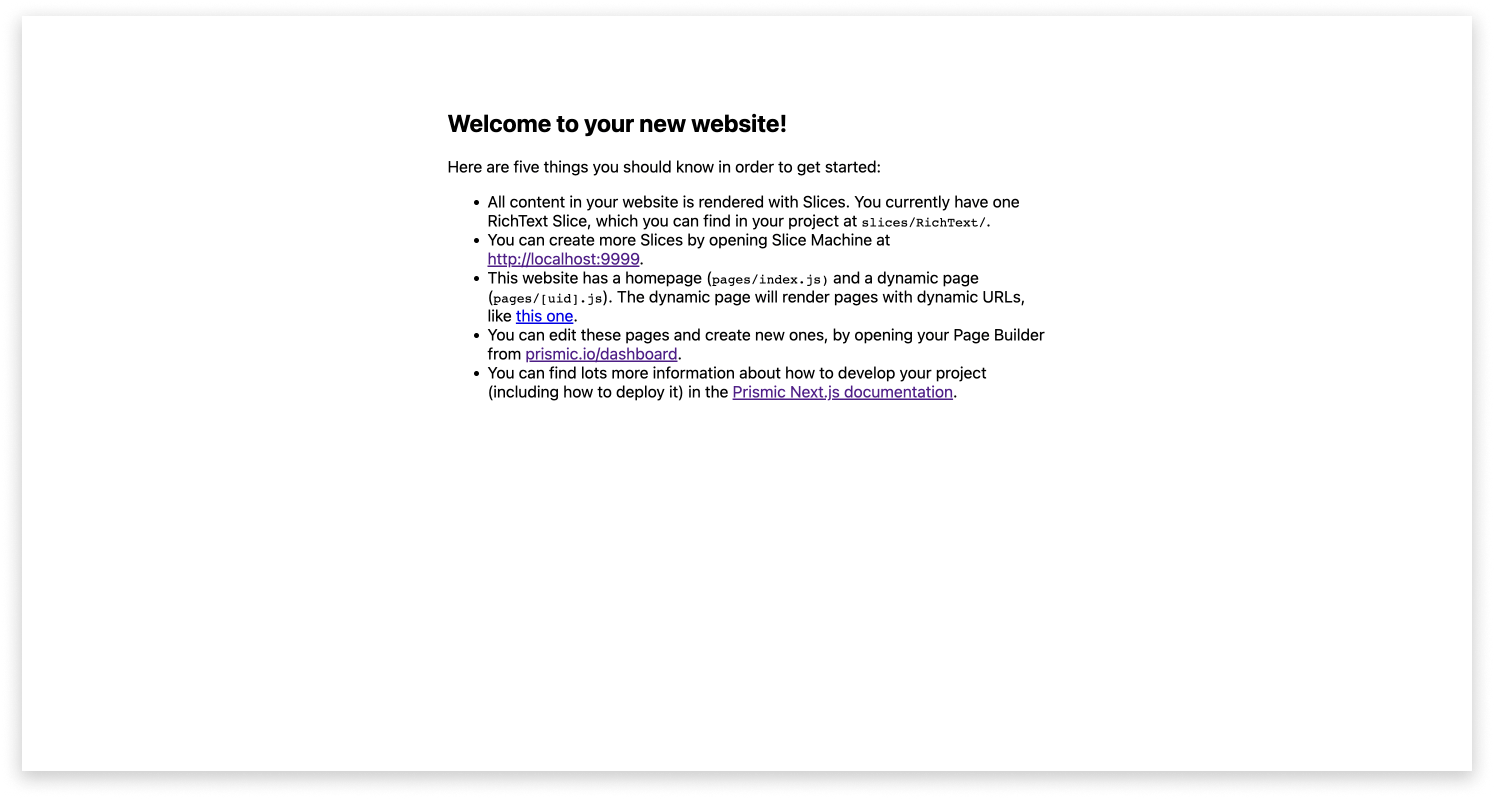
In your browser, you should be able to see the front end of your website locally at http://localhost:3000/.
Setup Tailwind CSS
Once your Prismic project is set up and the repository has been cloned to your local machine, the next thing we need to configure is Tailwind CSS. We can do this in a few steps:
1. Install Tailwind CSS by running the following commands in a new tab in your terminal:
npm install -D tailwindcss postcss autoprefixer
npx tailwindcss init -p
2. Update your tailwind.config.js file to work with the src directory our project uses. It should look like this:
// ./tailwind.config.js

/** @type {import('tailwindcss').Config} */
module.exports = {
  content: ['./src/**/*.{js,ts,jsx,tsx,mdx}'],
  theme: {
    extend: {},
  },
  plugins: [],
};
3. Create a styles.css file inside the app directory, and add the Tailwind CSS directives.
@tailwind base;
@tailwind components;
@tailwind utilities;
4. Import the new styles.css file in your layout.tsx file.
// ./src/app/layout.tsx

// ... other imports
import './styles.css';

// ... rest of the file
Slice Machine Configuration
With our project initialized, and Tailwind CSS set up, we can now turn our attention to building our blog and creating content for it. We will first configure our page types and slices using Slice Machine, which we can access by going to http://localhost:9999/ (this server was also started earlier when we ran npm run dev to launch our project).
What are Slices and Slice Machine?
Slice: A dynamic website section. Slices are freely arranged in a document's slice zone. These are the components that will render your content from Prismic and allow content editors to compose dynamic pages quickly.
Slice Machine: Prismic's local development tool for developing with slices in your codebase.
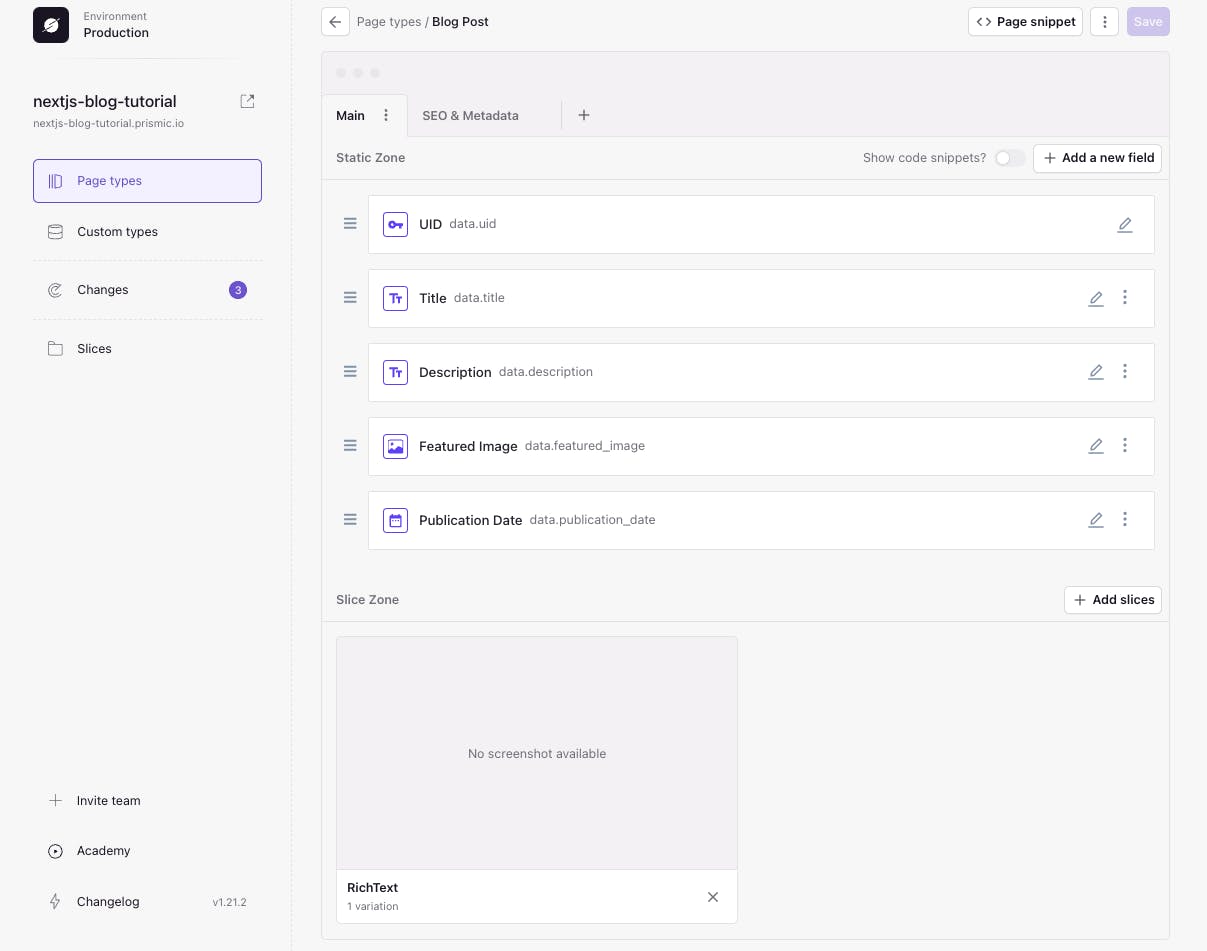
Creating a “Blog Post” Page Type
Once you’ve accessed Slice Machine, the first thing you’ll do is click Create and add a page type called “Blog Post.” This will be the page template we’ll be using for all of our blog post pages when we add content later on in Prismic. Since there will be many of these pages, we will select the "Reusable type."

After creating the new “Blog Post” page type, you’ll be shown a page where you can add slices. Our starter came with one existing RichText slice that we can add to our new page type. To do so, click Select Existing, select the RichText slice, and click Add.

After doing this, we’re going to add several fields to the “Static Zone” of the page, including:
- UID (pre-existing)
- Title: Rich Text field with only
h1tag - Description: Rich Text field with only
p,b,i, and link tags - Featured Image: Image field
- Publication Date: Date field
Make sure to save your changes by clicking Save in the top right.
Customizing your rich text field
You can select individual tags in a Rich Text element by clicking the pencil icon on the field, selecting the necessary tags under Accept*, and then clicking Done to confirm the changes.
Your “Blog Post” page type should now look like this.
Updating the “Page” Page Type
With our new “Blog Post” page type created and customized, let’s turn our attention to the other page type present in Slice Machine, called “Page.” We can navigate to this slice by clicking on the “Page Types” option from the side menu on the left. We will use this page type for our blog's home page, where we’ll display a hero section and our latest blog posts.
You can see we already have a UID and Title field added to the Static Zone of this page type, in addition to our RichText slice. The only thing we need to do is create a Hero slice that we can display at the top of the homepage.
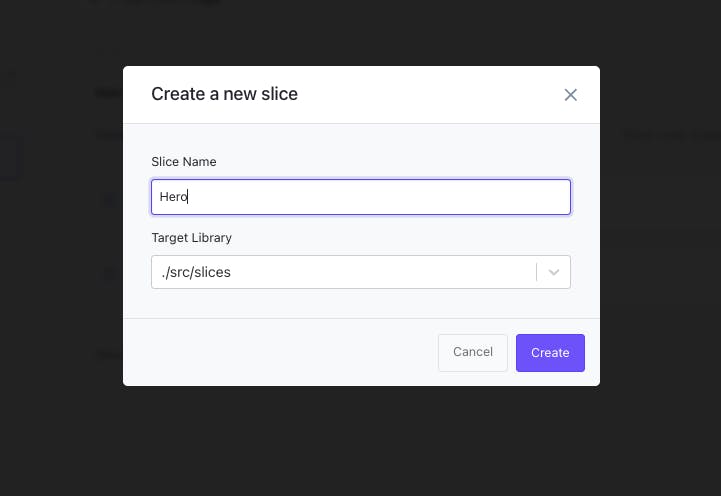
To do this, click Add slices > Create new and create a slice called “Hero.”
Then, click on our Hero slice and add the following fields to the Non-Repeatable Zone:
- Title: Rich Text field
h1tag only - Description: Rich Text field with only
p,b,i, and link tags - Image: Image
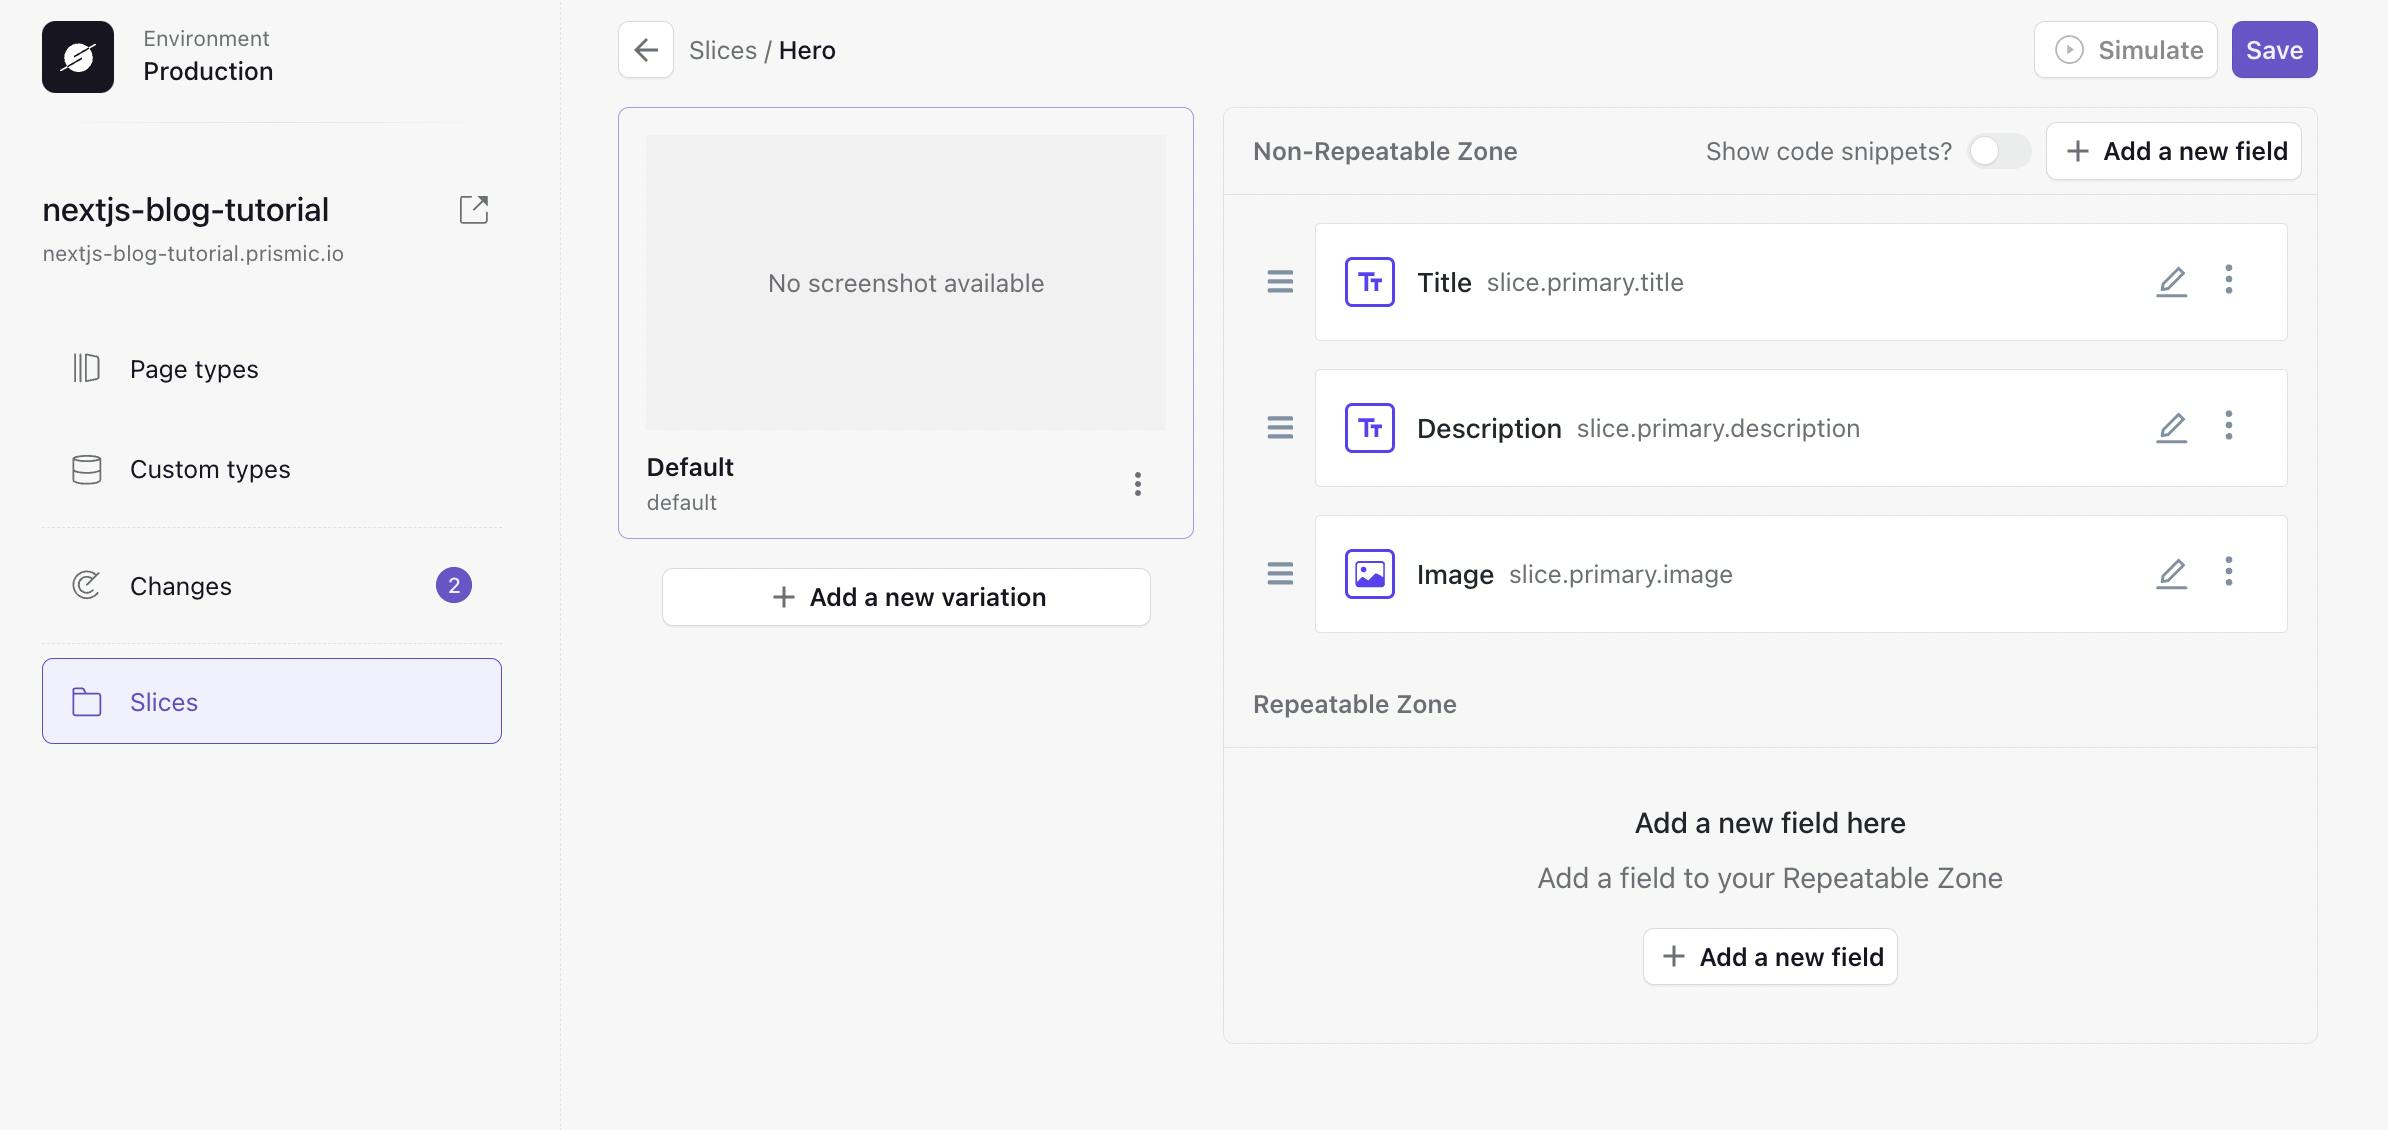
Make sure to click Save when you are done.
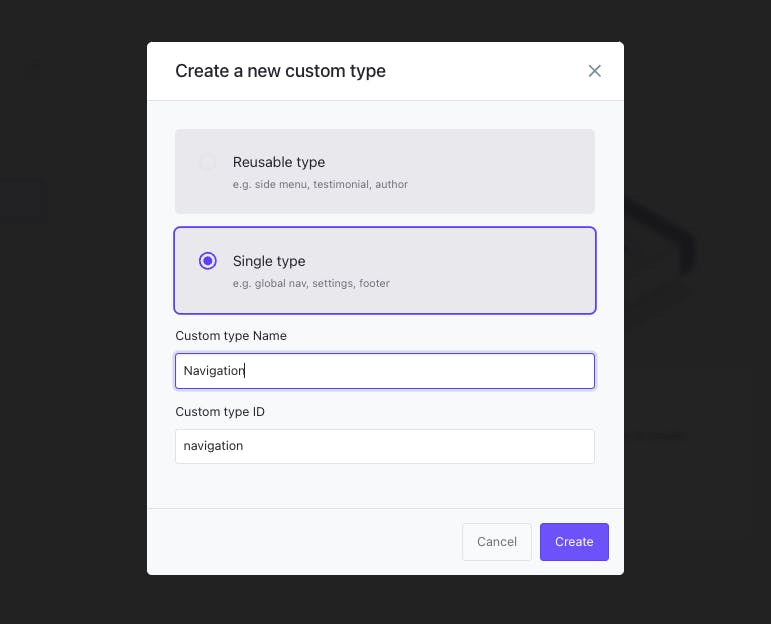
Creating a simple “Navigation” custom type
The final step in configuring Slice Machine is to create a simple navigation that allows us to navigate back to the homepage from our blog posts quickly.
To do this, click Custom Types from the left side menu and click Create. Add a single custom type called “Navigation.”
For this tutorial, we are going to keep our navigation very simple. First, in the Static Zone, add:
- Menu Items: Group field
Then, inside this group field, add two other fields:
- Label: Key Text field
- Link: Link field
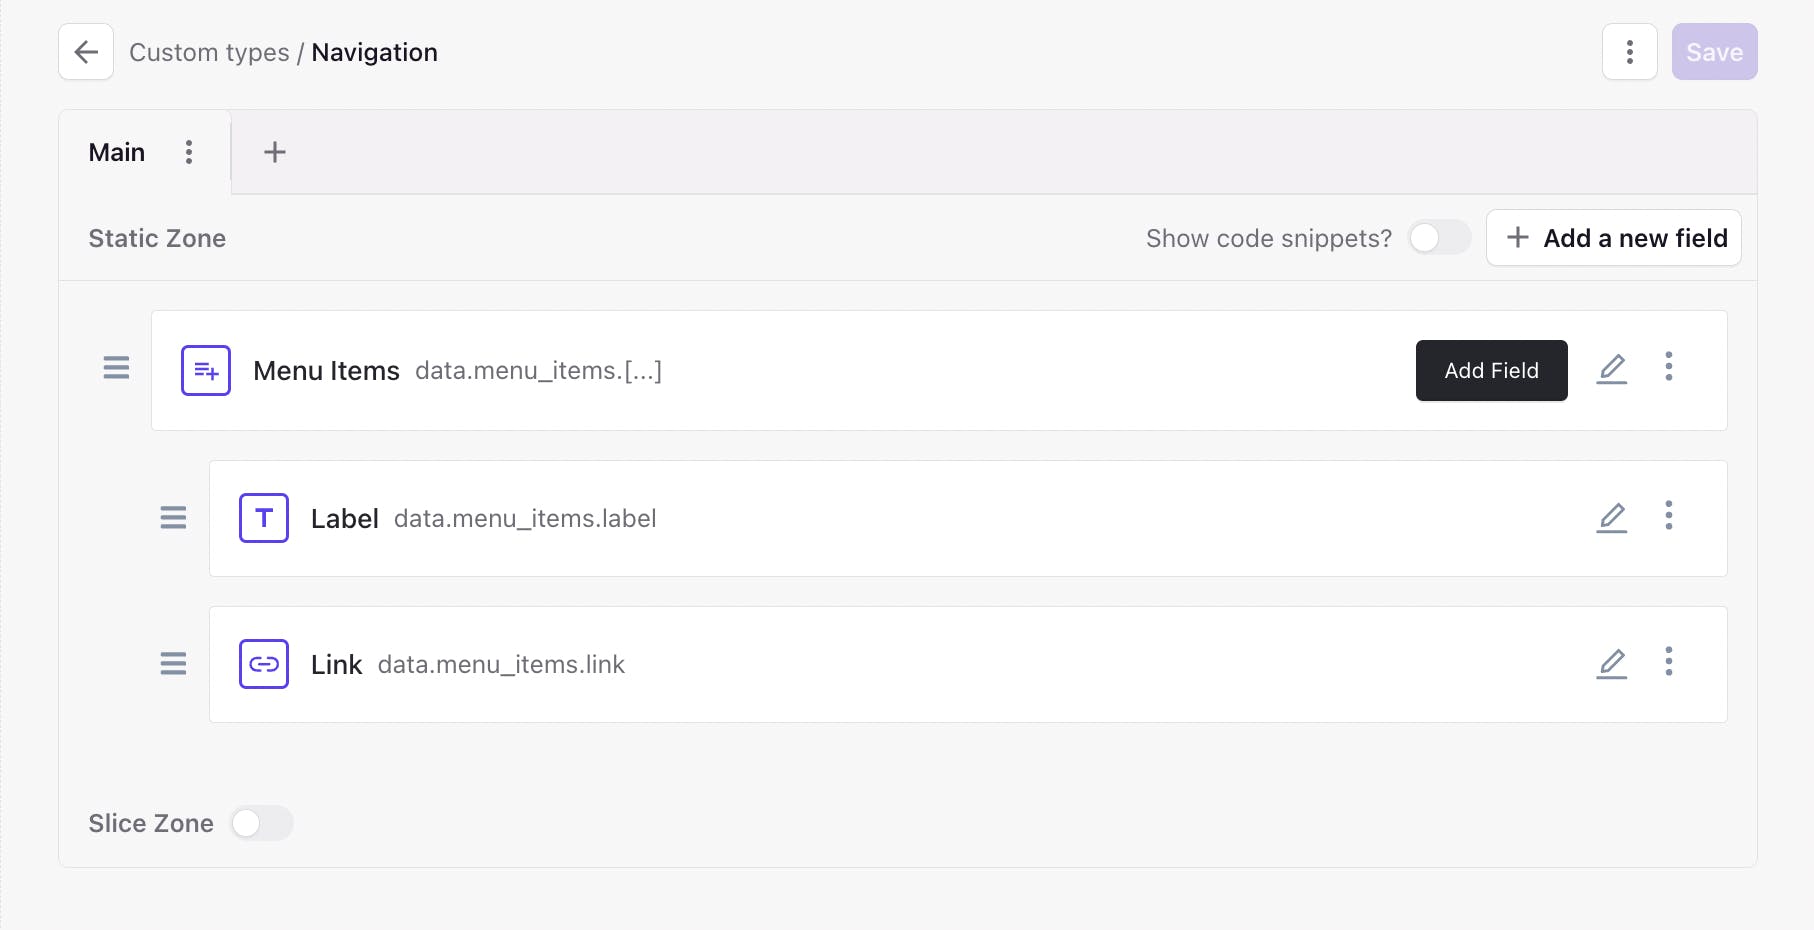
Make sure to save your changes after adding your fields.
Finally, with both our page types and navigation configured, we need to push our changes to Prismic by going to the “Changes” tab from the left menu and clicking Push Changes. This will sync your changes locally in Slice Machine with your Prismic dashboard and allow the new fields and slices to be used.
Not signed up for The Optimized Dev?
Staying on the leading edge of web development just got easier. Explore new tech with a fun, scaffolded coding challenge that lands in your inbox once a month.

Building our blog
Before heading to the Prismic dashboard and populating the new fields and slices we’ve created, let’s first jump into the code and update the layout and styling of our pages, components, and slices.
Updating Styles
The first page we’re going to update is the /app/layout.tsx file by adding some base styling. Below is the updated code for it.
import { PrismicPreview } from '@prismicio/next';
import { repositoryName } from '@/prismicio';
import './styles.css';

export default function RootLayout({
  children,
}: {
  children: React.ReactNode;
}) {
  return (
    <html lang="en">
      <head>
        <link
          rel="icon"
          type="image/png"
          sizes="any"
          href="https://prismic.io/favicon.ico"
        />
      </head>

      <body className="flex flex-col items-center bg-stone-50">
        <div className="bg-white max-w-7xl min-h-screen border-x border-solid border-gray-200 p-12 w-full flex flex-col gap-20 items-center text-slate-700">
          {children}
          <PrismicPreview repositoryName={repositoryName} />
        </div>
      </body>
    </html>
  );
}
Next, let’s create a custom component that handles the displaying of RichText elements used throughout our project.
To do this, create a new file at ./src/components/RichText.tsx and add the code below.
// ./src/components/RichText.tsx

import { RichTextField } from '@prismicio/client';
import { JSXMapSerializer, PrismicRichText, PrismicLink } from '@prismicio/react';

export const richTextComponents: JSXMapSerializer = {
  label: ({ node, children }) => {
    if (node.data.label === 'codespan') {
      return <code>{children}</code>;
    }
  },
  heading1: ({ children }) => (
    <h1 className="font-bold text-4xl">{children}</h1>
  ),
  heading2: ({ children }) => <h2 className="font-bold text-xl">{children}</h2>,
  heading3: ({ children }) => <h3 className="font-bold text-lg">{children}</h3>,
  paragraph: ({ children }) => <p>{children}</p>,
  hyperlink: ({ children, node }) => (
    <PrismicLink field={node.data} className="font-bold underline">{children}</PrismicLink>
  ),
};

interface RichTextProps {
  field: RichTextField;
}

export const RichText = ({ field }: RichTextProps) => {
  return <PrismicRichText field={field} components={richTextComponents} />;
};
This component allows us to easily render RichText elements throughout our project and have centralized styles apply to each element without us needing to import the custom styles multiple times in the project.
With that component created, we’re now ready to update the styling of our two slices: RichText and Hero. Below are the updated layouts and stylings for both.
// ./src/slices/RichText/index.tsx

import type { Content } from "@prismicio/client";
import { SliceComponentProps } from "@prismicio/react";
import { RichText } from "@/components/RichText";

type RichTextProps = SliceComponentProps<Content.RichTextSlice>;

export default function RichTextSlice({ slice }: RichTextProps) {
  return (
    <section className="flex flex-col gap-2">
      <RichText field={slice.primary.content} />
    </section>
  );
}// ./src/slices/Hero/index.tsx
import { Content } from "@prismicio/client";
import { SliceComponentProps, PrismicText } from "@prismicio/react";
import { RichText } from "@/components/RichText";
import { PrismicNextImage } from "@prismicio/next";
/**
* Props for `Hero`.
*/
export type HeroProps = SliceComponentProps<Content.HeroSlice>;
/**
* Component for "Hero" Slices.
*/
const Hero = ({ slice }: HeroProps): JSX.Element => {
return (
<section
className="flex flex-col gap-4 max-w-3xl w-full"
data-slice-type={slice.slice_type}
data-slice-variation={slice.variation}
>
<PrismicNextImage
field={slice.primary.image}
sizes="100vw"
className="w-full max-w-[100px] max-h-full rounded-md object-cover"
/>
<div className="flex flex-col gap-2">
<h1 className="font-bold text-4xl">
<PrismicText field={slice.primary.title} />
</h1>
<RichText field={slice.primary.description} />
</div>
</section>
);
};
export default Hero;Creating our Navigation component
With our slices now styled, we’re almost ready to look at updating our home page. But before we can do that, we must create a couple of new components. First, let's create a Navigation component to navigate between our homepage and blog posts. Create a new file called Navigation.tsx inside the components directory we created earlier and add the code below.
// ./src/components/Navigation.tsx

import { Client, Content, isFilled } from "@prismicio/client";
import { PrismicLink } from "@prismicio/react";

export const Navigation = async ({
  client,
}: {
  client: Client<Content.AllDocumentTypes>;
}): Promise<JSX.Element> => {
  const navigation = await client.getSingle("navigation");

  return (
    <nav className="font-bold text-xl self-center">
      <ul>
        {isFilled.group(navigation.data.menu_items) &&
          navigation.data.menu_items.map((item) => {
            return (
              <li key={item.label}>
                <PrismicLink field={item.link}>{item.label}</PrismicLink>
              </li>
            );
          })}
      </ul>
    </nav>
  );
};
Creating our PostCard component
The second component we will create is a PostCard component to handle the displaying of the blog posts that appear on the homepage.
To create this component, add a new file called PostCard.tsx inside the components directory. Then add in the below code, which takes in the blog post data as a prop and renders it with the styling we’ve added.
// ./src/components/PostCard.tsx

import { PrismicNextImage } from "@prismicio/next";
import { PrismicLink, PrismicText } from "@prismicio/react";
import { RichText } from "./RichText";
import { Content } from "@prismicio/client";

export const PostCard = ({
  post,
}: {
  post: Content.BlogPostDocument;
}): JSX.Element => {
  const { data } = post;

  return (
    <PrismicLink document={post} className="grid grid-cols-2 gap-10">
      <PrismicNextImage
        field={data.featured_image}
        sizes="100vw"
        className="w-full max-w-sm max-h-60 rounded-xl object-cover"
      />
      <div className="flex flex-col gap-3">
        <div className="flex flex-col gap-1">
          <p className="text-sm opacity-75 text-slate-700 border-b-2 w-min pb-1">
            {new Date(data?.publication_date || "").toLocaleDateString()}
          </p>
          <div className="hover:opacity-75 duration-300 ease-in-out transition-all">
            <h2 className="font-bold text-xl">
              <PrismicText field={data.title} />
            </h2>
          </div>
        </div>
        <RichText field={data.description} />
      </div>
      <div className="border-b border-solid border-gray-200 w-full col-span-2" />
    </PrismicLink>
  );
};
Updating our home page
With our new PostCard component created, we’re ready to start customizing our blog's home page. The home page can be found in the /src/app/page.tsx file. In this file, there will be a couple of pre-existing functions. We haven't updated the first generateMetadata(), so it can be left as is.
However, the second one Index(), handles rendering the content to the page. Below is the updated code for the entire file, including the necessary imports.
// ./src/app/page.tsx

import { Metadata } from "next";

import { SliceZone } from "@prismicio/react";
import * as prismic from "@prismicio/client";

import { createClient } from "@/prismicio";
import { components } from "@/slices";
import { PostCard } from "@/components/PostCard";
import { Navigation } from "@/components/Navigation";

/**
 * This component renders your homepage.
 *
 * Use Next's generateMetadata function to render page metadata.
 *
 * Use the SliceZone to render the content of the page.
 */

export async function generateMetadata(): Promise<Metadata> {
  const client = createClient();
  const home = await client.getByUID("page", "home");

  return {
    title: prismic.asText(home.data.title),
    description: home.data.meta_description,
    openGraph: {
      title: home.data.meta_title || undefined,
      images: [
        {
          url: home.data.meta_image.url || "",
        },
      ],
    },
  };
}

export default async function Index() {
  // The client queries content from the Prismic API
  const client = createClient();

  // Fetch the content of the home page from Prismic
  const home = await client.getByUID("page", "home");

  // Get all of the blog_post documents created on Prismic ordered by publication date
  const posts = await client.getAllByType("blog_post", {
    orderings: [
      { field: "my.blog_post.publication_date", direction: "desc" },
      { field: "document.first_publication_date", direction: "desc" },
    ],
  });

  return (
    <>
      <Navigation client={client} />

      <SliceZone slices={home.data.slices} components={components} />

      {/* Map over each of the blog posts created and display a `PostCard` for it */}
      <section className="grid grid-cols-1 gap-8 max-w-3xl w-full">
        {posts.map((post) => (
          <PostCard key={post.id} post={post} />
        ))}
      </section>

      <Navigation client={client} />
    </>
  );
}
Creating our /blog/[uid] page
With our home page now updated, let’s turn our attention to the new page we’ll need to create that will display our blog posts and their content. First, let’s create a new file to contain the code needed to generate and render our blog post pages.
To do this, create a new file at ./src/app/blog/[uid]/page.tsx. The file path is important because it allows us to create dynamic routes thanks to the [uid] portion. This will enable us to automatically generate new pages in Next.js whenever we create new pages in Prismic.
With the file created, let’s now add the code for it.
// ./src/app/blog/[uid]/page.tsx

import { Metadata } from "next";
import { notFound } from "next/navigation";

import { SliceZone } from "@prismicio/react";
import * as prismic from "@prismicio/client";

import { createClient } from "@/prismicio";
import { components } from "@/slices";
import { PrismicNextImage } from "@prismicio/next";
import { PostCard } from "@/components/PostCard";
import { RichText } from "@/components/RichText";
import { Navigation } from "@/components/Navigation";

type Params = { uid: string };

/**
 * This page renders a Prismic Document dynamically based on the URL.
 */

export async function generateMetadata({
  params,
}: {
  params: Params;
}): Promise<Metadata> {
  const client = createClient();
  const page = await client
    .getByUID("blog_post", params.uid)
    .catch(() => notFound());

  return {
    title: prismic.asText(page.data.title),
    description: page.data.meta_description,
    openGraph: {
      title: page.data.meta_title || undefined,
      images: [
        {
          url: page.data.meta_image.url || "",
        },
      ],
    },
  };
}

export default async function Page({ params }: { params: Params }) {
  const client = createClient();

  // Fetch the current blog post page being displayed by the UID of the page
  const page = await client
    .getByUID("blog_post", params.uid)
    .catch(() => notFound());

  /**
   * Fetch all of the blog posts in Prismic (max 2), excluding the current one, and ordered by publication date.
   *
   * We use this data to display our "recommended posts" section at the end of the blog post
   */
  const posts = await client.getAllByType("blog_post", {
    predicates: [prismic.filter.not("my.blog_post.uid", params.uid)],
    orderings: [
      { field: "my.blog_post.publication_date", direction: "desc" },
      { field: "document.first_publication_date", direction: "desc" },
    ],
    limit: 2,
  });

  // Destructure out the content of the current page
  const { slices, title, publication_date, description, featured_image } =
    page.data;

  return (
    <div className="flex flex-col gap-12 w-full max-w-3xl">
      <Navigation client={client} />

      {/* Display the "hero" section of the blog post */}
      <section className="flex flex-col gap-12">
        <div className="flex flex-col items-center gap-3 w-full">
          <div className="flex flex-col gap-6 items-center">
            <p className="opacity-75 border-b-2 w-min pb-1">
              {new Date(publication_date || "").toLocaleDateString()}
            </p>
            <div className="text-center">
              <RichText field={title} />
            </div>
          </div>
          <div className="text-center">
            <RichText field={description} />
          </div>
        </div>
        <PrismicNextImage
          field={featured_image}
          sizes="100vw"
          className="w-full max-w-3xl max-h-96 rounded-xl object-cover"
        />
      </section>

      {/* Display the content of the blog post */}
      <SliceZone slices={slices} components={components} />

      {/* Display the Recommended Posts section using the posts we requested earlier */}
      <h2 className="font-bold text-3xl">Recommended Posts</h2>
      <section className="grid grid-cols-1 gap-8 max-w-3xl w-full">
        {posts.map((post) => (
          <PostCard key={post.id} post={post} />
        ))}
      </section>

      <Navigation client={client} />
    </div>
  );
}

export async function generateStaticParams() {
  const client = createClient();

  /**
   * Query all Documents from the API, except the homepage.
   */
  const pages = await client.getAllByType("blog_post");

  /**
   * Define a path for every Document.
   */
  return pages.map((page) => {
    return { uid: page.uid };
  });
}
Let’s break down the functions in the code block above.
generateStaticParams()
The generateStaticParams function enables us to generate a new page in Next.js for each blog post in Prismic.
The first thing that happens is we query Prismic for all of the pages that use our custom page type blog_post. Then, we loop over the returned data and return an array of all of the pages UID’s. This array then tells Next.js to create a new page for each item in it so in our case, a new page for each uid.
You’ll also notice that uid is the parameter name we used in the file path a moment ago. This is important because we’ll use that parameter to query data from Prismic when we look at the following two functions.
generateMetadata()
The generateMetadata function helps create the metatags and data for the page. This is largely similar to the one you would’ve seen inside the home page a moment ago, but with the query to Prismic updated to take in the UID parameter from the route to identify which page we’re on.
Page()
The final function to review from above is the Page function, which handles the rendering of content for our blog post page. I’ve added some comments to help break down what each section in the code is responsible for.
Adding our blog post route
Before we can start creating pages and adding content in Prismic, the final step is to add a route for our blog post pages. To do this, we need to add a path in ./src/prismicio.ts under the / path.
// ./src/prismicio.ts

...
{
  type: "blog_post",
  path: "/blog/:uid",
},
...
This will ensure our blog posts have the proper URL structure, for example, /blog/example-post.
Adding content in Prismic
With our blog post page created, we’ve finished everything we need to do in the code. We’re now ready to move on to adding our content in Prismic and testing our blog!
So, to get started, revisit your Prismic dashboard from earlier, which you can get to by going to https://prismic.io/dashboard and clicking on your repository. If your dashboard tab is still open from before, just make sure you refresh the page. You should be shown two pages, “Homepage” and “Another page.” We won’t need the “Another page” for this tutorial, so you can select it and press the “Archive” button to archive it.
Navigation
To create a simple navigation, from the Prismic dashboard click Create New and select “Navigation.” For now, let's just add a single menu item by adding:
- Label: ‘Home’
- Link: Select “Link to a Prismic page” and choose “Homepage.”
Our document should now look like this:
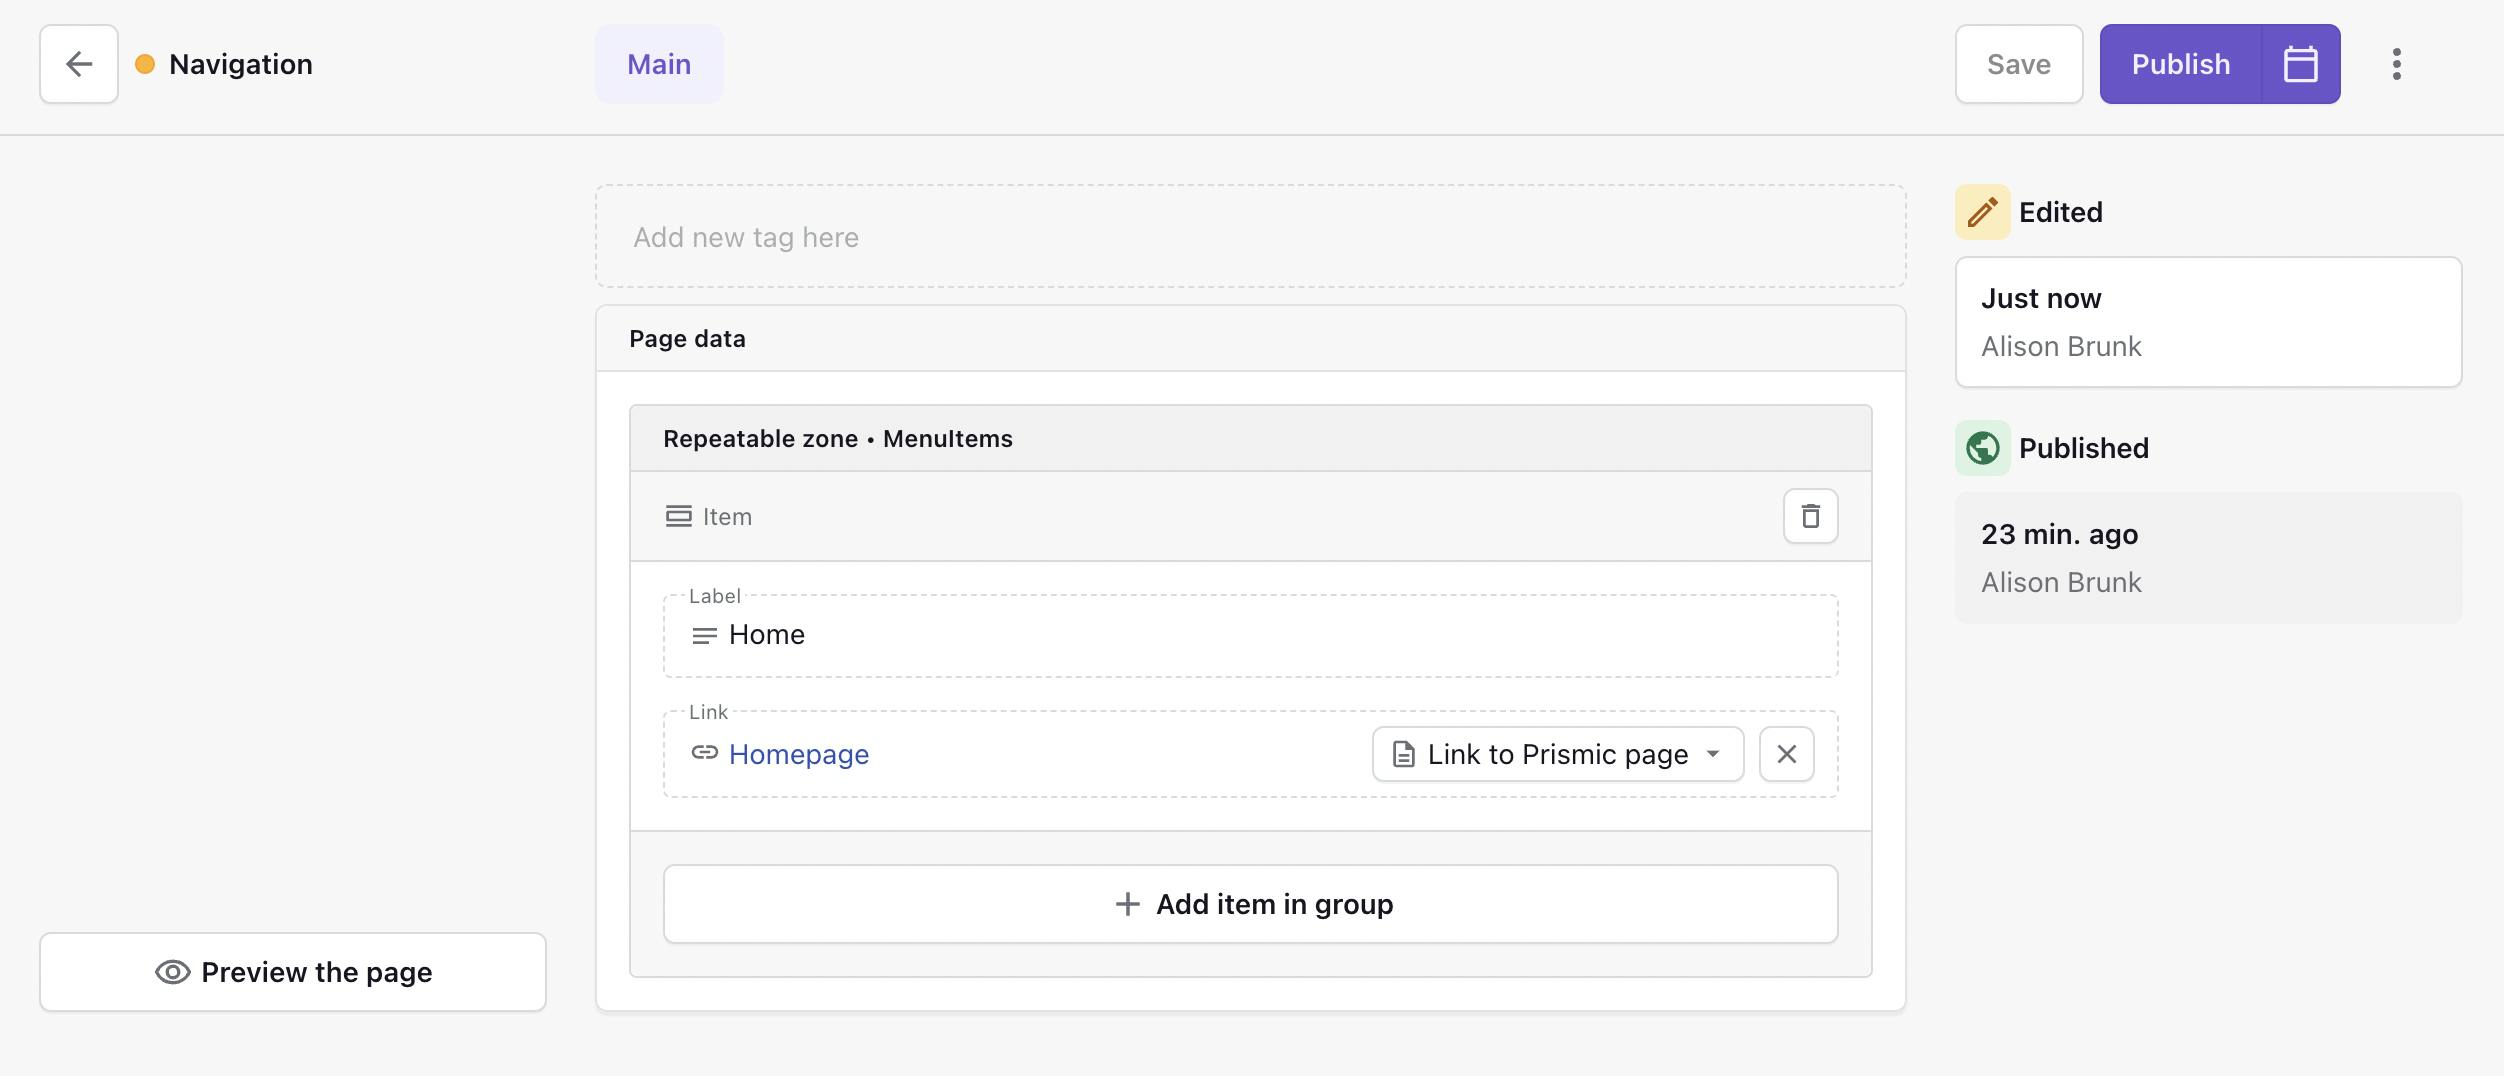
When you’re ready, click Save and then Publish in the upper right.
Specifying a document title
You may have noticed that I have given a name to my document, 'Navigation,' which appears in the top left corner next to the back button in the image above. This naming convention helps with easy searching of documents that you would like to link to.
Although the document title will eventually be auto-saved with upcoming feature improvements, adding it manually for each page when using the new Page Builder is currently recommended.
Homepage
The next thing we need to do is update the content of our “Homepage.” To do this, navigate back to the dashboard and click the “Homepage” document to open it in the Prismic Page Builder.
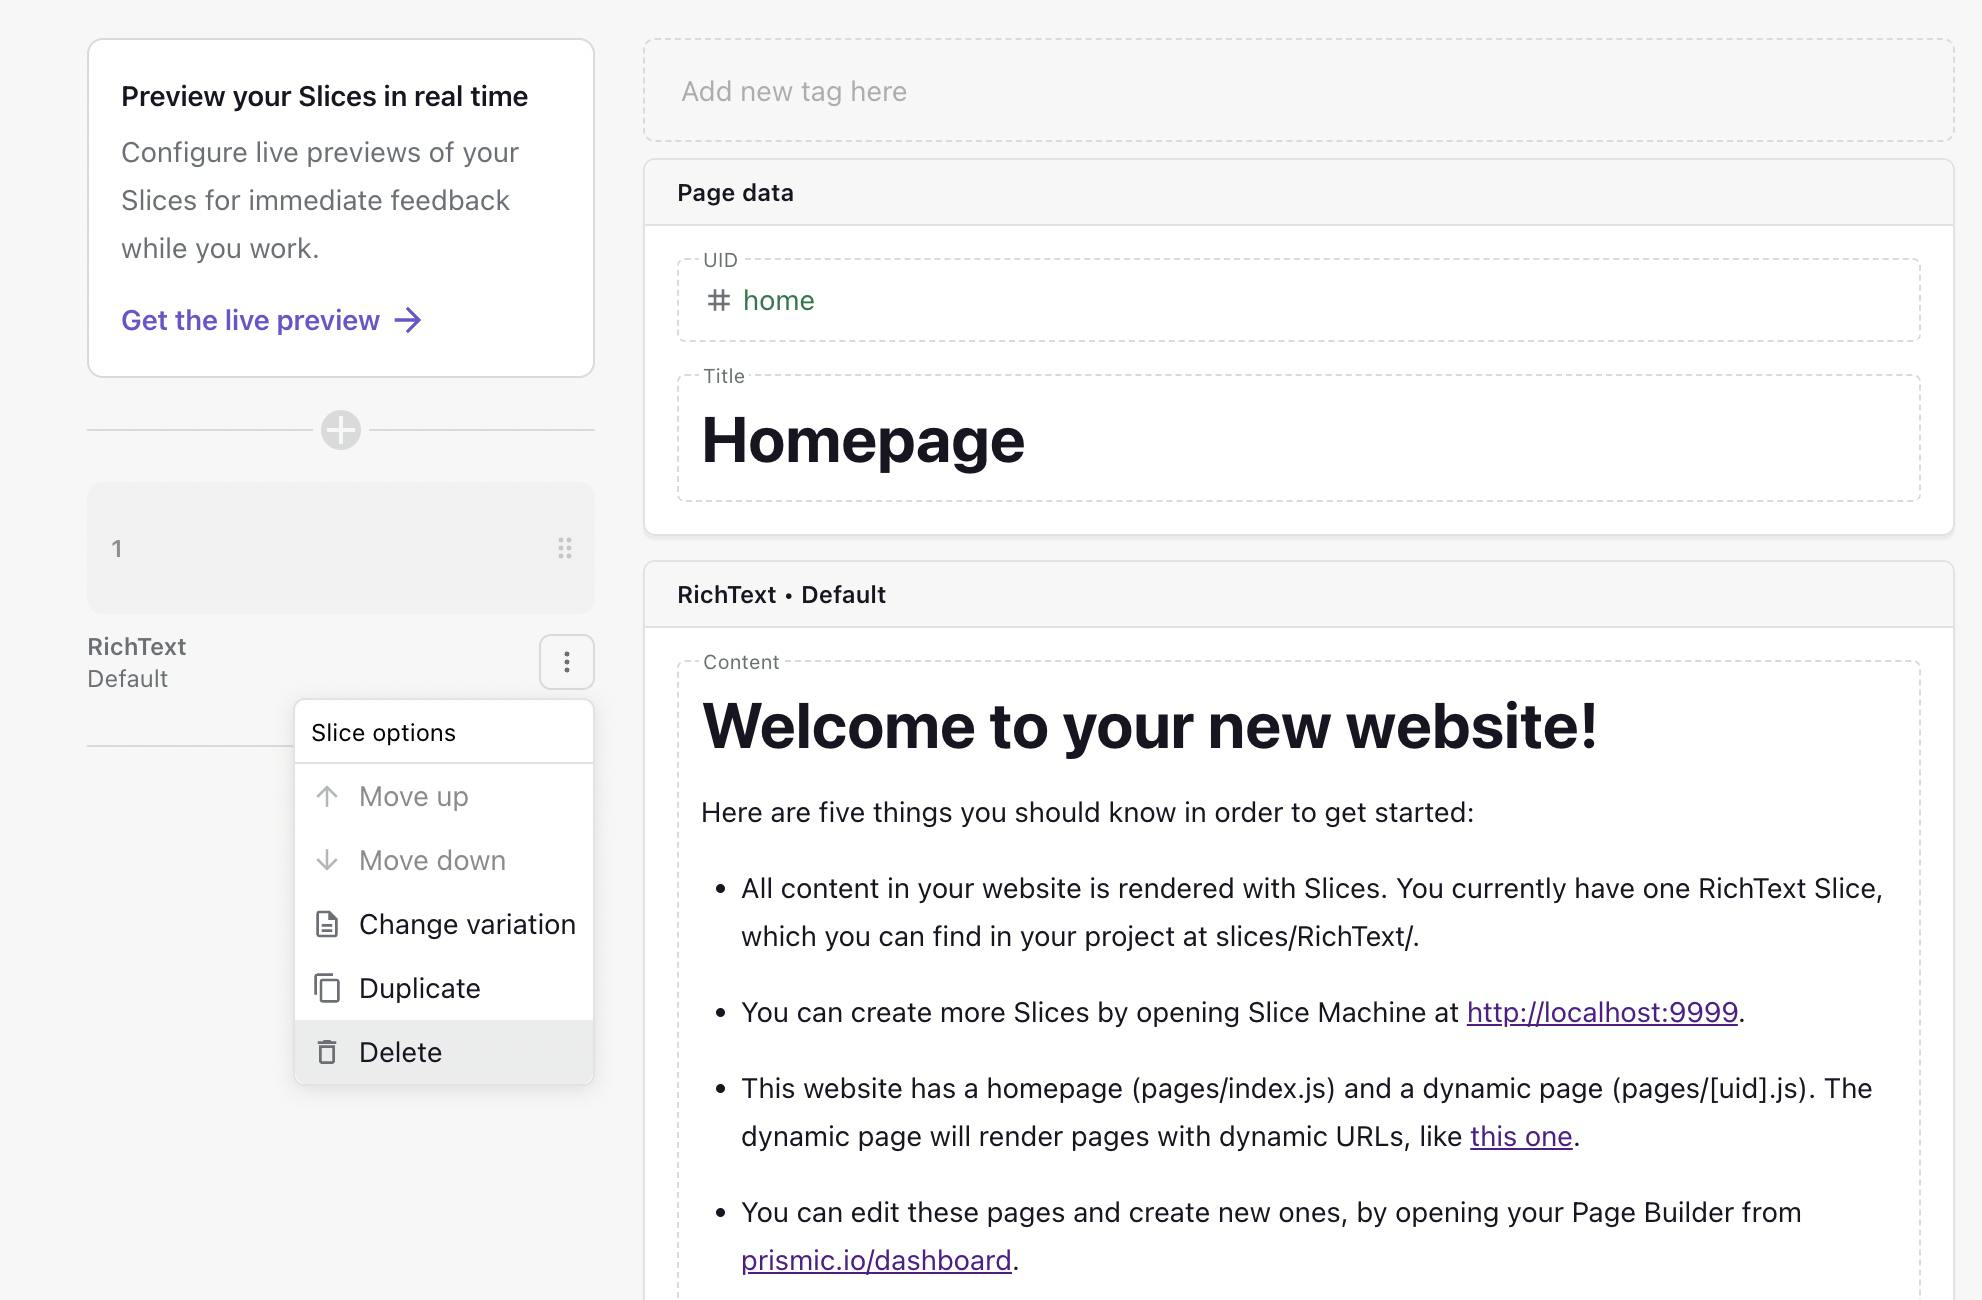
You’ll see an existing RichText slice in our document. We won’t need this for our Homepage, so you can click the three dots on the slice on the left and click Delete.
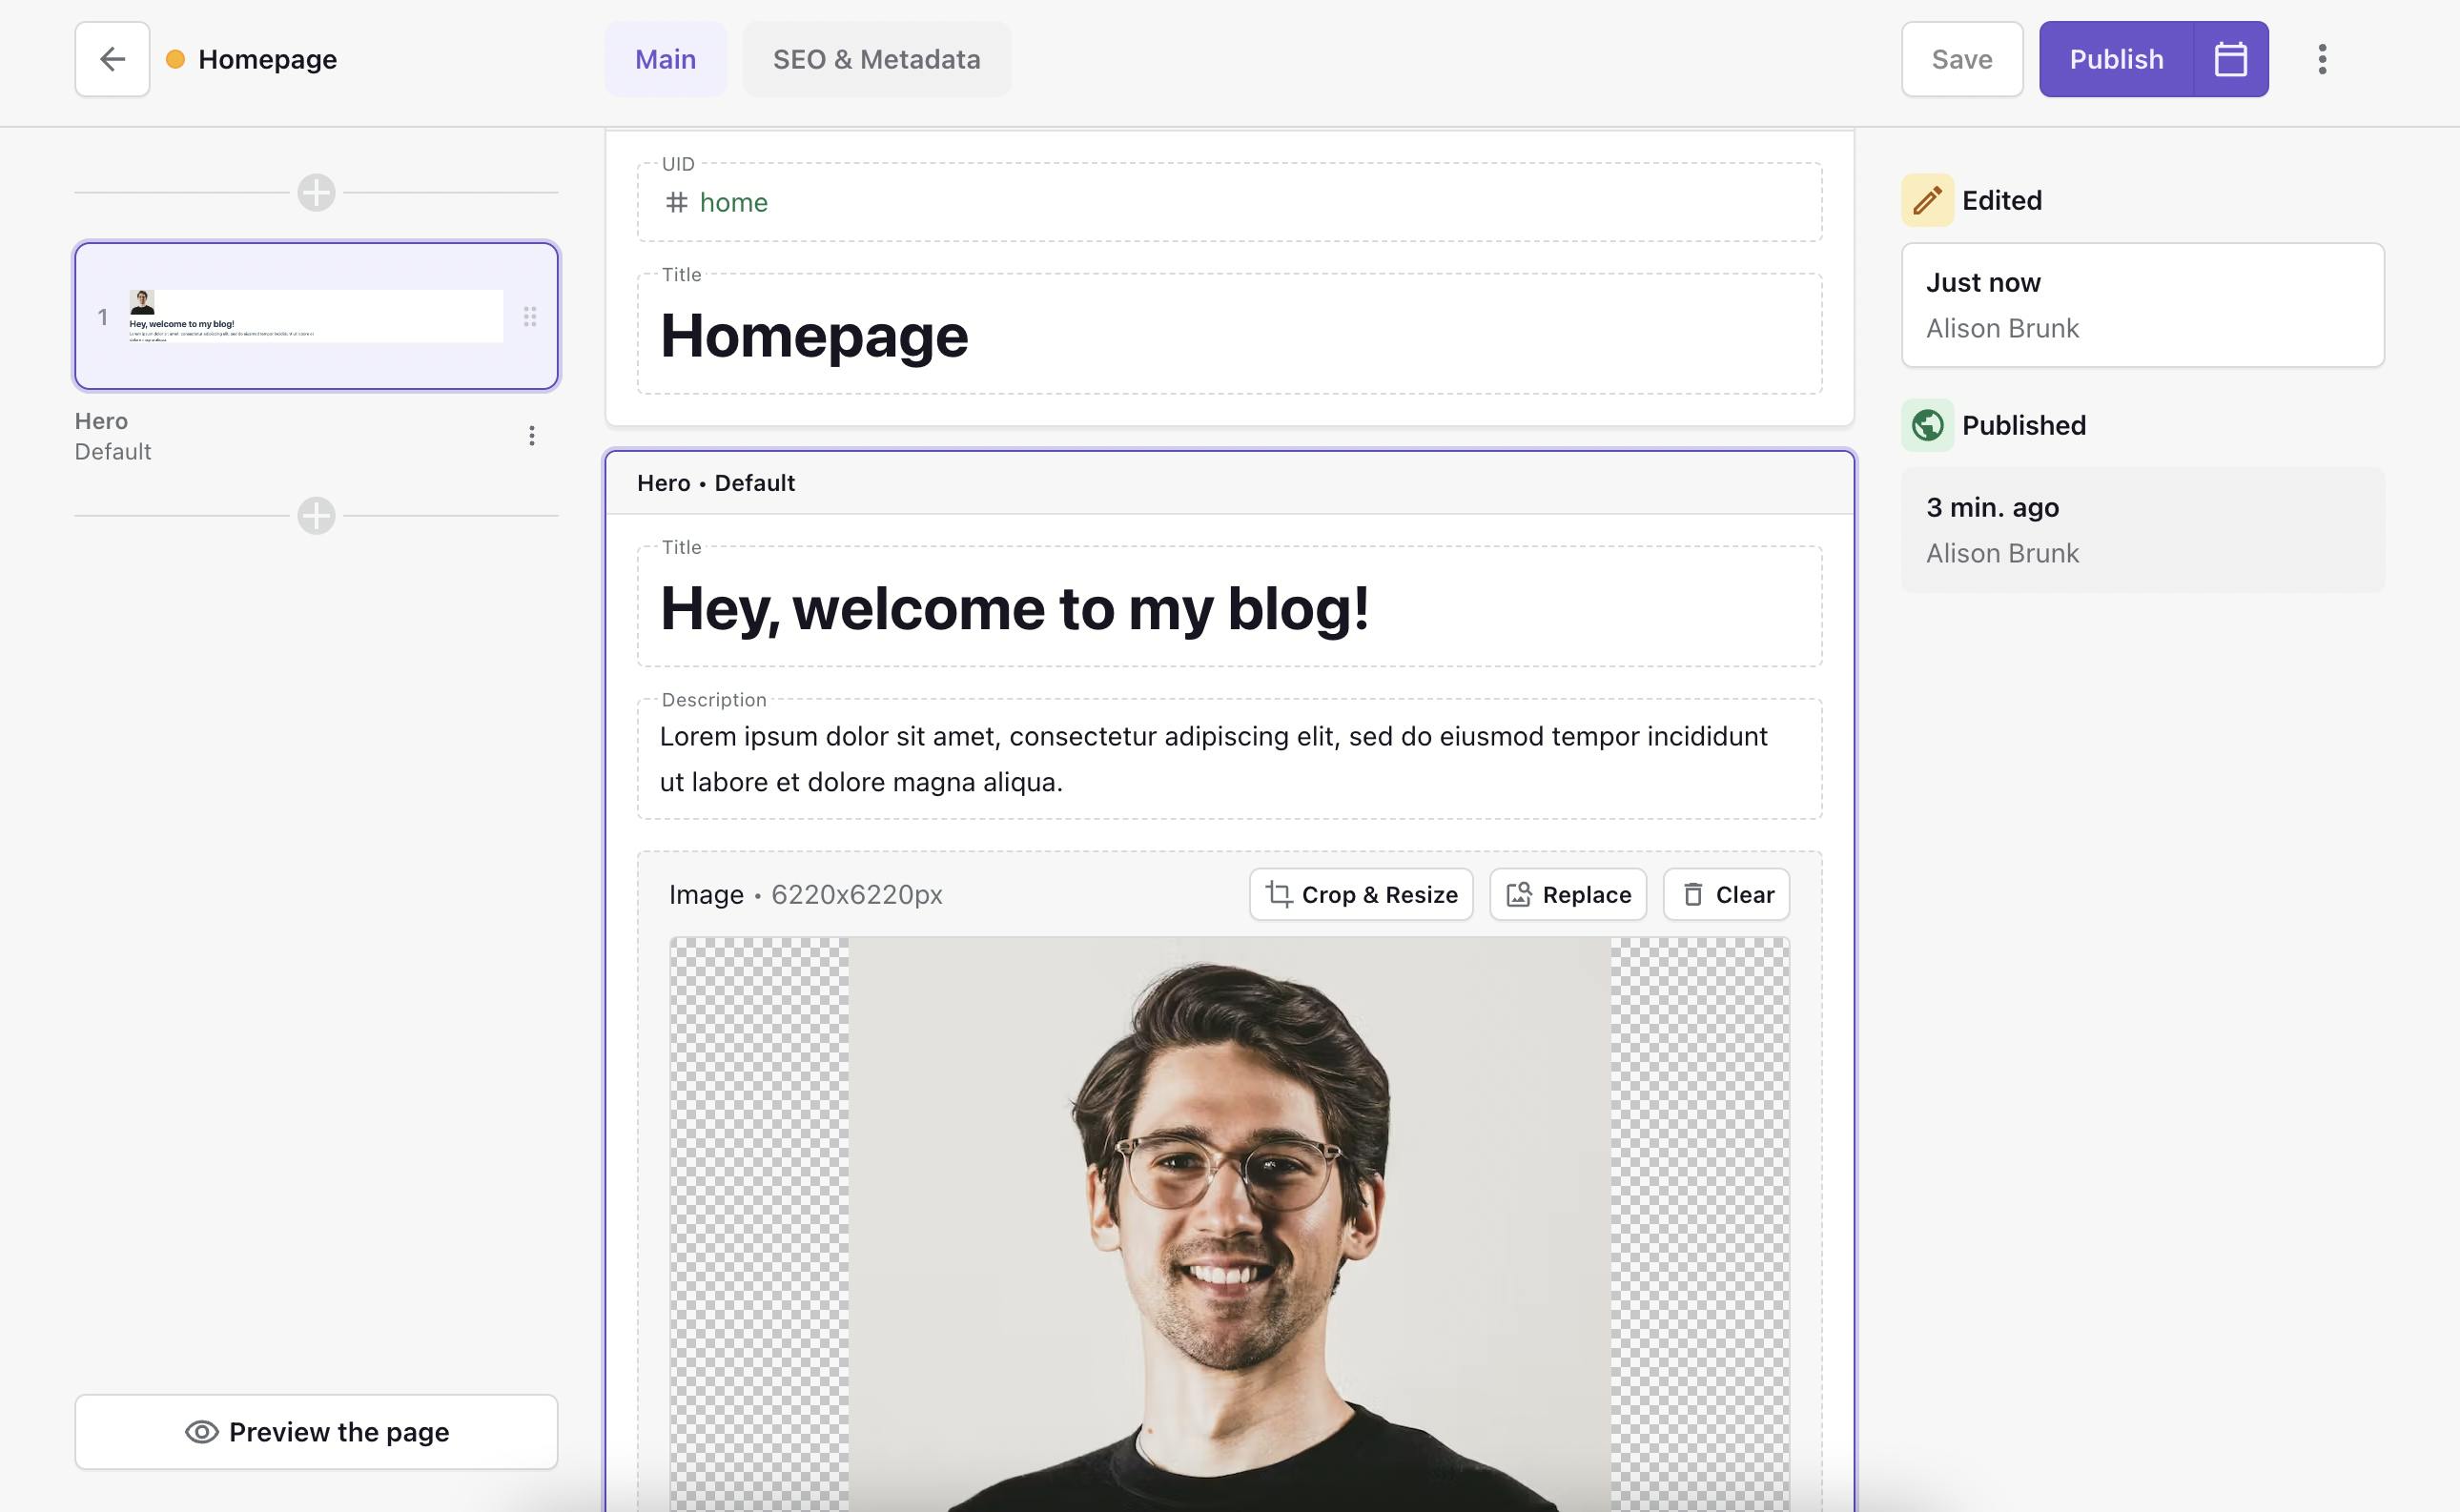
Then, let’s add a Hero slice to our homepage by clicking Add Slice on the left and selecting the Hero slice. Make sure to add a title, description and image to your slice, and then save and publish your page to make the changes live.
Configure a live preview
To view a live preview of your slices on the left as you build your pages, click the three dots in the upper right and select Live Preview Settings. Then, add http://localhost:3000/slice-simulator in the input.
Create a new blog post page
With the “Homepage” page now updated and ready to go, we need to create some blog posts to display on the home page. To do this, go back to the Prismic dashboard and click Create new > Blog Post from the list of types presented to you.
You’ll want to fill in the details for the UID, title, description, featured image, and publication date on the newly created page.
After filling in these details, you’ll want to add a RichText slice by clicking Add slice from the table of slices on the left and selecting RichText. Add some content you’d like to display as the blog post's content.
Once you’ve finished adding content and customizing the page, it should look similar to the below page.

Make sure to click Save and Publish to make your changes live.
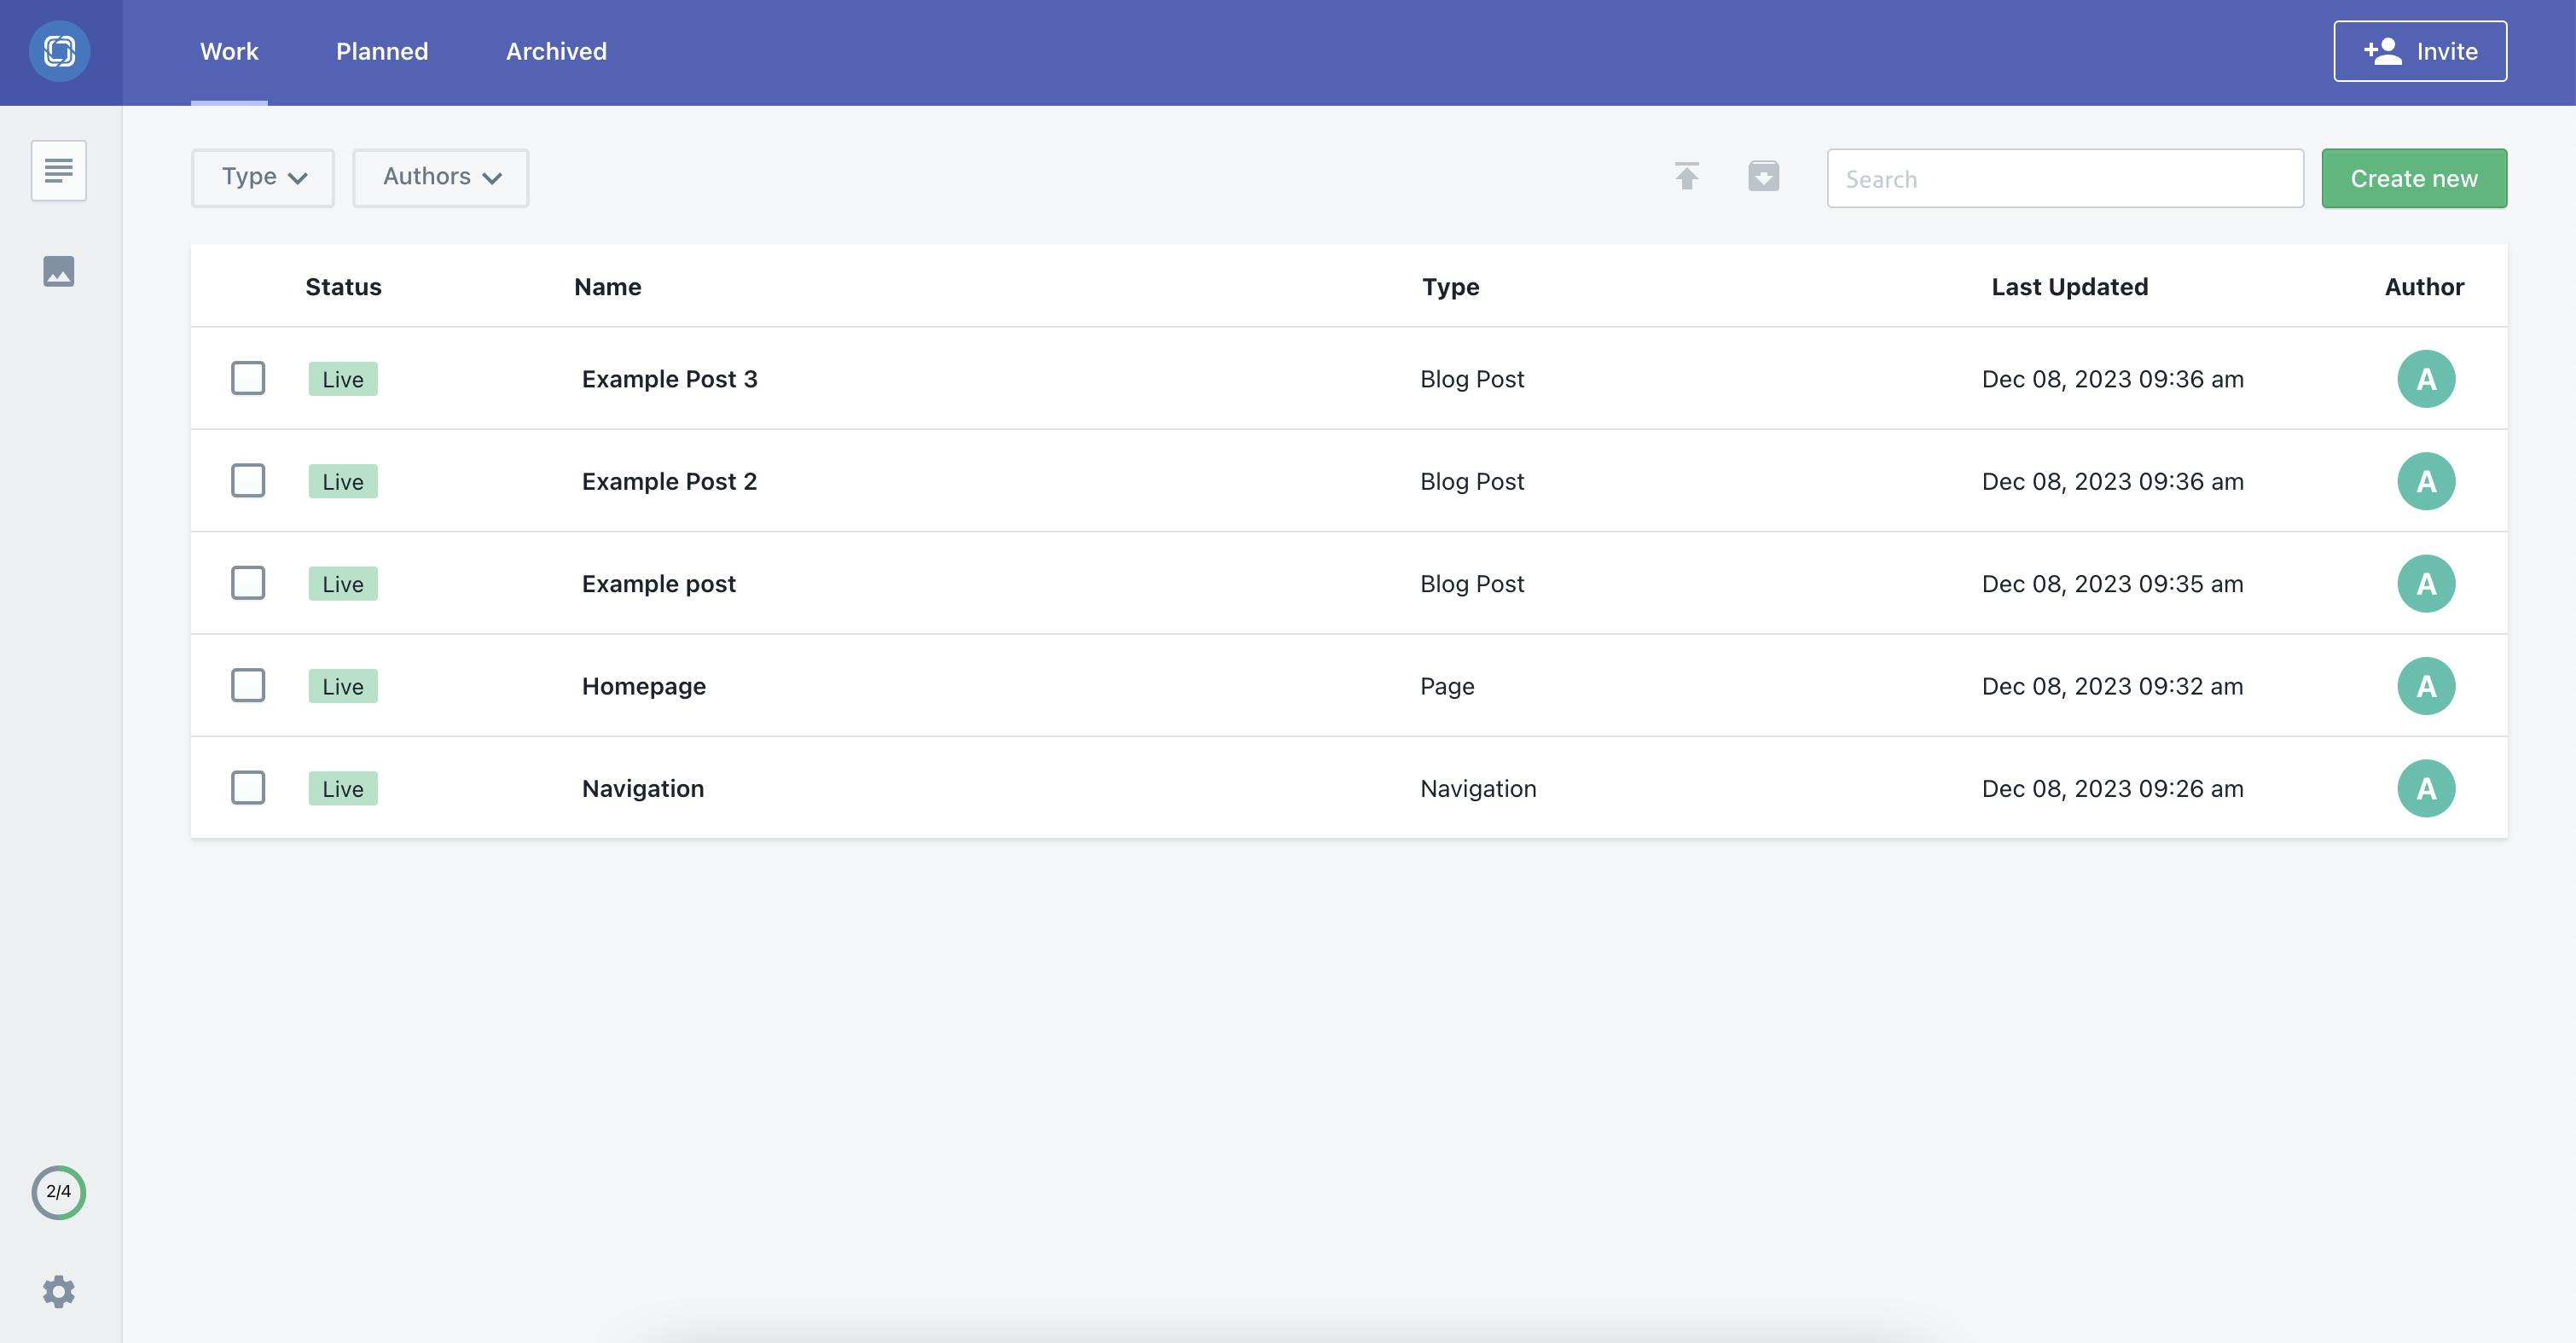
Create two more blog posts
To ensure we have at least three blog posts, repeat the step above and add two more blog post types to your repository. When you’re done, you should have at least three blog posts in total.
In your repository, you should now have at least five documents.
Testing Our Blog
At this point, we’ve configured our slices and page types, updated the styling and layout of our blog, and added the content we’d like to display on the page. So, we’re now ready to give our blog a test by visiting http://localhost:3000/ in your browser (you may need to restart your dev server by running npm run dev).
You should then see something similar to the page below, but with the content you added in Prismic.

Closing Thoughts
And, with that, it’s brought us to the end of the tutorial. In this tutorial, we’ve looked at how to build a blog with Next.js and Prismic. If you’re interested in checking out the final code for this project, check out the GitHub repository here, and let us know what you think in the comments below! 👇
Thanks for reading!
Further learning
Create a stunning 3D animated portfolio website
If you are looking to take your creativity and Next.js knowledge up a notch, try this 3D animated portfolio website tutorial with Next.js 14, Three.js, GSAP, and Prismic! In this fun step-by-step course, we will make a stylish and interactive personal portfolio site that really stands out.


