

The frontend web development space is filled with multiple JavaScript frameworks to work with. However, two top contenders come to mind: Vue and React. Both frameworks are efficient and flexible solutions for building modern web applications and have enjoyed widespread adoption, even from major brands like Adobe, Airbnb, Alibaba, Figma, and Netflix.
While Vue and React serve the same purpose, we must take note of their difference when deciding which to work with. Choosing the right framework is crucial because our choice can greatly impact the development process and the overall success of our application.
In this article, we will compare Vue and React to see how they measure up against each other. We will examine their similarities, differences, pros and cons, and factors to consider when deciding between them.
At the end of this article, you’ll be able to make an informed decision. Along the way, we’ll also get our hands dirty by building a basic project with both frameworks. Let’s dive in!
What is Vue?
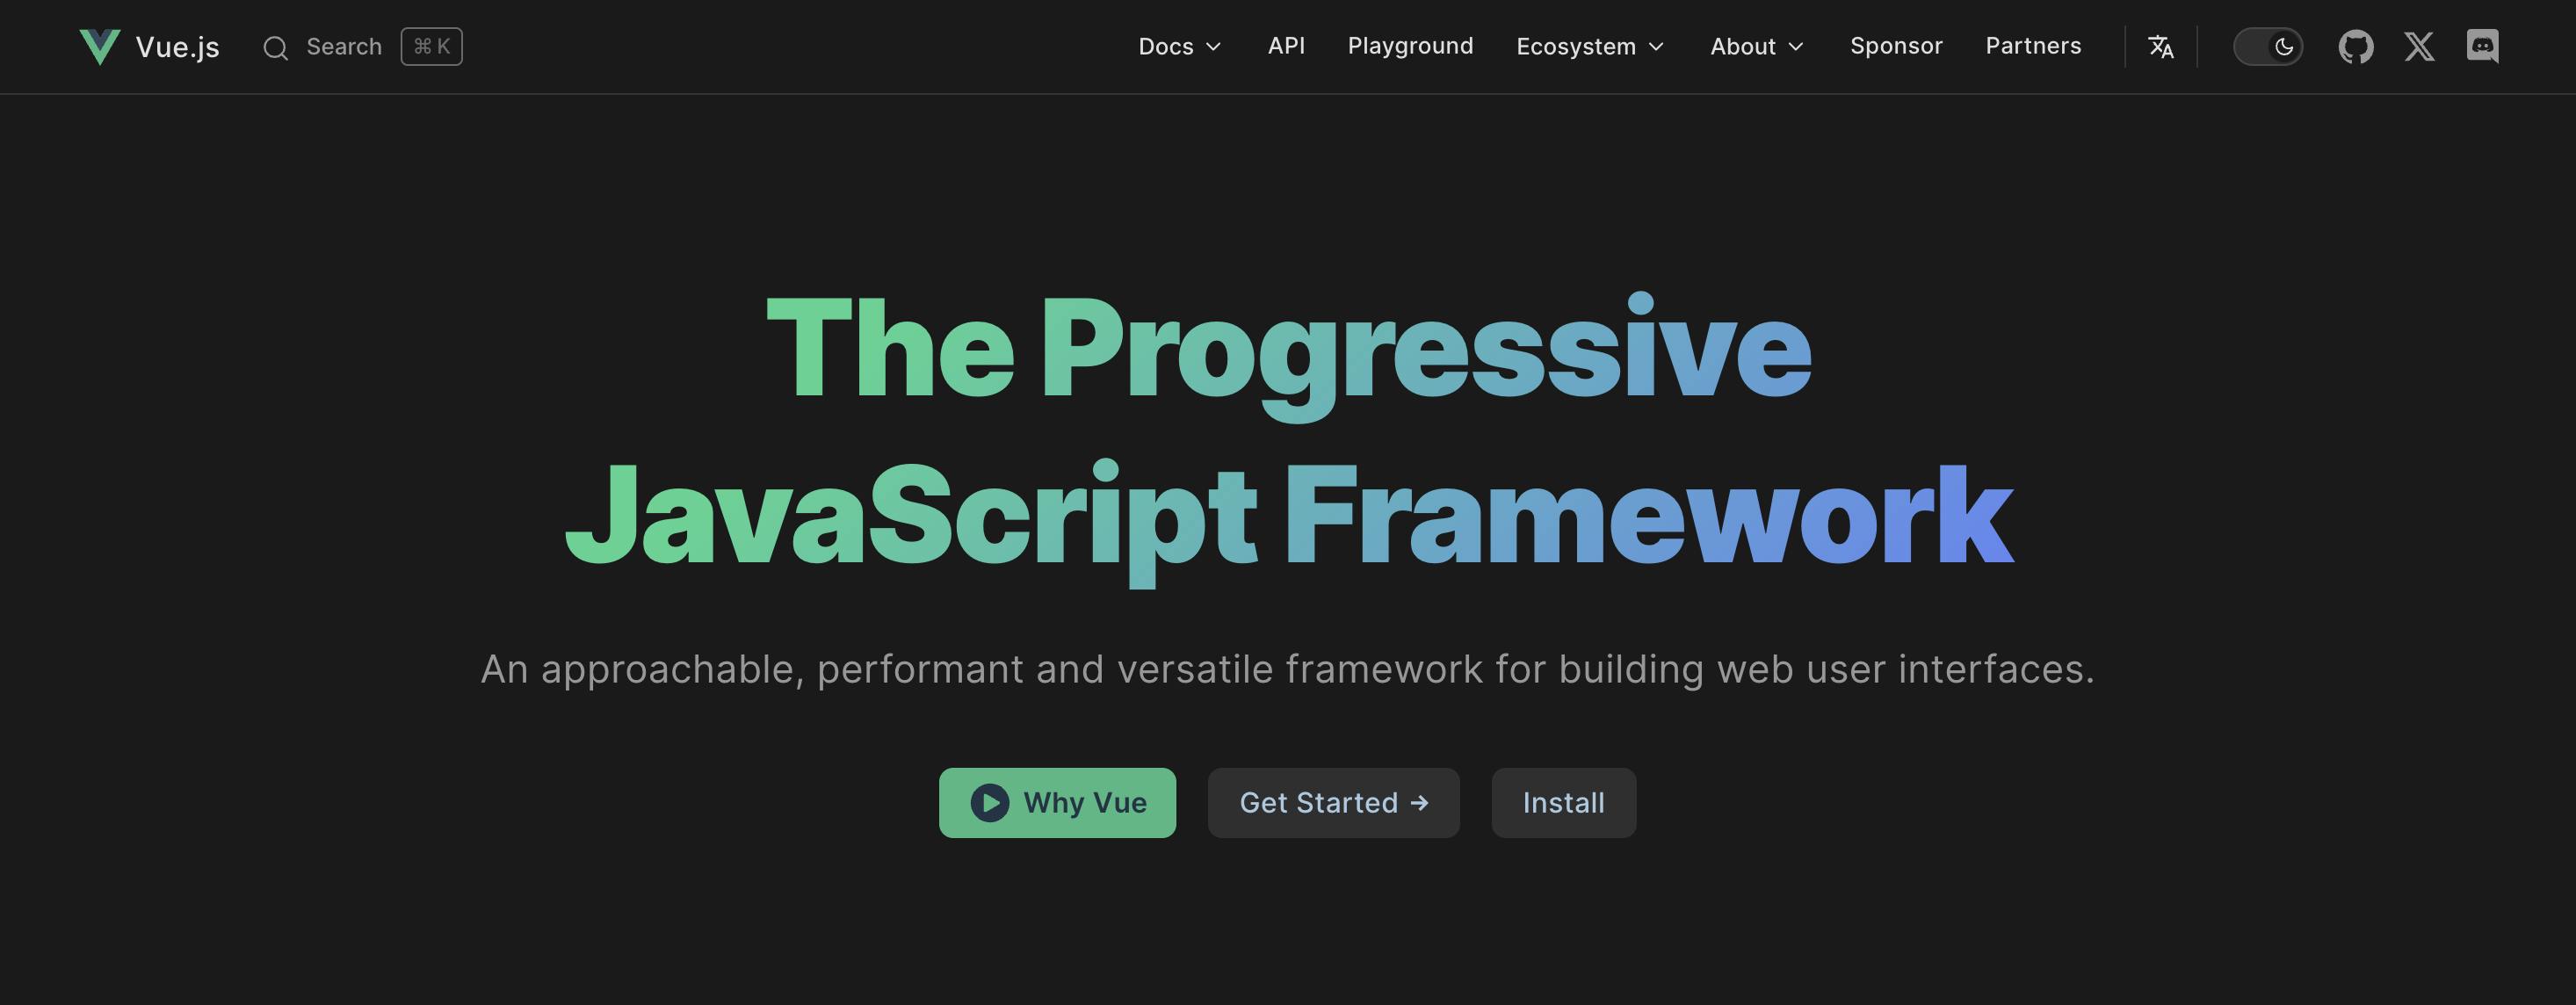
Vue, pronounced as “view” or Vue.js, is an open-source progressive JavaScript framework for building websites and applications. It was developed by Evan You, a former Google engineer, who officially launched the framework in February 2014. Some popular brands that use Vue include Adobe, Gitlab, and Apple.
Vue is designed to be lightweight and easy to understand, making it a great choice for both beginners and experienced developers. It focuses on the view layer of an application, allowing developers to create interactive and dynamic web interfaces with ease.
Vue has gained immense popularity over the years because of its simplicity, flexibility, and performance. It is easy to learn because it has a simple templating syntax that sticks closely to the HTML, CSS, and JavaScript fundamentals. Another framework that’s widely known for having an easy-to-understand syntax is Svelte.
Pros
- Vue has a gentle learning curve and is beginner-friendly.
- Vue has a compact and lightweight core library with a size of 34.7kb when gzipped.
- Vue can easily be integrated into existing projects and supports gradual adoption. We don’t need a full-scale rewrite to work with Vue.
Cons
- Vue has a smaller ecosystem than its counterpart, React, meaning there are fewer community-generated libraries and tools.
- There is no native support for mobile support.
- While it is a solid framework, there is a lower demand for Vue developers than for React.
What is React?
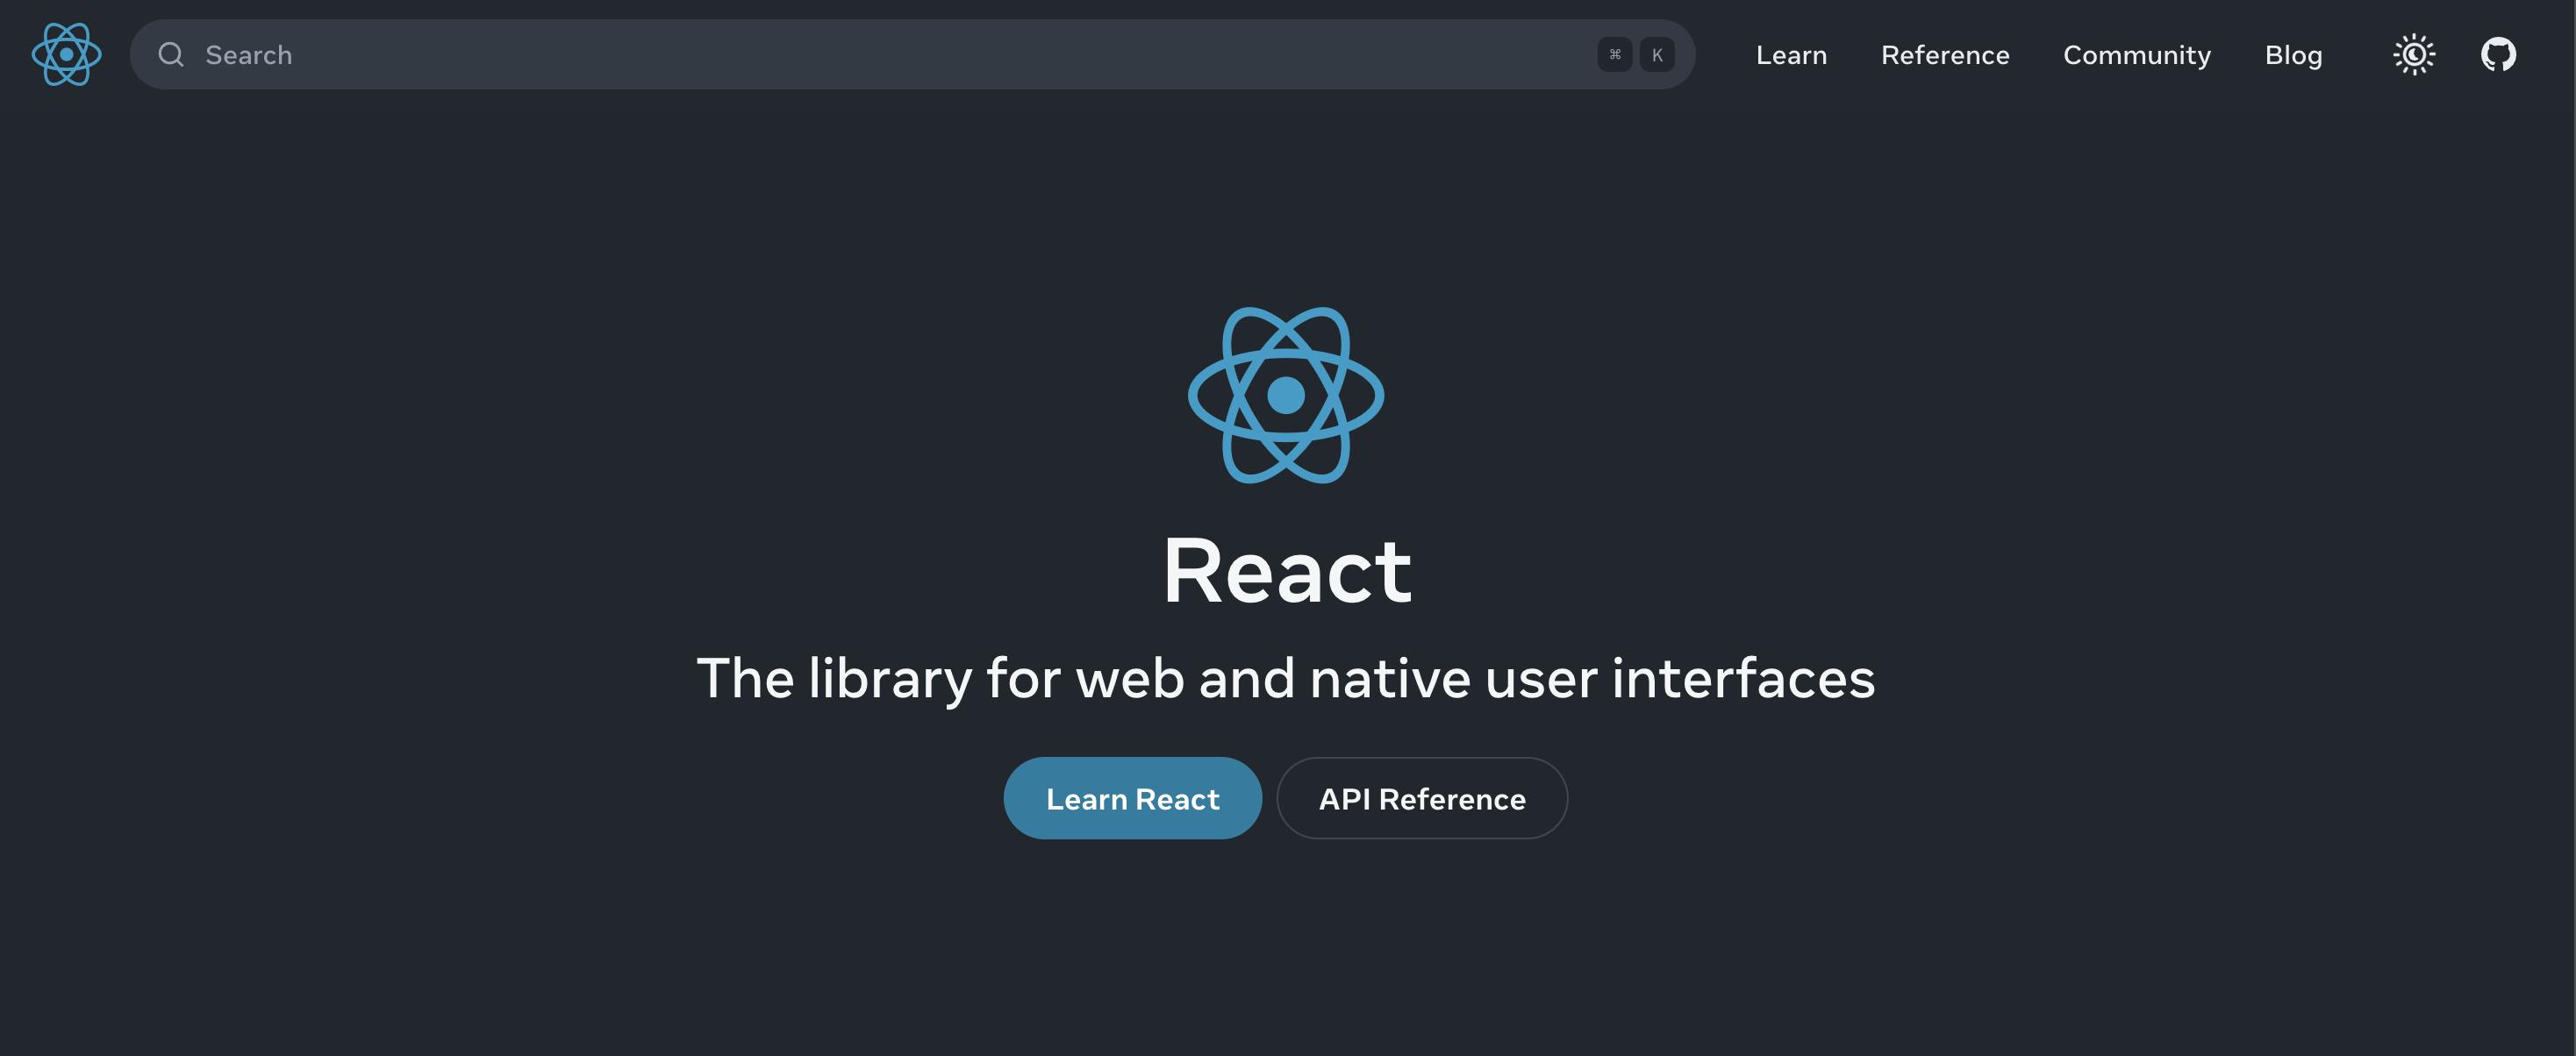
React is an open-source JavaScript library for building user interfaces for web applications. It was developed by Facebook (now called Meta) and was initially released internally until it was released to the public on May 28, 2013. Watch this video to learn more about the history of React. Some popular brands that use React include Netflix, Facebook (obviously), and Uber.
One of React’s key features is the virtual DOM (Document Object Model), which is a lightweight copy of the actual DOM elements and their properties. React uses a diffing algorithm that compares the virtual DOM with the actual DOM and only updates the parts that have changed. This makes React very fast and efficient, especially when dealing with large and complex applications.
Pros
- React supports iOS and Android development via React Native, its mobile development framework.
- React has a large ecosystem that is full of a wider range of open-source third-party libraries and tools.
- React is actively maintained and enjoys frequent updates. An example is the release of React 18 in March 2022, which came with features like Server Components and the new startTransition API.
Cons
- React has a steeper learning curve, especially for beginners.
- The ecosystem is full of several third-party solutions for state management, routing, UI, animations, etc., which can be a disadvantage and lead to decision paralysis, particularly in teams where developers have different preferences.
First time here? Discover what Prismic can do!
👋 Meet Prismic, your solution for creating performant websites! Developers, build with your preferred tech stack and deliver a visual page builder to marketers so they can quickly create on-brand pages independently!

Key similarities between Vue and React
Component-based architecture
One of the main similarities between Vue and React is their component-based architecture. Both frameworks allow us to break down UI interfaces into reusable and self-contained components. This allows us to create complex frontend layers by combining and reusing these components while our code remains modular and maintainable.
Virtual DOM
React introduced the virtual DOM. However, both tools use it to efficiently update and render UI components. Instead of directly manipulating the actual DOM, changes are first made to the virtual DOM and then applied to the actual DOM only when necessary. This results in improved performance and makes the rendering process more efficient.
Meta frameworks
Vue and React have Meta frameworks based on them. With Vue, we have Nuxt.js and static site generators like Gridsome and VuePress. With React, we have Next.js, Gatbsy, and Remix, among others.
Flexibility and Scalability
Vue and React are highly flexible and scalable frameworks. They can be integrated into existing projects or used to build new ones from scratch. They can be used to create simple single-page applications or complex enterprise-level applications.
Key differences between Vue and React
Popularity and adoption
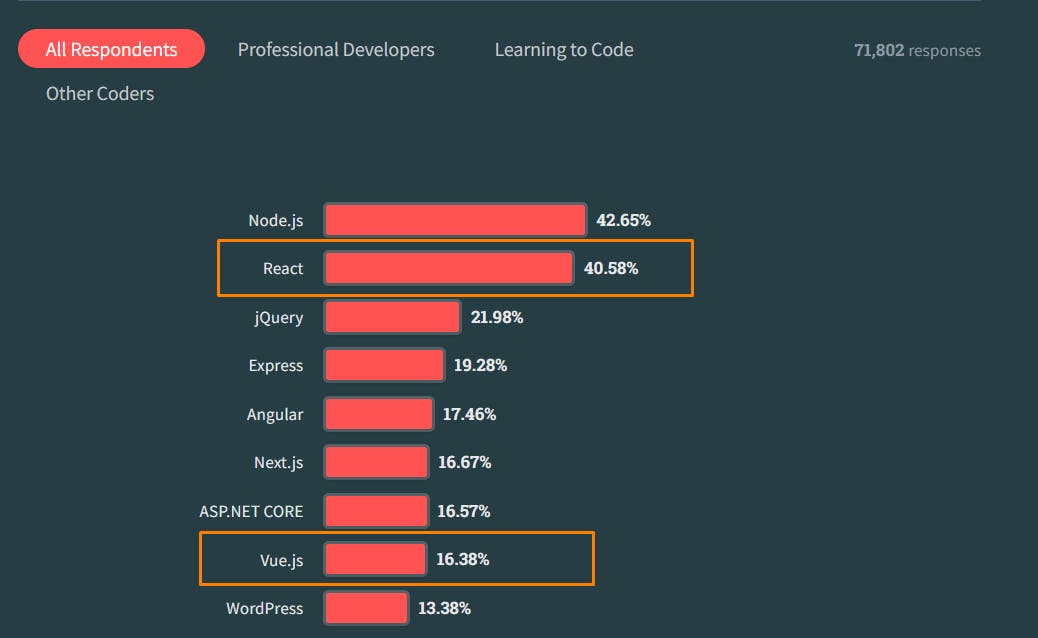
According to Stack Overflow’s 2023 Developer Survey, React is more popular than Vue. Based on his stat, 29,137 developers use React, while 11,761 developers use Vue. These percentages have stayed relatively the same since 2022’s Stack Overflow survey, which showed that 42.62% of developers used React, while 18.82% used Vue.
Syntax: JSX vs templates
One of the most notable differences between Vue and React is the different syntaxes they offer. Vue provides a template syntax, which is an HTML-based syntax that provides a clear separation between the presentation layer (HTML) and the logic layer (JavaScript).
It supports data binding, attribute binding, regular JavaScript expressions, and special Vue-based attributes called directives. The template syntax was heavily inspired by Angular. One of the things I love about Vue is how easy the syntax is to grasp in one go.
Here’s a sample code of Vue’s Syntax for a number increment button:
<script setup>
import { ref } from "vue";
const count = ref(0);
</script>

<template>
  <button v-on:click="count++">Count is: {{ count }}</button>
</template>

<style scoped>
button {
  font-weight: bold;
}
</style>
React, on the other hand, provides JSX, which stands for JavaScript XML. It allows us to write HTML-like code directly within our JavaScript files. Any JSX code we write is transpiled into regular JavaScript before it is executed in the browser.
I’ve gotten used to JSX over the years. However, it was a bit difficult to understand as a React beginner. JSX was initially disliked by some developers because it went against the conventional pattern of separation of concerns, which separated HTML, CSS, and JavaScript.
Here’s the same increment button in React’s JSX syntax.
import { useState } from 'react';

function Counter() {
  const [count, setCount] = useState(0);

  return (
    <div>
      <button onClick={() => setCount(count++)}>Count is: {count}</button>
      <style>
        {`
          button {
            font-weight: bold;
          }
        `}
      </style>
    </div>
  );
}
Learning curve
React has a steeper learning curve than Vue. This is mainly because of their different templating syntaxes. React’s JSX syntax JavaScript and HTML, which makes it challenging to grasp, particularly for beginners. On the other hand, Vue’s template-based syntax is more similar to traditional HTML, making it easier for beginners to understand.
Mobile development support
React supports mobile app development with React Native. Besides mobile development, React Native provides support for building Windows and macOS applications. It was released in 2015 and is used by brands like Instagram, Pinterest, and Uber Eats.
Vue once had its mobile development offering called Vue Native. However, it has long since been deprecated. While there is no official solution from the Vue team, we can use NativeScript as an alternative for Vue-based mobile development.
Built-in transition components
Just like Angular, Vue provides built-in transition components, <Transition> and <TransitionGroup>, that we can use to elevate the user experience. We can use these components to create different types of effects like enter and leave animations, CSS-based transitions, and reusable transitions. On the other hand, React does not provide native animation or transition capabilities. However, we can use animation libraries like Framer Motion or React Transition Group.
Supports component-based architecture
Supports component-based architecture
Uses a virtual DOM
Uses a virtual DOM
Provides meta frameworks like Nuxt.js, Gridsome, and VuePress
Provides meta frameworks like Next.js, Gatsby, and Remix
Ensures flexibility and scalability
Ensures flexibility and scalability
Less popular than React
Very popular
Uses template syntax
Uses JSX syntax
Has a low learning curve
Has a steeper learning curve
Has no official tool for mobile development
Provides official support for mobile development with React Native
Provides built-in transition components
Does not provide built-in transition components
40.6k
214k
Factors to consider when choosing between Vue and React
Let’s explore some factors to consider when choosing between Vue and React.
Learning curve
One of the first factors to consider is the learning curve associated with each framework. React has a steeper learning curve compared to Vue, especially for developers who are new to JavaScript frameworks. Vue, on the other hand, has a gentle learning curve and is considered to be more beginner-friendly. Depending on project timelines, we may want to choose the tool that we can grasp and get started with quicker.
Community support and ecosystem
The size of a framework’s community can greatly impact its growth and support. React has a larger community and a more well-established ecosystem than Vue. Take GitHub stars as a metric: React currently has 216k stars, while Vue has 40.6k stars. The React ecosystem is so large that Next.js has more stars than Vue, 113k stars, to be precise. Vue shouldn’t be counted out of the game, though, because it has been rapidly gaining popularity, and its community keeps growing.
Job market and industry demand
Except if you’re learning a JavaScript framework as a hobby or for personal projects, you most likely intend to use it to get a job and earn money. In that case, it's safe to consider what tool is in high demand in the job market. One way to determine this is by examining 10 to 20 frontend developer or software engineer job applications to see which tool is most required for those roles.
Easy access to third-party solutions
Except we plan on building every feature from scratch, then easy access to third-party solutions like pre-built UI components, styling solutions, authentication systems, animation libraries, image optimization libraries, etc., is important. This is one area where React shines forth, as the community has provided, and keeps providing, libraries tailored to different needs. However, Vue also has some great packages worth checking out.
Cross-platform requirements
If the only platform being considered is the web, then our framework of choice use does not matter that much. However, suppose we plan on building iOS and Android applications. In that case, it may be best to use the solution with a battle-tested and well-supported mobile (iOS and Android) development framework that top brands like Microsoft, Skype, Shopify, and Pinterest actively use.
Getting started with Vue
Follow the steps below to spin up a new Vue application.
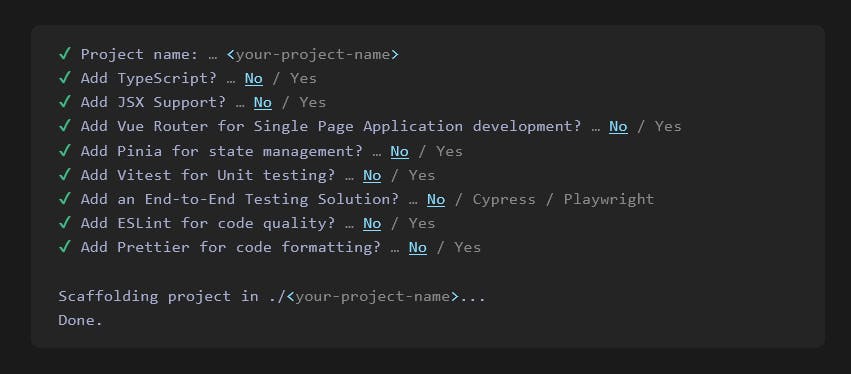
Step 1: Install the create-vue scaffolding tool
Run the command below to create a new Vue project. The command will install and trigger create-vue, a Vite-powered scaffolding tool. It provides prompts we can use to configure Vue applications according to our preferences.
npm create vue@latestHere’s a screenshot of the configuration options.
Step 2: Install dependencies and start the dev server
Run the following commands consecutively to complete the installation process. The first command navigates into the project’s directory, the second installs the third-party dependencies Vue needs, and the last command starts the dev server.
cd <name-of-project>
npm install
npm run dev
The default port for Vue applications is http://localhost:5173/. Navigating to that URL on the browser gives us the below web page. Explore Vue's documentation for more info on getting started.
Recommended courses for learning Vue
Some great free and paid resources to learn more about Vue include:
- A roadmap for learning Vue
- Vue 3 Fundamentals with Vue School
- Fullstack Vue 3 by Newline
- Intro to Vue 3 by Vue Mastery
- Vue 3 Tutorial for Beginners by Codevolution
Useful Vue Libraries
While Vue’s ecosystem does not have as many open-source solutions as React, it does have some great libraries and tools we can work with. Some options include:
Building a simple Todo app with Vue
In this section, we will build a simple Vue-based todo application. The image below shows the application and its different components.
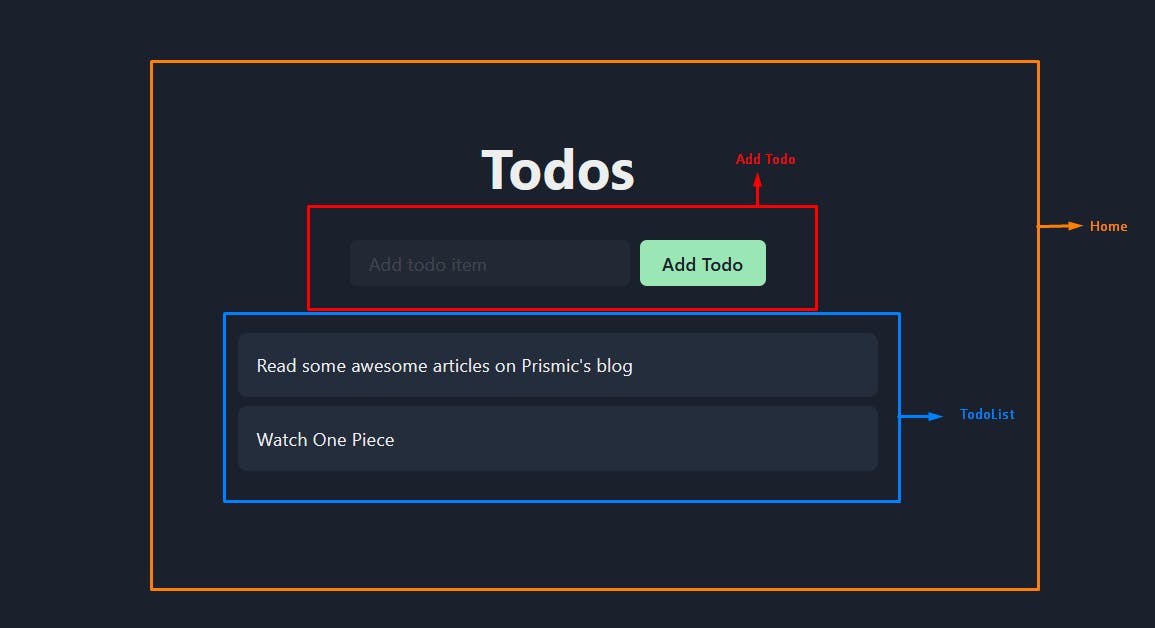
The todo application consists of:
- A
TodoListcomponent containing the different todo items - An
AddTodocomponent containing the input field and submit button - The homepage that renders the UI and handles the state and functionalities
We’ll build the application by following the steps below.
Step 1: Create the user interface
Note that we’re using plain CSS for the interface. For simplicity, the following code blocks don’t include the styling, but if you would like to style your project as seen in the image above, feel free to use the styling found in this sandbox.
To start, let’s create two files in the components directory.
First, the TodoList component. For now, we’ll hard code the todo items. However, we’ll change that and populate them programmatically.
<!-- ./src/components/TodoList.vue -->
<template>
  <ul>
    <li>Read some awesome articles on Prismic blog</li>
    <li>Watch One Piece</li>
  </ul>
</template>
Then, the AddTodo component.
<!-- ./src/components/AddTodo.vue -->
<template>
  <div>
    <input type="text" placeholder="Add todo item" />
    <button>Add Todo</button>
  </div>
</template>
Lastly, we register the components and bring them together in the homepage, which is the App.vue file.
<!-- ./src/App.vue -->
<script>
import AddTodo from "./components/AddTodo.vue";
import TodoList from "./components/TodoList.vue";

export default {
	components: {
    AddTodo,
    TodoList,
  },
  setup() {
    return {
      AddTodo,
      TodoList
    };
  }
};
</script>

<template>
  <div id="app">
    <h1>Todos</h1>
    <AddTodo />
    <TodoList />
  </div>
</template>
Step 2: Create the todo state and the state update functionality
To achieve this, we need to update the App.vue file.
<script>
import AddTodo from "./components/AddTodo.vue";
import TodoList from "./components/TodoList.vue";

export default {
  data() {
    return {
      todos: [
        { id: 1, item: "Read some awesome articles on Prismic blog" },
        { id: 2, item: "Watch One Piece" },
      ],
    };
  },
  methods: {
    addTodo(item) {
      let newTodo = {
        id: performance.now(),
        item,
      };
      this.todos.push(newTodo);
    },
  },
};
</script>

<template>
  <AddTodo @add-todo="addTodo" />
  <TodoList :todos="todos" />
</template>
Here, we did the following:
- Created a
todosstate and populated it with some tasks. - Created an
addTodomethod, which takes the todo a user submits and adds it to thetodosstate. - Passed the
addTodomethod and thetodosstate to theAddTodoandTodoListcomponents, respectively.
Step 3: Track the user input and handle the form submission
To achieve this, we need to update the code in the AddTodo.vue file.
<script>
export default {
  name: "AddTodo",
  data() {
    return {
      todoInput: "",
    };
  },
  methods: {
    handleClick(val) {
      if (!val) return;
      this.$emit("add-todo", val);
      this.todoInput = "";
    },
  },
};
</script>

<template>
  <div class="form-container">
    <input v-model="todoInput" type="text" />
    <button @click="handleClick(todoInput)">Add Todo</button>
  </div>
</template>
Here, we did the following:
- Created a todoInput, which would hold the state of the input field, and synced it with the input through the
v-modeldata binding. - Created a handleClick function that captures that text in the input when the user submits it and sends it to its parent component, which then updates the todos state.
- Passed that handleClick function to the button’s click event handler.
Step 4: Display the todos from the state
Lastly, we need to display the todo items that are in the todo state instead of hard-coding them in the TodoList.vue component.
<template>
  <ul>
    <li v-for="todo in todos" :key="todo.id">
      {{ todo.item }}
    </li>
  </ul>
</template>

<script>
export default {
  name: "TodoList",
  props: {
    todos: {
      default: () => [],
    },
  },
};
</script>
With that, we have successfully built the todo app with Vue. This is the most basic version of a todo app. We can improve by adding more features like local storage, database integration, role-based permissions, editing and deleting tasks, and more.
Getting started with React
The React team recommends using React-powered frameworks like Gatsby, Next.js, and Remix for building applications. For this article, we will work with Next.js.
Follow the steps below to spin up a new React application.
Step 1: Create a new Next.js app with create-next-app
Just like create-vue, the create-next-app CLI tool helps create and configure a new Next.js application. Run the command below to create a new project.
npx create-next-app@latestIf you are following this tutorial step-by-step, you can select the following configuration options:

Step 2: Install dependencies and start the dev server
Like with Vue, the first command navigates into the project’s directory. We used create-next-app to create our project, which handles the dependencies for us, so all we need to do is start the dev server with the second command below.
cd <name-of-project>
npm run dev
The default port for Next.js applications is http://localhost:3000. Navigating to that URL on the browser gives us the below web page. Explore React’s documentation for more info on getting started.

Recommended courses for learning React
Some great free and paid courses to learn more about React include:
- A roadmap for learning React
- React: the Complete Guide by Maximilian Schwarzmüller
- The Ultimate Next.js 13 Crash Course for Beginners - Build 6 Apps in 18 Hours
- Epic React by Kent C. Dodds
- Full Modern React Tutorial by Net Ninja
- Fullstack React by Newline
Useful React Libraries
React’s ecosystem is full of several great open-source solutions we can take advantage of. Some great libraries and tools include:
Building a simple Todo app with React
Let’s create the same todo application we created earlier, only this time, in Next.js. You can view this sandbox to get the code or follow along using the steps below.
Just like the Vue application, the Next.js version’s UI consists of the same components, TodoList, AddTodo, and the homepage that holds everything together.
Step 1: Install Chakra UI and uuid
The user interface for the React application is the same as the Vue version, so we won’t go over the details. The only difference is that we’ll be using Chakra UI here.
So first, let’s install Chakra UI by running the following command in a separate tab in your terminal (if you aren’t using npm, you can follow the other installation instructions here):
npm i @chakra-ui/react @emotion/react @emotion/styled framer-motionWe will also be using uuid to give each todo item a unique ID. So, in a new tab in the terminal, run the following command so you don’t get an error when we add that code.
npm install uuidStep 2: Update the layout
If you haven’t already, open your project in your code editor.
Now, let’s update our layout.js file to import our Chakra component by adding the following code:
// ./src/app/layout.js
import './globals.css'
import { ChakraProvider } from "@chakra-ui/react";

export default function RootLayout({ children }) {
  return (
    <html lang="en">
      <body>
        <ChakraProvider>
          {children}
        </ChakraProvider>
      </body>
    </html>
  )
}
Step 3: Create the todo state
The state will live in the homepage component, which is in the /src/app/page.js file. Update it with the code below.
// ./src/app/page.js

"use client";

import { useState } from "react";
import { Heading, VStack } from "@chakra-ui/react";
import AddTodo from "@/components/AddTodo.js";
import TodoList from "@/components/TodoList.js";

export default function Home() {
  const [todos, setTodos] = useState([
    { id: "1", item: "Read some awesome articles on Prismic's blog" },
    { id: "2", item: "Watch One Piece" },
  ]);

  const addTodo = (todo) => {
    setTodos([...todos, todo]);
  };

  return (
    <VStack p={4} mt="28">
      <Heading size="2xl">Todos</Heading>
      <AddTodo addTodo={addTodo} />
      <TodoList todos={todos} />
    </VStack>
  );
}
Let’s break down the code above.
- We imported
useStatefrom React, which is React’s in-build state management hook. - After that, we used the hook to create a
todosstate and populated it with some default todo items. - Next, we created a
addTodofunction responsible for adding todo items. The function takes atodoobject as a parameter and adds it to thetodosstate with thesetTodosfunction. - Lastly, we pass
addTodoandtodosto their respective components through props. Props are a major way of passing data between React components.
At this stage, if you go to the front end of your site, you will notice an error. This is because we are trying to import components that don’t exist yet, so let’s create those next! 👇
Step 4: Track the user input and update the state
Inside /src, create a /components directory and add our AddTodo.js file inside. Add the below code to the AddTodo.js file.
// ./src/components/AddTodo.js
import { useRef } from "react";
import { Button, HStack, Input } from "@chakra-ui/react";
import { v4 as uuidv4 } from 'uuid';

export default function AddTodo({ addTodo }) {
  const todoRef = useRef(null);

  const handleSubmit = (e) => {
    e.preventDefault();

	if (!todoRef.current.value.trim());
    const todo = {
      id: uuidv4(),
      item: todoRef.current.value,
    };

    addTodo(todo);
    todoRef.current.value = "";
  };

  return (
    <form onSubmit={handleSubmit}>
      <HStack m="8">
        <Input
          variant="filled"
          border="gray.600"
          placeholder="Add todo item"
          ref={todoRef}
        />
        <Button type="submit" colorScheme="green" px="8">
          Add Todo
        </Button>
      </HStack>
    </form>
  );
}
Here, we:
- Imported the
useRefhook from React and used it to get a reference of the input field and track its value. It helps us know if a user has typed on the input or not. - We created a
handleSubmitfunction that adds a newtodoobject to thetodosstate with theaddTodofunction we passed in step 2.handleSubmitalso confirms that the input field is not empty withtodoReffirst before adding it to the state. This is because we want to ensure that todos can only be added when someone fills the form.
Step 5: Display the todos from the todos state
Now, add a TodoList.js file inside our /components directory and add the below code to the file.
// ./src/components/TodoList.js
import { HStack, Text, VStack } from "@chakra-ui/react";

export default function TodoList({ todos }) {
  return (
    <VStack
      w="100%"
      alignItems="stretch"
      maxW={{ base: "90vw", sm: "80vw", lg: "50vw", xl: "40vw" }}
    >
      {todos.map((todo) => (
        <HStack key={todo.id} bg="gray.700" borderRadius="lg" p="4">
          <Text color="white">{todo.item}</Text>
        </HStack>
      ))}
    </VStack>
  );
}
Here, we accessed the state through the todos prop, mapped through the array, and displayed the todos in the state. With this setup, anytime a new todo object is added to the state, it gets updated, and the new todo item shows up in the UI.
With that, we have successfully built the todo app with React.
Build performant websites with Prismic and your preferred frontend tool
Whether you’re in the React camp or prefer working with Vue, Prismic has got you covered. Love building with React and Vue meta frameworks? Well, Prismic provides seamless integration with Next.js and Nuxt.js, allowing you to leverage features like Slice Machine to create powerful, modular, and easy-to-maintain websites.
Prismic also provides SDKs for React and Vue.js if you prefer using the parent frameworks themselves. Ready to get started? Then, create an account.
Conclusion
Vue and React are powerful JavaScript frameworks for building modern web applications. They both have their advantages and disadvantages. When choosing between them, it's important to consider factors like cross-platform support, learning curve, personal preferences, project requirements, ecosystem, and job market.
Regardless of your choice, learning either Vue or React will surely enhance your skills and open up new opportunities in the ever-evolving field of web development. Also, whichever one we choose, it's important to pay attention to their conventions and best practices to fully harness and get the best out of them.


